


 Have you ever had a sudden realization?
Instantly, everything becomes clearer.
One seemingly small revelation can bring on your mixes by leaps and bounds.
Yesterday, EQ seemed complicated and confusing. But then something happens…
You read an article, or watched a video, or figured something out whilst playing around with a mix – and now everything makes sense.
My career as a musician, producer and home recordist has been full of these small realizations.
I’m guessing you’re here because you want to make your mixes sound professional. We put together a brief training that covers a totally new approach to music production. Until now, everyone has been teaching production totally backward. Just click below to watch.Get industry-quality every time (steal this framework)
But if you just want to learn these 20 Mix Tips specifically, keep reading.
Quick Tips – Easy to Implement Yet Effective
Over the last few months I have been sending quick tips to my email subscribers every Friday. Each tip summarizes one of these realizations that I had myself.
Whenever I’m trying to think of new tips to share, I try to think outside the box. I try to put my mind back a few years and think about what I used to struggle with, and what solution I found.
Sometimes, when you have been doing this stuff for a while, you take certain things for granted. But these are the things that will make a huge difference to your music and mixes – so I want to share them with you now.
I have decided to stop sending quick tips to my subscribers. But that’s not to say that tips aren’t useful.
In this article, you can find my best tips. Read them, watch them – just don’t forget to implement them and give them a try.
1 – How to Approach Attack Time
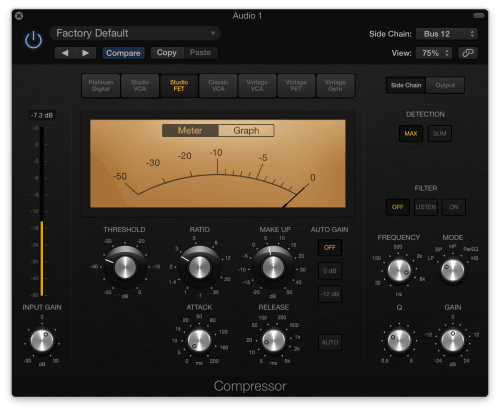
When using a compressor, don’t obsess too much over the exact time in milliseconds of the attack parameter.
Most old school analogue compressors don’t work in milliseconds, they just have an attack knob that goes from ‘slow’ to ‘fast’.
Instead, think of the attack time as controlling the amount of attack (not the speed).
A fast attack time will mean LESS attack, and a slow attack time will mean MORE attack.
Seems backwards, I know. But let me explain…
The attack time dictates how much of the transient of the note (the very beginning, e.g. the pick hitting the string on a guitar, or the first consonant of a word) gets though uncompressed.
When the attack time is fast, the compressor squashes the transient. This means that the instrument or voice sounds flatter and less aggressive (less attack).
When the attack time is slow, the compressor doesn’t react fast enough to compress the transient. This means that the instrument or voice sounds more aggressive and dynamic (more attack).
Start with a slow attack time, and slowly turn the knob until you have the desired amount of attack.
2 – Don’t Use Solo – Do This Instead
Now, you may already know that it’s best to avoid using the solo button too much.
The end listener will never hear anything in solo, therefore you should avoid mixing in solo.
Apply your EQ and other plugins in the context of the mix. This will allow you to make better decisions.
But… it’s not always easy.
Sometimes it’s difficult to hear the changes that you are making without solo’ing the channel.
Here’s my solution…
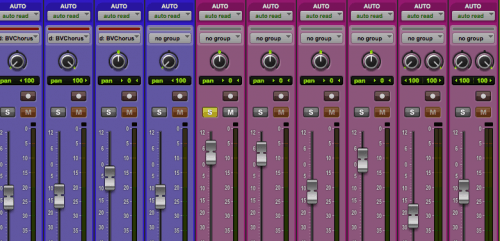
Turn the channel up a bit.
Hah, yep, that’s the tip. But this is powerful.
By turning the channel up you can hear your changes more easily…
But you can still make you decisions based on the entire mix, because everything else is still there.
Best of both worlds.
Practice making changes without doing this, but if you are struggling, it’s better to bring the channel up a bit than it is to solo it.
Here are the exact steps for when you are struggling to hear your changes in the mix:
- Bring up the channel that you’re processing a bit (maybe 5-10dB or so, using the volume fader).
- Apply your plugin and tweak the settings (EQ or compression for example).
- Once you’re done, bring the volume fader back down to where it was and listen to your change in the context of the mix.
- Bypass the plugin, then bring it back in again, and decide if it is an improvement.
- Rinse and repeat.
For this to work, you also need to make sure you have applied proper gain staging so you have enough headroom to bring up the channel without clipping.
3 – Why the Professionals are Scared of You

Professional studios around the world are closing down.
And the pro’s are scared of people like you.
(I used to be too, until I fully embraced this modern era of home recording)
Be confident in your ability to produce high quality music at home, because it is perfectly possible.
The problem is that the big brands want you to think that you need expensive equipment to produce high quality mixes. In fact, the entire audio industry want you to think that.
But don’t listen to them.
Like the music industry, the audio industry is changing (and has been for many years).
More and more chart-topping music is being produced in bedrooms, hotel rooms, living rooms and other non-professional spaces.
One of my favourite low-budget albums, ‘For Emma, Forever Ago’ by Bon Iver was recorded in a cabin with only an SM57.
Plus, more and more famous mixers are working entirely in-the-box. Expensive outboard equipment is no longer necessary for professional, radio quality mixes.
Take lead vocals, for example. The most important part of the mix.
Most top-end studios use a vocal booth for vocal recording. You can quite easily replicate the sound of a vocal booth at home with basic acoustic treatment (whether that’s with DIY panels or bed mattresses).
Now the only thing separating you from the pro’s is microphone choice and microphone placement.
Sure, they might have top-end valve microphones that cost a small fortune, but when you spend enough time finding the right microphone for a particular vocalist and experimenting with placement, you will be amazed at how small the difference really is.
Focus on developing your skills rather than buying new equipment, because you can produce amazing music and mixes with the gear you already have.
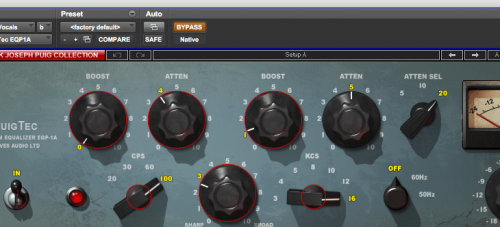
4 – Getting Perfect Top End AND Low End
Split processing opens up a whole new world of options.
By splitting instruments and sound sources with HP/LP filters, you can process the highs and lows separately.
How does this help?
Here’s an example – you can process a bass guitar to sound powerful and deep on larger speakers, but to still be audible on mobile phone speakers (as the highs are processed separately).
Let me show you how…
5 – The Foolproof Mic Placement Technique

This is a tip that I learned in one of my first assistant engineer positions – this is going back a while now.
It’s a foolproof technique that can help you place any mic on any source, and get it right every time.
Plus, it’s really simple…
Move your head.
Yep, that’s it. Let me explain…
There are no rules when it comes to mic placement. Sure, there are certain placements that work 80% of the time. For example, a condenser mic 6 inches from a vocalists mouth works 80% of the time.
But anything goes. The most important part of good mic placement is experimentation. Move the mic and listen.
So what does this have to do with your head?
Before you even put the mic up, you can use your ears to find the ideal position for the microphone.
Move your head around the source until you find a sweet spot.
Try moving a few inches to either side, take a step back, get in real close – listen to where it sounds best.
Let’s say you’re about record an instrument that you have never recorded before, like a double bass. You aren’t sure where to place the microphone.
Instead of looking it up online (or just guessing) you could move around the bass pointing your ear at different parts (the neck, the body etc). Think of your ear as the microphone. Try different heights, different distances, different rotations.
Sure, it might look a bit weird. But who cares, right?
Find the best spot with your ears and start there with your mic placement.
6 – Always Adjust Plugin Gain
Far too many times, I have seen people completely ruin their gain structure by making this easily avoidable mistake.
Keeping your audio around that -18dBFS sweet spot helps (more on that in my article on gain staging).
In this weeks quick tip, I want to make sure you are aware of this mistake.
Then, I’ll show you EXACTLY how you should be using plugins.
7 – How to Make Your Mixes Loud
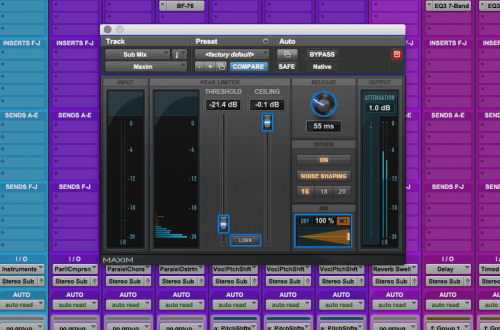
I’m guessing you want your tracks to be loud enough to compete with stuff made by professionals. Thankfully, that’s now quite achievable (the loudness war is dying).
Loudness comes from maintaining plenty of headroom during the mixing then raising the volume at the final stage.
Mix around -18dBFS (peaking between -6 and -10) and then use a limiter at the final stage to raise the average volume to -8dBFS (peaking at -0.01).
It’s that easy.
Open up a mix and make sure everything is around -18dBFS (even the master buss). Bounce a stereo wav (at the same sample rate and 24 bit if that’s what you mixed in, no need to dither yet).
Create a new project with that stereo file and load up a gain/trim plugin and a limiter. Increase the gain until the track is averaging around -8dBFS and the limiter is catching the peaks.
Adjust the limiter to taste. Don’t push it too hard, though – it’s better to sacrifice a bit of volume for more dynamic range.
Apply dithering if needed. Export at 16 bit and 44.1kHz.
8 – Enhancing Width and Depth with Reverb
I often get asked about reverb on vocals. There seems to be a common misconception.
Most people assume that you should use reverb on vocals… but in most cases, you don’t.
With reverb, the vocals seem too wet. Without reverb, the vocals seem too dry.
To solve this issue, most people use delays to create a space around the vocal…
But there is still a great way to use reverb to add space and width to your vocal, without making it too wet.
In this video I’ll show you exactly how (in two easy steps)…
9 – Sidechain Compression
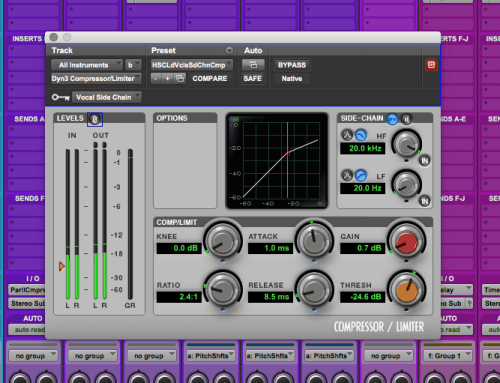
A lot of people don’t understand the true power of sidechain compression.
Pretty much every compressor plugin gives you the ability to use a sidechain.
And the best way to use that sidechain is to create space for something more important in the mix.
Here are the two ways I find myself using sidechain compression in most mixes…
Compress the bass guitar when the kick drum hits (add a compressor to the bass and sidechain the kick)
You don’t need a lot of gain reduction, maybe 2-5dB. Use a quick attack time and medium release.
This creates a bit more space in the low end and prevents your mix from sounding boomy.
Compress guitars/pianos when the vocal comes in (add a compressor to the guitar/piano and sidechain the vocal)
The vocal needs to be upfront at all times. Using subtle sidechain compression on any instruments that are battling with the vocal is a great way to create more space in the mix.
Again, you don’t need lot of gain reduction. I find that a quick attack and medium release also works well here.
Give it a go! This is a great little trick for creating space in your mix without reaching for an EQ.
10 – The Better Way to Improve the Low End in Your Mix
If the low end of a particular instruments is lacking, I imagine the first tool you would reach for is an EQ.
But when the bass and kick sound inconsistent, multiband compression will give you a lot more control than EQ.
When the vocals sound thin, multiband compression will tighten up and improve the low end only when it needs it.
In this short video, I want to show you a better way to improve the low end of your kick, bass or vocals, so you can feel confident and improve your mixes…
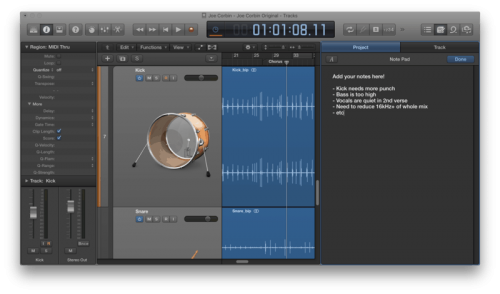
11 – Punchy Drums at Home

Pretty much every time you see a picture or video of drums being recorded in a studio, there will be a stereo pair of condensers hanging overhead.
There are a few different techniques (spaced pair, X/Y pair, Glyn Johns, Recorder Man) but pretty much all of them are stereo techniques.
That’s absolutely fine in a treated room and in a controlled environment. But when you’re recording at home that’s rarely the case. And that means phase issues.
Out of phase drum overheads are perhaps the biggest cause of poor drum mixes.
Instead, try using a single mono microphone.
Start with it directly above the drums head or over their shoulder, and experiment from there.
Now you don’t have to worry about phase as much. You still have to consider phase between the close drum mics, but this is rarely as big a problem as phase between overheads.
The drums will sound tighter and fuller. Plus, you can use your best mic.
Worried that your drums will sound boring in mono? Add a stereo reverb, and pan your close mics more than you usually would.
If you do record in stereo, use a mic technique that keeps the microphones next to each other, like X/Y. This will also help prevent phase issues.
12 – The Perfect Number of Vocal Takes

In the survey I ran a few weeks ago, a lot of people asked the following question…
“How many takes should I record when recording vocals?”
The answer is 7. Exactly 7.
No less, no more…
Just kidding. That would be a ridiculous answer.
In fact, my advice is this…
Record AT LEAST 3 full takes of the song the whole way through.
This gives you a good foundation for comping, and whole takes often have better emotion.
(The singer can really get into it, more so than when recording individual phrases or sections)
Then, record as many takes as you need for the trickier sections until you have a few good takes.
Depending on the skill of the vocalist, this second step might not be necessary.
I had a brilliant vocalist in the other week, and he nailed it in the first take. Still, I recorded two more takes out of habit.
I’m glad I did, because upon listening back some of the notes were very slightly flat.
If I had just stuck to the one take, I would have to resort to pitch correction instead of comping (I prefer to avoid pitch correction where possible).
13 – If You Ever Struggle with Recording…
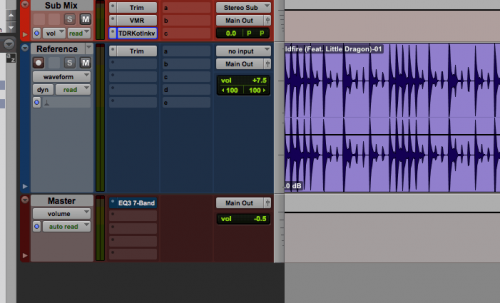
It’s important to use references when mixing.
Constantly comparing your mix to a professional track will help you to make the right decisions and find out where you are going wrong.
But you can use references before the mixing phase…
In fact, you could use reference tracks when recording.
Let’s use electric guitar recording as an example.
Without using a reference, over time you might lose sense of the tone you are capturing.
After minutes or hours of tweaking the amp tone, moving the microphone and testing different guitars, you will start to loose sight of the bigger picture.
It might sound great now, but when you come back to mix the track the tone could be way off.
But if you use a reference when recording, you can make informed decisions and compare the tone you are capturing to the professional track.
Find a good song in the same genre that has a guitar tone that you like. Then, when it’s time to mix, use the same reference track to improve the tone even more.
You can apply this tip to anything. It works especially well with vocals.
Then, as you continue to learn your room and equipment, you will naturally know when the tone is right and won’t have to do this every time.
Give it a go next time you record!
14 – The Simple Yet Easily Forgettable Way You Should Reference Your Mix
Hopefully you are already aware of the importance of referencing professional tracks.
(If not, it’s pretty simple – always compare your track to a professional record when you’re mixing. Use it as a point of ‘reference’ for your mixing decisions)
But there is another super important way you should reference your tracks to make sure your mixing decisions are improving the music, not making it worse…
Reference your mixed tracks to the unmixed version.
It’s that simple. How do you do this? By constantly bypassing your plugins.
It’s quite possible to make a track sound worse with mixing. You’d be surprised – most often, less is more.
One way you could reference the unmixed track is to bounce down a static mix with just balancing and panning (no plugins) and import it back into your mix for referencing.
My prefered technique is to constantly bypass plugins.
Every time you add a plugin, repeatedly bypass it and unbypass it to check you are actually improving the sound.
IMPORTANT: Make sure the gain is the same going out as coming in (as I discussed in an earlier article) otherwise the change in loudness will be perceived as a change in quality.
Then, once you think you have finished with a particular instrument or channel, bypass ALL of the plugins and listen.
Ask yourself – have your changes actually improved the overall mix and the music, or have you made it worse?
15 – Are You Using This Simple Compression Trick?
I talk about this technique a lot when it comes to vocal compression, but it applies to any form of compression.
Mix buss compression, bass compression, snare compression… all of it.
So, here it is…
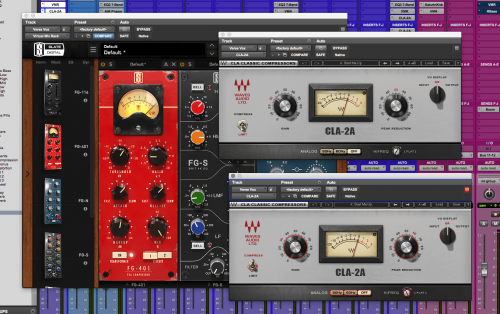
If you aren’t already doing it, try using incremental compression.
This is the act of using multiple compressors in your plugin chain.
Instead of using one compressor applying heavy gain reduction to control the levels of a source, try using 2 or 3 subtle compressors in your plugin chain.
This way your compressors won’t have to work as hard. They will work together, each doing their bit.
This sounds more musical, more natural, and makes it easier to avoid over-compression.
You should also aim for less gain reduction on each plugin when stacking compressors to compensate.
To take it a step further, you could combine fast attack compressors with slow attack compressors.
Use a compressor with a fast attack first to tame the transients and control the peaks.
After that, use a compressor with a slow attack second to control the tone and dial in a bit more punch and aggression (or use another fast compressor for a heavier, thicker tone).
Load up a mix and give it a go. It works especially well on vocals, I find.
16 – Stop Buying Plugins
This tip is simple…
You don’t need any more plugins.
You can get great mixes with your current collection of plugins.
The plugin manufacturers want you to think that expensive plugins are the missing ingredient.
Trust me… they’re not.
Focus on developing your skills with the tools you already have. This is the fastest way to become a better mixer.
17 – Don’t Be a Lone Wolf

I got an email asking “how do I know if I’m heading in the wrong direction?”
This is a great question. You could be making some vital errors and be completely unaware of it.
You could be heading in completely the wrong direction.
But there is a simple solution to this… feedback.
Ask your friends and fellow musicians what they think of your mixes.
If you have any friends that are audio engineers, even better!
Don’t be a lone wolf. Get feedback on your mixes to help steer you in the right direction.
Any musician will be able to hear any obvious problems that you may have grown used to.
(The more you hear your own mixes, the less subjective you will be. That’s why it’s also important to take regular breaks)
So, this week I challenge you to play your mixes to at least 3 different people, and ask for honest feedback.
Take their criticisms with pride and think about how you could fix your mistakes.
18 – Mix Prioritization
It’s HUGELY important to have a system when you mix.
Over time, you will develop your own habits. You’ll find a logical order of approaching the mix.
(If you aren’t doing this, start right away)
But once you’ve run through your system, how do you know when the mix is finished?
After you have gone through your usual mixing process, the first thing you need to do is take a break. Rest your ears.
Then, come back and listen to the track the whole way through. Turn off the monitor, or close your eyes.
As you’re listening, take note of what needs fixing and what could be improved.
I mean this literally – write it down.
Then, go through and address those issues one by one.
Rinse and repeat till your mix is finished.
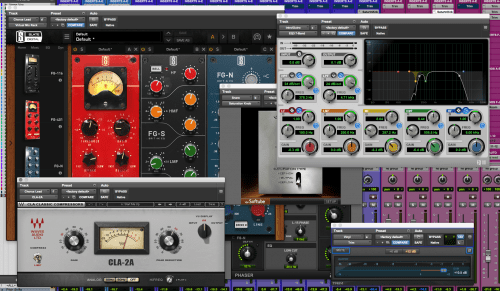
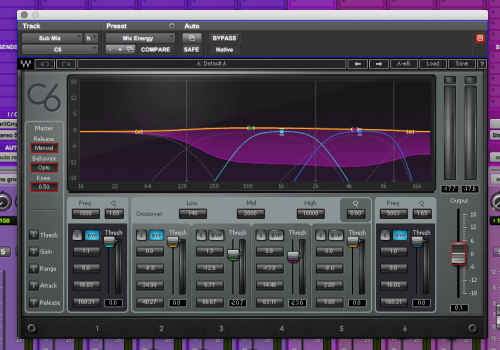
19 – Using Multiband Compression to Add Energy to Your Mix
Today’s tip is a great technique I learned from Graham Cochrane, who in turn learned it from Greg Wells.
This trick will only take a few seconds to implement, but can instantly give your mix more energy.
It’s a great alternative to just using single band compression on your mix bus, and it works well after a single band compressor too.
Here it is…
Compress the low mids and high mids individually, and leave the bass and treble uncompressed
Step 1: Load up a multiband compressor on your mix bus.
Any multiband compressor will work.
Step 2: Adjust the middle two bands.
Turn on one band and adjust the perimeters to 140Hz and 2kHz.
Turn on another band and adjust the perimeters to 2kHz and 10kHz.
These are just starting points – experiment with different cutoff frequencies, but try to avoid going lower than 100Hz or higher than 12kHz.
Step 3: Dial in 2-3dB of gain reduction on each band.
Add 1-2dB of makeup gain (so there is no change in volume).
Step 4: Adjust the attack and release times.
Start off with an attack time above 5ms.
You don’t want to squash the transients too much here – your aim is to add energy, not tame the dynamics. Using an attack time that is too fast will make your mix sound smoother rather than punchier.
Use a medium-slow attack time too, somewhere around 50-100ms. Use a faster release time for more apparent loudness. If the mix starts distorting, your release time is too fast.
If your compressor has an auto release function, try that. If not, time the release time to breathe with the tempo of the track.
Step 5: Listen
That’s it! Instant energy. Bypass this compressor to hear the difference.
It’s pretty subtle, but you should hear it.
View the original video on The Recording Revolution
20 – Prince’s Drum Mixing Trick

In memory of one of the greatest musicians to have ever graced this planet, I’d like to share with you one of Prince’s drum mixing tricks.
This one trick was responsible for the characteristic sound of most of Prince’s early albums, including 1999, Purple Rain and Sign o’ the Times.
This is a technique that Prince rarely gets credit for.
Tuning drums to the key of the song.
Tuning hi-hats, snares, kicks, claps and more using his trusty Linn Drum LM-1 allowed him to use the drums as both a melodic and rhythmic instrument.
Some of his biggest hits don’t even have bass on them, because the drums do the job (‘When Doves Cry’, for example).
If you ever produce music with electronic drums, tuning the kick to the right key often helps.
But take a leaf from Prince’s book and try tuning the snare, hi-hat and other percussion parts too.
If you DON’T produce electronic music, here’s another mixing trick that Prince used: for a really groovy track, try going against conventional wisdom and tuck the vocals UNDER the drums (listen to how loud the drums are in ‘Kiss’, for example).
(Image courtesy of JadeDT)
It’s Your Turn
Do you have any mixing tips that changed the way you approached mixing?
Share them below – I’d absolutely love to hear from you.
Recommended for you:
If you want to dig deeper into music production and learn what it actually takes to make mixes that sound pro… And you’re an intermediate or advanced producer… Be sure to check out the free masterclass: Enjoy!Next Steps


