


There’s a proven way to set up your kick drum EQ like a pro… and, no, it isn’t by using some fancy, expensive plugin!
All you have to do is follow these 3 simple steps: Search, Shape, and Slot.
By the end of this guide, you’ll know exactly how to use these 3 techniques in your mix.
I’m guessing you’re here because you want to make your mixes sound professional. We put together a brief training that covers a totally new approach to music production. Until now, everyone has been teaching production totally backward. Just click below to watch.Get industry-quality every time (steal this framework)
But if you just want to learn about kick drum EQ specifically, keep reading.
How to Use Kick Drum EQ Like a Pro
Why Is the Kick Drum EQ So Important?
The kick drum plays a vital role in most genres of music.
The kick drum sound can sometimes be the difference between a PROFESSIONAL sounding mix and an AMATEUR sounding mix. It’s that important!
So it’s essential that you approach it using a method that works.
We’ve all probably been there…
You spend hours and hours working on your mix. Tweaking EQ’s, adding compressors, and trying anything you can to get that perfect kick drum sound.
Then when you go back and listen, your mix sounds lifeless, dull, and muddy.
Your kick drum isn’t punchy. Your low end sounds blurred. There’s no balance or clarity.
This happens when we don’t mix with intention.
The key to success in mixing is to find a process using proven techniques, then approaching each mix using that same process.
Mixing with intention isn’t throwing on an EQ or a compressor “just ‘cause,” but knowing exactly what each mixing move is doing to the audio, and why you’re doing it.
Knowing how to handle each instrument in the mix is the first step to mixing with intention. It’s much better than trying technique after technique and just hoping that something works.
With that in mind, let’s dive into the pros’ 3 step process to kick drum EQ: SEARCH, SHAPE, and SLOT.
Step 1: Search
When setting up the kick drum EQ, the main thing to consider is the relationship between the kick drum and the bass. This is the key to getting a full, balanced, and punchy kick drum sound in your mixes!
There are times you will mix two elements, like a kick drum and a bass, in the same frequency band. It’s important that they complement each other.
By deciding where each element fits the best, you can use EQ to literally carve out a space for both elements. That’s what we’ll be doing in the next step.
Simply put, where you boost the kick drum, you should reduce the bass. And where you boost the bass, you should reduce the kick drum.

Essentially, you want to allocate a frequency range to the different elements. This is called RANGE ALLOCATION.
If you would like to learn more about range allocation, check out this video!
The first step is to find out where the energy is most prominent on the kick.
There are essentially two ways to do this: with your EARS or with your EYES.
Generally, the best option is to use your ears.
Start by soloing the kick and bass and bypassing any plugins you’re using. Then use your ears and just listen.
Now, what exactly are we listening for? While this can seem difficult, the more you mix using this method, the easier it will become for you.
Listen closely for which one you think will have prominence in the sub bass (around 50 Hz) and which one will have more in the upper bass range (around 100–200 Hz).
Right away, you will probably have a good idea of where the kick drum and bass should go on the frequency spectrum.
For example, does the kick drum sound deep and punchy? It would likely sound best in the sub bass frequency range, around 50–80 Hz.
Maybe the bass guitar sounds a little more aggressive. Then it would most likely sound best in the upper bass frequency spectrum, around 100–200 Hz.
Depending on the genre of your track, this might vary. That’s why it’s important to always listen carefully first before making any decisions!
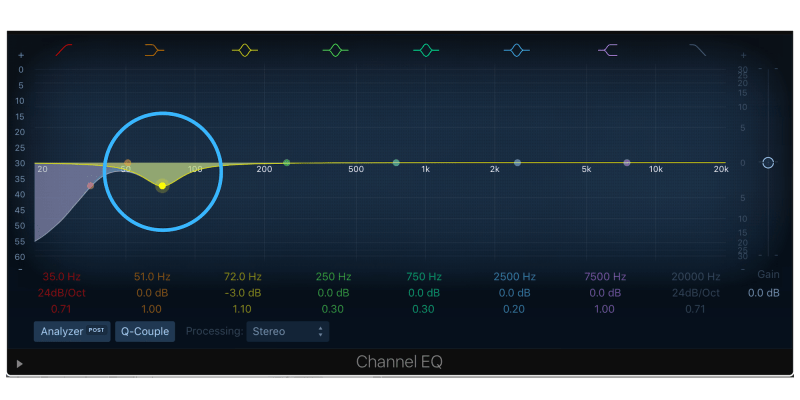
The other option is to mix using your eyes.
Use a spectrum analyzer on the kick drum and the bass channels to see where each one is most prominent.
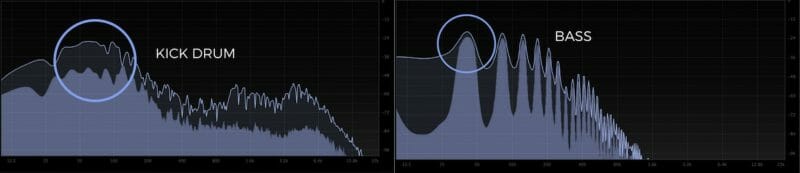
In the image above, you can see that the kick drum and the bass both occupy space in the low frequency area. But the bass has a bit more energy in the sub-bass, between 30–50 Hz, and the kick drum has more energy in the 50–150 Hz range.
So, for this example, the bass would occupy more of the sub-bass. This means you would carve out space for the kick drum in the 80–150 Hz range.
Of course, you can combine the two approaches if you want. Use your ears to start with and then your eyes to check your work.
The important thing is to find what works best for you and focus on doing it that way.
So Step 1 is finding out where each of your low instruments are prominent in the frequency spectrum. Now, let’s create some space for them in Step 2: Shape.
UPDATE: We released another video that shows shows you how to hear EQ:
Step 2: Shape
Now that you’ve found where your kick and bass will live, let’s shape the kick.
To get the perfect kick drum for your mix, you need to find out two things: what’s missing, and what’s in the way?
Once you’ve decided where you want your kick drum to be in the frequency spectrum, you need to shape it using EQ.
Why is using EQ important for shaping the kick drum tone?
Using an EQ plugin allows you to boost and cut frequencies to achieve the right sound for each element in a mix.
With an EQ, you can boost to highlight the frequencies that make the kick drum sound good. And you can cut to reduce the frequencies that are simply in the way.
For example, you’ll want to cut the frequencies that are in the way of the bass.
Let’s think back to Step 1. Where in the frequency spectrum did you decide the bass was going to live?
You’ll need to make room for the bass to sit in the mix. That means cutting the kick frequencies that are in the way.
Let’s say that you decided your bass is going to live in the 100–200 Hz area of the spectrum. That means you’ll want to make a wide cut on the kick drum track around 100–200 Hz.
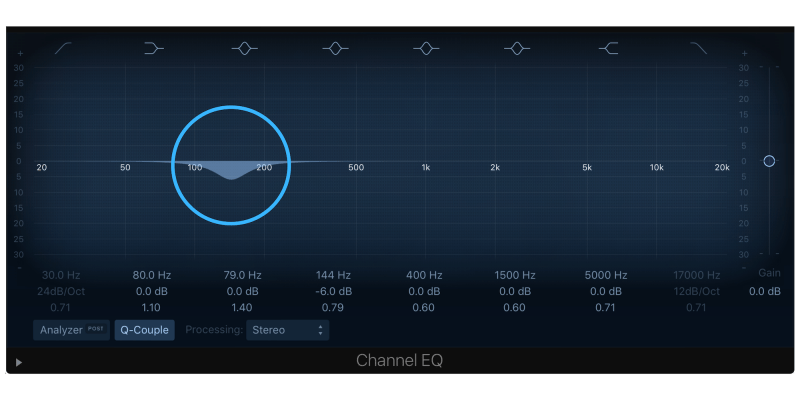
Be careful not to overdo it.
A subtle cut of 1–3 dBs should be plenty of room for the bass track, without affecting the sound of the kick drum in the overall mix.
There, you’ve established where the kick drum and the bass will sit in the mix. Now you can start to shape your kick drum sound more precisely.
Once you’ve cut what’s in the way, you can listen to the kick and ask yourself, “what does this need?”
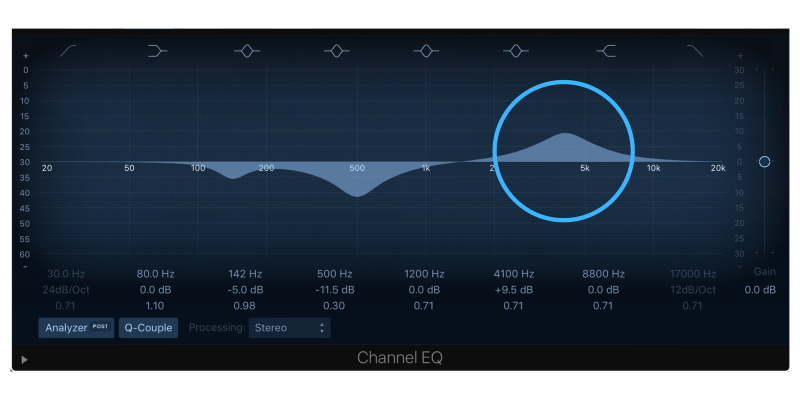
One great EQ trick to try if your kick isn’t cutting through the mix is to boost the upper mids.
You can be a little aggressive with it to help you find the right frequency to boost.
Find the frequency that gives you the shape/tone you’re looking for. Then adjust the gain to a level that sounds good to your ears.
Step 3: Slot
Step 3 is slotting, which is the act of creating space for the kick drum.
Many people refer to this as frequency slotting. I like to refer to it as range allocation.
You’ll want to go to other parts in the mix that have lower frequencies and create a slot for the kick drum in the mix.
Make sure to cut 2 – 3 dB’s or more out of any other bass or kick parts in the main frequency range of your kick. You want to minimize any low end parts that might be interfering with your kick drum’s energy.
Once you’ve created space for your kick drum to live in, it will shine in the mix.
Once you have a process in place for approaching how you EQ your kick drum, you can try out a few other things to help take your kick to the next level!
BONUS TIPS:
Before you go, here’s a few bonus tips on making your kick drum sit well in the mix.
Tip # 1: Try Adding Harmonics
Adding harmonics to specific frequencies can help the kick drum cut through the mix (and sound better in smaller speakers)!
Plugins like Waves Renaissance Bass add new harmonics around the center frequency of a kick. What that means is, rather than boosting the kick’s mids and upper mids that are already there, you’re actually adding new frequencies to the mix.
If you kick just isn’t poking through the mix, it can be a great help. Let your ears help you decide if and when to use this.
Tip # 2: Add Compression
Often, adding some compression will help give the kick drum extra energy and punch. Try using a stock compressor plugin on the kick drum track.
Most compressors come with useful presets that provide a good starting point!
Depending on the genre of the song, the settings will vary. But in general, you want the compressor to give some energy and consistency.
Once you have a kick drum you like, try out some of the presets and choose the one that sounds the best on your track. From there, tweak the threshold knob until the VU meter is hitting anywhere from about 2 – 5 dB’s of gain reduction.
Since you’re compressing the audio, it may sound a bit quieter than before. You can use the make up gain to get back some of the volume you lost.
Like I said, your compression settings will vary on the genre you’re working on. So don’t be afraid to tweak the settings and experiment!
Tip #3: Add Saturation to Top End
Adding saturation to the kick drum will give it an added “dirt” that can be pleasing to the ears.
It’s not right for every situation. But sometimes adding a touch of it can really help it cut through the mix.
Just add a saturation plugin on a kick’s send, distort it, and turn the tone knob up. Then, subtly turn the volume up to mix it in.
Hopefully that will add a little dirt that will help your kick poke out of the mix.
CONCLUSION: Kick Drum EQ
With these 3 steps, you no longer have to play the guessing game when making EQ decisions on your kick drum tracks.
Using a proven method will give you the confidence to make the right decisions quickly.
So when you’re ready to start on your next mix and want to get the perfect kick drum sound, remember:
- Search – determine where you want the kick drum to sit on the frequency curve
- Shape – use EQ to boost or cut frequencies to get the sound you want
- Slot – create space for the kick drum using range allocation/frequency slotting
Good luck!
If you want to dig deeper into music production and learn what it actually takes to make mixes that sound pro… And you’re an intermediate or advanced producer… Be sure to check out the free masterclass: Enjoy!Next Steps


