


Mastering is a crucial part of music production.
It’s your last chance to make sure the song sounds as good as it possibly can. Which means it’s really important you get it right.
Today, I’ve outlined all the processing I use on most masters and what order I use them in.
I’ve also included some tips to make sure you can find your own workflow.
So if you want to make sure you have the right tools for the job, you’re in the right place!
Get industry quality every time (steal this framework)
I’m guessing you’re here because you want to make your mixes sound professional.
So before you read this entire post, I wanted to let you know that we have an in-depth video training that covers a totally new approach to music production. Inside, I reveal why learning mastering is actually the key to unlocking your potential as a mixer and producer.
And it might be better for you to start there first — especially if you’ve been doing this for a while, and you want your mixes to sound industry-standard… but you’re still struggling to achieve the sound in your head.
If that’s you, you need to watch this:
But if you just want to learn about mastering specifically, keep reading.
Mastering with Intention
Knowing what you’re trying to achieve is way more important than memorizing a list of plugins.
Nothing I say here will help you if you don’t know why you’re doing it.

When you’re mastering, your main goals are to
- Make the track louder
- Make the track sound better
- Make sure the track translates well between different speakers
Everything you do should serve one of those goals. Beyond that, there isn’t one right answer for what plugins you use or what order they’re in.
Now let’s talk about what mastering isn’t for.
Don’t Drastically Change the Mix
When it comes to mastering, subtlety is the name of the game. You’re making small tweaks that will elevate the song.
The mix should sound professional already.

If you notice major issues, don’t try to fix it with mastering. It needs to be fixed in the mix.
For example, what if the vocals are super quiet? Or the mid frequencies are way too loud?
You shouldn’t try to fix it with mastering. The mixing engineer needs to make those changes.
You probably won’t need to use a ton of effects while mastering. If you’re totally altering the balance of the mix, you’re doing too much.
So make sure you understand the differences between mixing and mastering!
With that out of the way, let’s move on to the list…
#1: Cleaning EQ
I like to start off with EQ. I use a couple of different EQs for different goals.
First, I use a cleaning EQ to take care of any nasty frequency ranges. This is usually about turning down anything that’s a little too loud.
For example, if the high mids are really harsh, I’ll turn them down. Like I said, subtlety is important in mastering, so I’ll use broad Qs to make small adjustments.
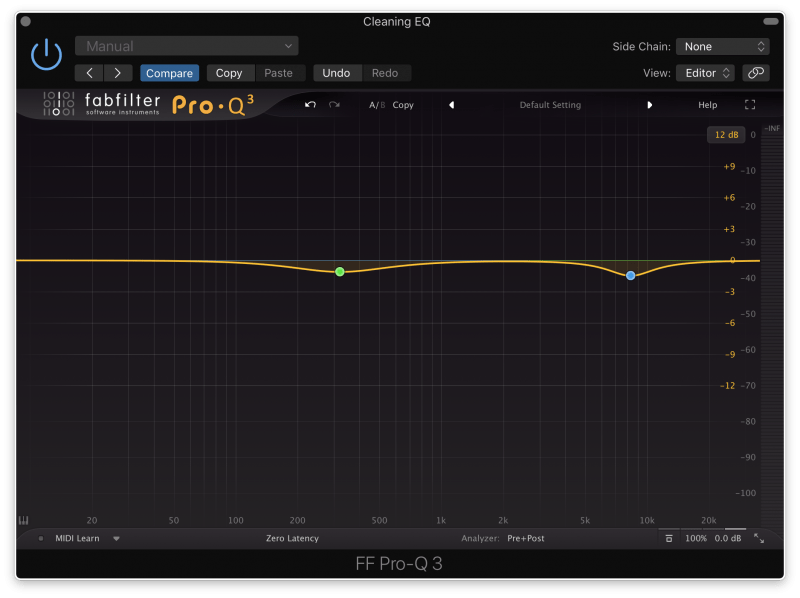
This is all about cleaning up problems. So a transparent EQ will do the trick perfectly.
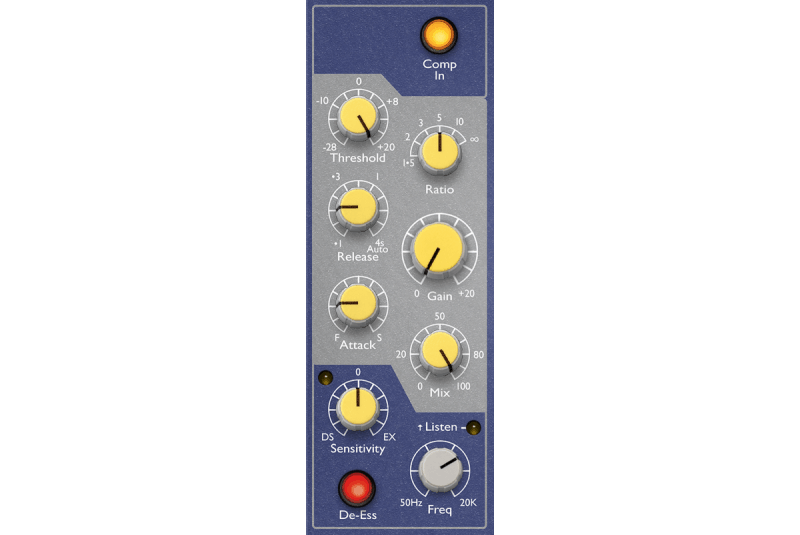
Bonus Tip: De-Essing
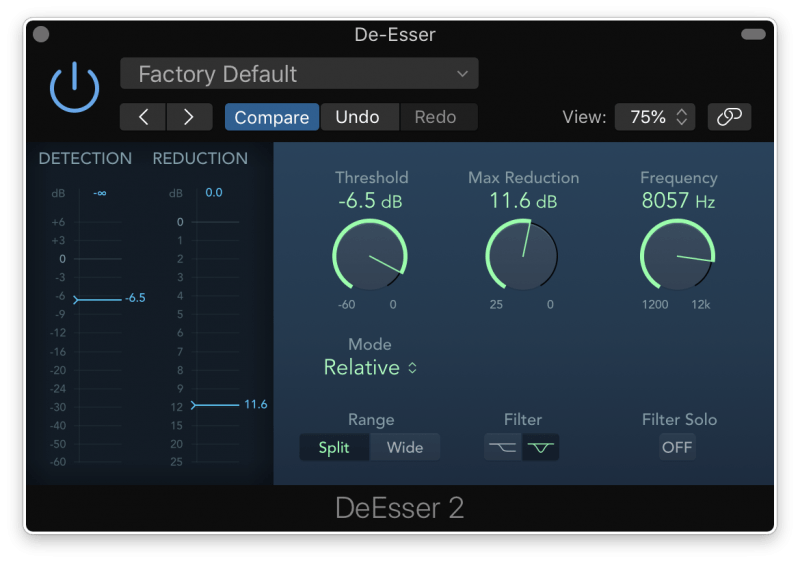
Are the high frequencies a little too loud? Maybe the cymbals need a little taming, or some “Ss” are poking out in the vocal.
When this happens, you may want to bring a de-esser into the mix. You can turn down those offending frequencies as they get too loud.
Sure, you can do this with an EQ. But if you only want to turn certain frequencies down on occasion, a de-esser will work better.
But be careful! You’re affecting the whole track, so your de-essing should be subtle.
Double-check it’s only working when you want it to be.
#2: Glueing Compressor
A glueing compressor does exactly what it says: it glues the track together.
Lack of glue is one of the telltale signs of an unmastered mix.
Ever been listening to a track where everything’s well balanced, but you can just tell something’s missing?
The song doesn’t sound as cohesive as professional ones. Using a glue compressor can fix that.
Check it out.
Original mix:
With glue compression:
Hear that? Everything’s gelling together, like it’s all in the same room.
So how do you get solid glue compression? I recommend starting out with a fast attack time (under 1 ms) and a slow release time (around 2–5 s).
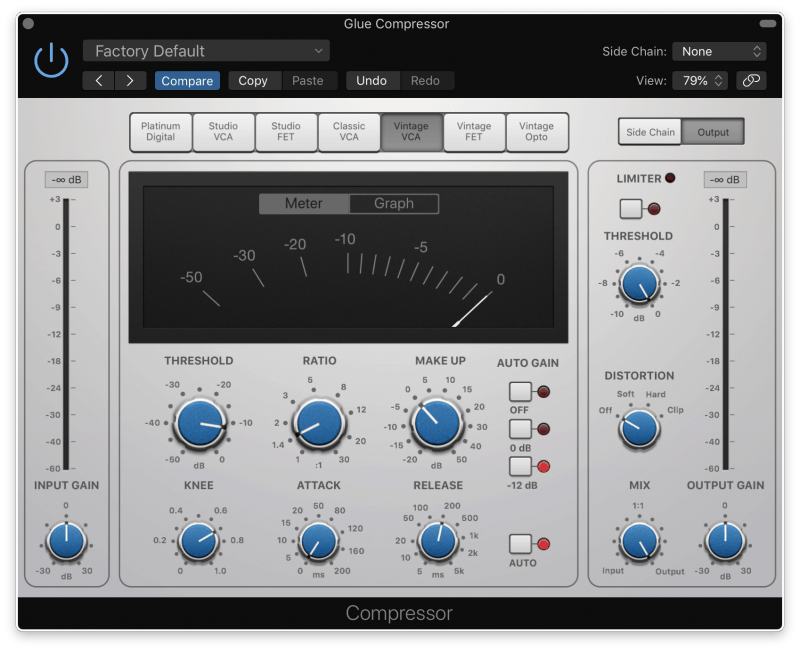
Make sure to set the threshold pretty high because you don’t want a ton of gain reduction!
Bonus Tip: Multiband Compression
You may also want to use a multiband compressor. Especially if you want different amounts of compression across the frequency spectrum.
Let’s say you really want to rein in the lows, but you only need a little bit of compression for the high frequencies. Multiband compression is your best friend.
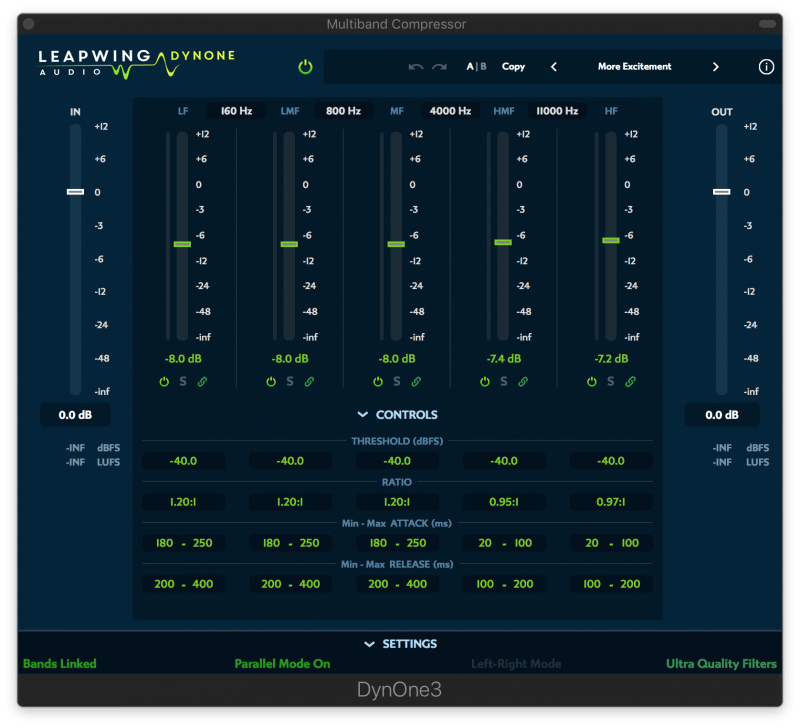
My favorite time to use multiband compression is when a song needs more movement.
You can change the attack and release times so everything gets compressed at a different rate.
By timing these attack and release times with the song, it’s almost like the frequency ranges are dancing.
I find it breathes a little more life into the song.
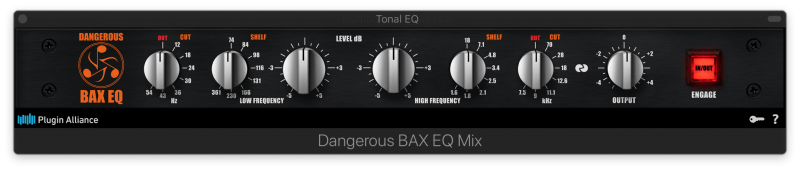
#3: Tonal EQ
Unlike the cleaning EQ, tonal EQ is all about adding color.
This is where hardware and emulations of hardware really shine!

As sound goes through hardware processors, it gets colored. That means certain frequencies get a little boost and pleasant distortion is added.
The result is a more musical-sounding track. This is especially important when the mix sounds too “digital,” too pristine.
When using tonal EQ for a master, you won’t need to do much processing.
I might make a couple small boosts to frequencies I want to highlight. But it’s not uncommon to just run the track through an EQ for color, with no boosts or cuts at all.
Don’t have thousands of dollars for a hardware EQ? Don’t worry!
There are tons of plugins that emulate them. So you can still find a really great mastering EQ for when your track needs a little pick-me-up.
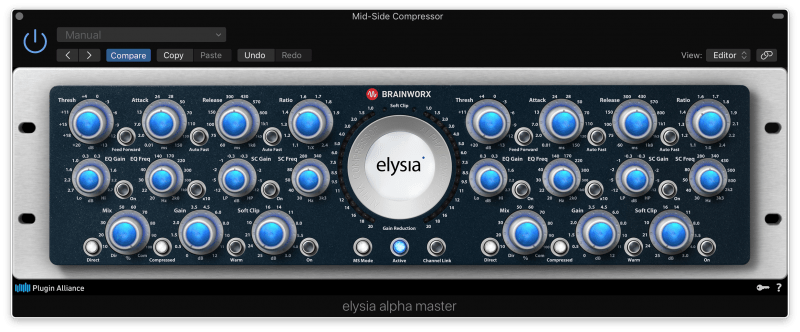
#4: Tonal Compressor
Similar to the tonal EQ, tonal compression is about adding color. There are plenty of great compressors out there that can add dirt, shine, and plenty of other flavors to a song.
Some of you may be wondering, do I really need two compressors? Not necessarily!
You may decide the mix doesn’t really need glue. Or maybe you can add glue and color with the same compressor.
The same thing goes for using two EQs. You don’t have to do it the way I’ve outlined.
There aren’t any hard and fast rules for how much compression to use. Using two compressors makes sense to me because I like dividing them up by what their purpose is.
#5: Stereo Expansion
Another important part of mastering is stereo expansion. This pushes the stereo field further to the left and right, making the song sound wider.
A lot of amateur songs sound narrow when compared to professional ones.
Obviously a great mix will help with that. But using stereo expansion on the master is another great technique!
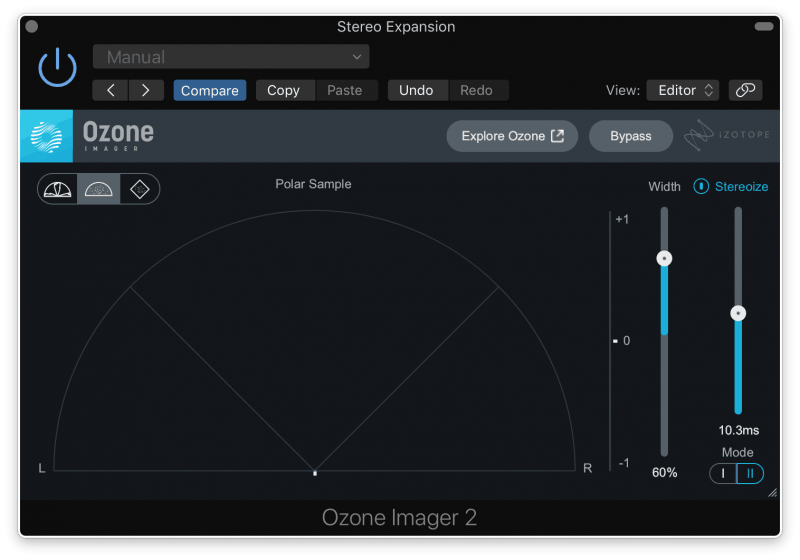
Most of them use the Haas effect to widen out the sound. Which means you need to be careful!
If you make the mix too wide, you’ll get phase issues. More on that later…
#6: Limiter
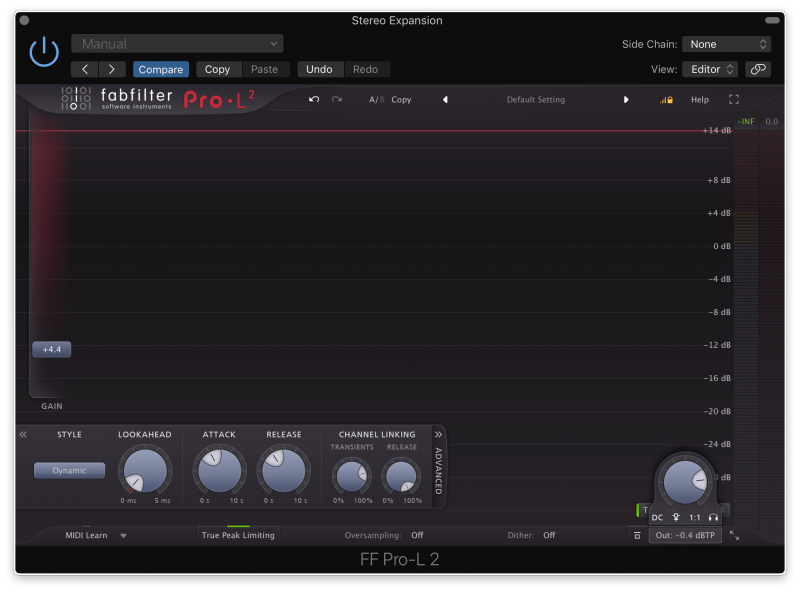
Limiters are an extremely important tool in mastering, but they’re easily misunderstood.
Gone are the days of slapping on a limiter and turning the track up as loud as it’ll go.
Mastering engineers and streaming services are pushing back against the loudness wars. So volume for the sake of volume isn’t what you want.
Nowadays, you want a master that sounds loud but is nice and dynamic as well.
More abrasive genres like rock may call for more aggressive limiting. But you don’t want to crush your track with super heavy limiting.
Here are some great tips for setting up your limiter:
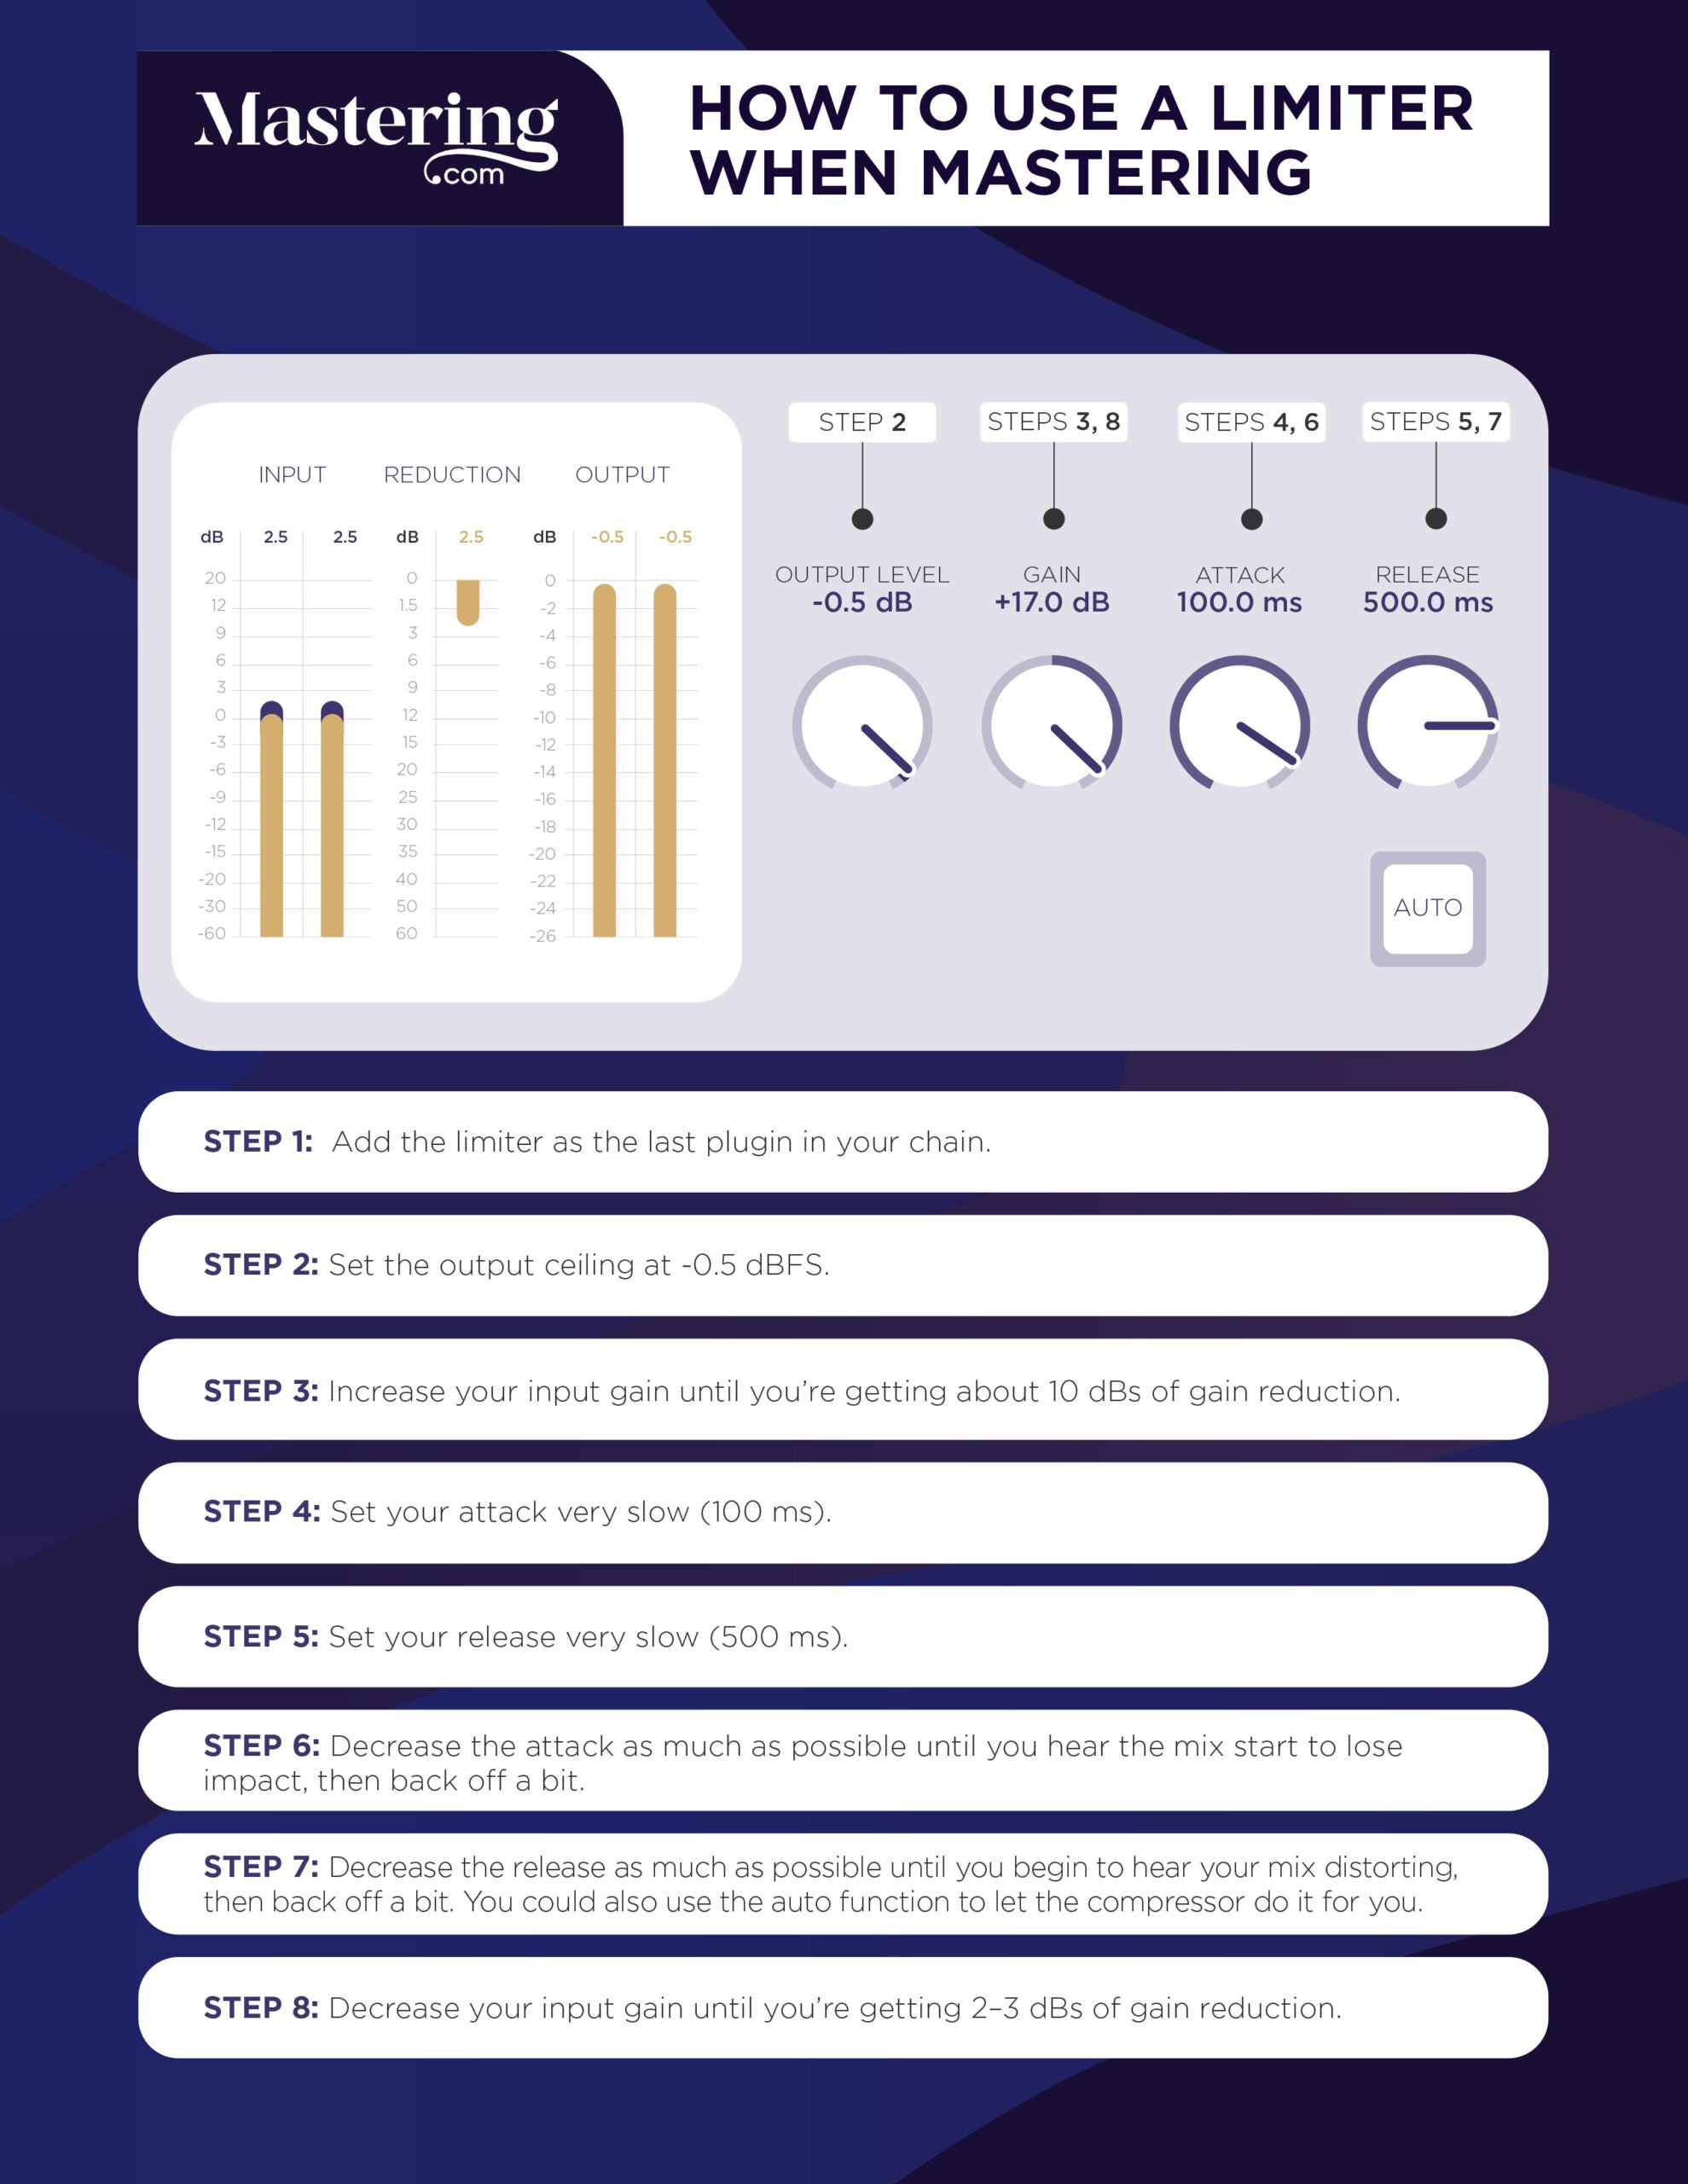
These are great starting points. But you’ll want to adjust to suit the track.
Generally speaking, lighter songs need lighter limiting. Plus, more transparent attack and release times.
Heavier songs need stronger limiting. And a little pumping can even be desirable in some cases.
Bonus Tip: Use Two Limiters
Some engineers swear by using two limiters.
The first one has a fast attack time and a fast to medium release. It’s just there to catch the peaks.
The second limiter is used to bring up the loudness of the song. This is where you turn the gain up and use a slower attack to get transparency.
#7: Meter
Last but certainly not least: meters!
Using meters is crucial while mastering. They’ll help you make masters that translate well to different listening systems.
Here are some of the different types of meters you’ll want to use.
Loudness Meters
Loudness meters are aptly named. They measure how loud your song sounds.
Even if the peaks of your track are decently loud, the rest of the song may be too quiet.
Loudness meters will help you make masters that sound just as loud as professional tracks.
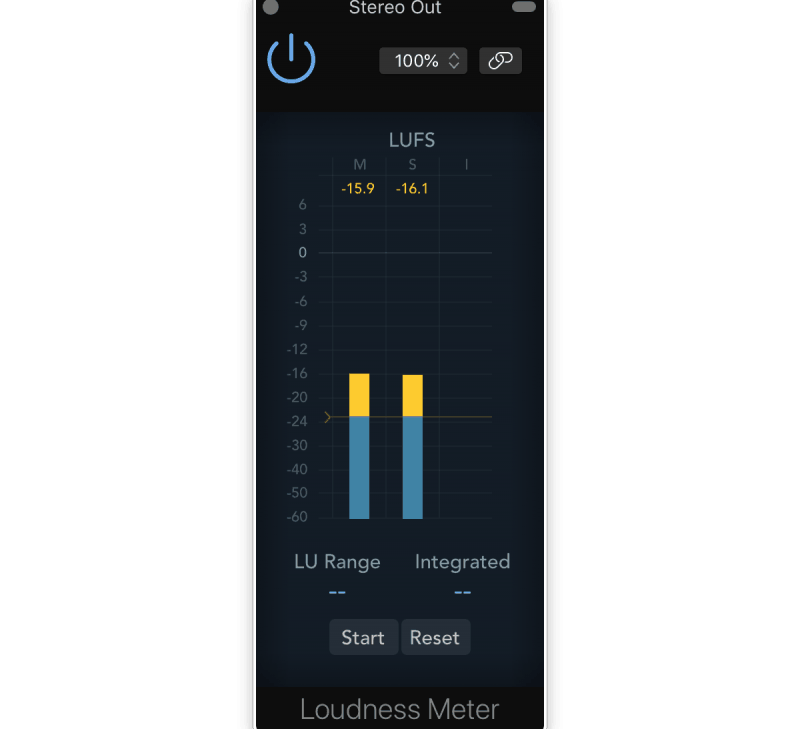
Loudness meters use LUFS (aka LKFS) to show you how loud your song will seem to listeners. Different streaming services have different LUFS standards.
AES (Audio Engineering Society) recommends your song sit somewhere between −16 and −20 LUFS.
Meanwhile, Spotify normalizes songs to sit around −14 LUFS.
You could create multiple masters for different streaming platforms. Otherwise, stick with what AES recommends.
True Peak Meters
You’re probably already familiar with peak meters.
When the loudest parts of your song are too loud, they’ll get squashed. This causes some nasty distortion and dynamic range issues.
Peak meters tell you when this happens so you can fix it. But true peak meters do a little bit more.
After your master fader, the sound from your DAW gets converted from a digital signal into an analog one. Basically, your computer turns the 1s and 0s into something we can hear.
And when this happens, there are other peaks that might get clipped.
True peak meters show you every peak that’ll get clipped when converting from digital to analog.
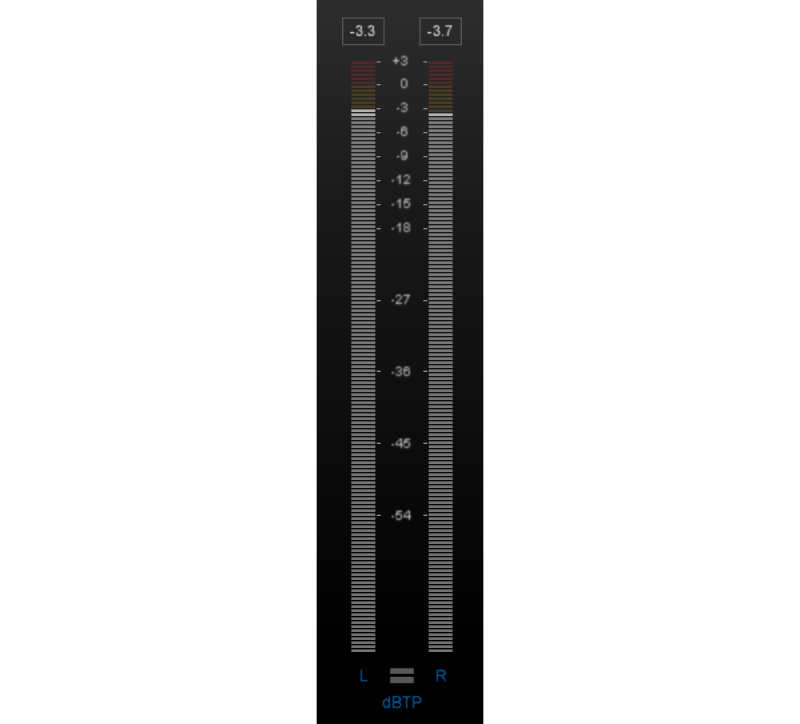
Without a true peak meter, you might miss these, which will damage the exported version of your master.
Correlation Meters
Phase issues are a real pain. Especially when you’re dealing with a master.
If something’s out of phase in the final song, it won’t sound good on mono speaker systems. And tons of speaker systems are still mono.
So you need to make sure the song won’t get wrecked if it gets played in a club. Introducing: the correlation meter!
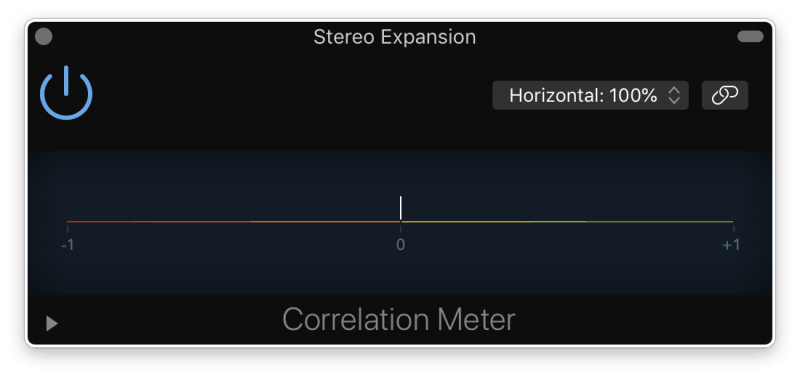
Correlation meters tell you if your entire track is in or out of phase. When it’s in phase, the meter will be hitting around +1. If it’s out of phase, it’ll point towards −1.
During the master, you want the correlation meter to read somewhere in this range.
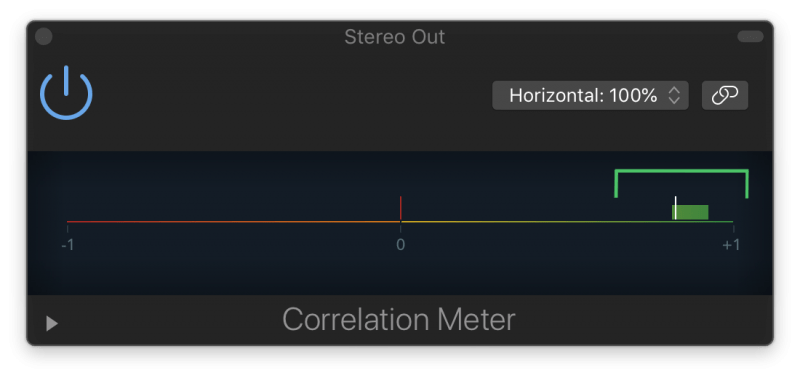
That’s in phase enough that you shouldn’t have issues.
Other Mastering Techniques
Here are a few other tricks that can help you make incredible masters.
Use a Reference Track
Reference tracks are a must while mastering. Pick one or two professionally mastered songs to compare yours to.
Reference tracks give you a roadmap. It’s easy to lose sight of where you’re going, even if you’ve been mastering for years.
Reference tracks give you much-needed perspective on how your track stands up to other ones.
So find a song that matches the one you’re working on. It should be a similar genre and production quality as your song.
You’ll want some input from your client here. That way, you know your vision matches theirs.
Mid-Side Mastering
If you can, try to use mid-side processing. Mid-side processing lets you affect the middle channel separately from the side channels.
You could apply one set of EQ and compression settings to things in the middle. Then use totally different settings for the sides.
This makes it way easier to make your track sound clean and wide.
For example, maybe you want to increase the perceived width of the song. Lift the high frequencies on the left and right while turning them down in the middle.
Or you could tighten up the low frequencies by turning down any sub-frequencies in the left and right.
Lots of mastering-grade hardware and software allow you to do this.
The possibilities are endless.
Once I brought mid-side processing into my mastering, my tracks started sounding way clearer. Try it out if you can!
Sonarworks
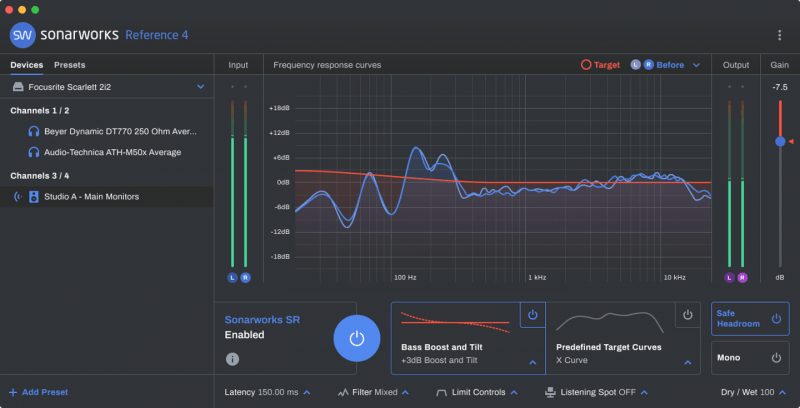
Sonarworks is a super helpful program when it comes to mastering.
It flattens the frequency spectrum of your headphones or speakers. So you know everything you’re hearing is accurate.
Mastering is the last step of the production process.
Imagine you’re at a listening party for a song you’ve mastered. Suddenly you realize the low mids are way too loud once you hear them on different speakers.
You don’t want that to happen. Which is why it’s important you know exactly how the song sounds.
Saturation
You can also use a standalone saturation processor for color.
These add harmonic distortion to the track, accomplishing a similar goal as tonal EQs and compressors.

It can also make your track sound louder by bringing up the quieter parts of a sound without turning up the peaks.
As for where to put it in the chain, there are a lot of different opinions.
Some engineers say it should go first, that way they can EQ out any nasty artifacts it brings up.
Others place it right after the first EQ. So they’ve already gotten rid of anything gross the saturator might enhance.
As for me, I put it right before stereo expansion and limiting. I only use it lightly, so I’m not super worried about adding artifacts.
Conclusion
This mastering chain is a great starting place for most tracks:
- Cleaning EQ
- Glueing Compressor
- Tonal EQ
- Tonal Compressor
- Stereo Expansion
- Limiter
- Meter(s)
But what really matters is mastering with intention.
Don’t just imitate this list. Focus on understanding what these tools accomplish.
The most important thing is that, anytime you add an effect to your master, you know why you’re doing it. If you develop an entirely different workflow, that’s fine!
Next Steps
Although this isn’t a short post, we’ve only scratched the surface.
If you’re sick of not being able to translate the sound you have in your head to come out of the speakers the way you want…
And you want to finally reach industry-standard quality in your music by becoming a professionally trained mastering engineer…
Watch this next:
Enjoy!


