

To me, the biggest factor of a song sounding “pro” is the band’s performance. Even the most non-musical listener can tell between a hobbyist garage band playing out of sync and the well-rehearsed, sold-out-arena band.
Simply put, if the band sounds “locked in” with each other, your audience will be much happier.
In Part 2 of our series on editing, you’re going to learn how to “lock in” your recordings with rhythmic editing.
I’m guessing you’re here because you want to make your mixes sound professional. We put together a brief training that covers a totally new approach to music production. Until now, everyone has been teaching production totally backward. Just click below to watch.Get industry-quality every time (steal this framework)
But if you just want to learn all about Rhythmic Editing specifically, keep reading.
[This is a part of my series on audio editing. Make sure to check out Part 1 (The Importance of Editing) and Part 3 (How to Tune Your Vocals)]
Before We Start…
The most important thing in making a band sound tight is recording a great performance!
I highly encourage everyone to do as many takes as necessary until the band is as naturally locked in as possible. The more in-sync the recordings are, the easier the editing process will be. You’ll thank yourself later.
The easiest way to get quality in-time recordings is to make sure the musician(s) have a good headphone mix. Make sure they can hear the rest of the band clearly so that they can play in time.
If you’re tracking multiple players at the same time, try to have good “lines of sight” so that they can see each other and notice physical cues.
I also encourage you to ALWAYS use a click track. Especially if you are going to be doing rhythmic editing later. It is MUCH easier to have a tempo grid to reference!
What Should I Focus On When I Edit?
While editing your tracks to make the band sound tight, there are 2 key factors to keep in mind:
1) GROOVE
A lot of engineers and musicians (and likely a number of you reading this) are very wary of editing because they don’t want to “kill the groove.” As a pro-editing engineer, I couldn’t agree more!
Editing should never kill the “feeling” or “vibe” of the song. It should only enhance it. Getting each instrumental part locked in to the specific groove makes the listener “feel” that groove more.
2) COHESION
The best “groove” in the world doesn’t matter or feel good unless the band is playing it together! Once you’ve established the groove and feel of the song, make sure each part is playing the same thing.
Each musician is adding their own personal piece to form one song. The band should feel synchronized and act as one whole, cohesive unit in creating the song.
Again, any listener can tell if a band sounds out of time with each other compared to being in-sync. This is how you take the garage band and make them sound like the touring pros.
The Editing Process
The easiest way to approach editing is to start with your rhythm section (which is usually what sets the groove of the song).
In a standard band, it’s best to start with the drums. If it’s a more stripped down acoustic recording, choose whichever instrument seems to set the main rhythm of the track. Edit whichever one of those tracks first, and then have the rest of the band follow.
The two main elements to keeping the groove & forming cohesion are related to the performance and style of the song.
If the band is already super locked in and gave a killer performance, you probably only need to adjust a couple notes here and there. If the band was a little on the sloppy side, you might need to move most (if not all) of the notes to make the groove feel right and the band feel cohesive.
Make sure you’re editing to the style of the song.
If it’s a pop leaning track, you might want everything to be “on the grid,” or perfectly lined up to the tempo and meter divisions.
On the other hand, if it is a more natural/raw sounding genre, you might want to leave certain notes a hair behind the beat, or just leave them in general if the performance sounds good.
Remember: Trust your ears, never your eyes!
There is no “right or wrong” when it comes to keeping the groove. Sometimes you need to combine both the pop and natural approaches.
For example:
Last month I was working on a song that was very RnB/bluesy, but the artist wanted to lean as “pop” as possible. If I edited everything “to the grid,” it sounded very pop, but lost the emotion and feeling that came from the “raw” aspect of blues and RnB.
I ended up editing the first beat of each measure (the kick drum) to the grid, but letting the rest of the drums in the measure (the snare and hi-hat) be looser and slightly behind the beat. This balanced both styles and keep the groove of the song sounding awesome.
Once you’ve established the groove and feel of the song, make sure each part is playing the same thing.
If the drummer has been perfectly locked with the groove (whether that be “to the grid” or another feel), but the bass or guitar player isn’t matching up, it will kill that feel. Make sure to align each remaining track to the initial edited rhythm track.
As with the groove, you’ll want to consider the style of the song and use your ears. Maybe everyone needs to be perfectly in time with each other. Maybe it sounds cool for the bass or guitar to be juuuuuust behind the beat. It all depends on the needs of the song.
Technique #1: Manual/Hand Editing
There are two main ways to edit the band to make them sound tight:
Manual or “hand” editing…
…and elastic/warp/time stretch/flex editing.
While many argue for one or the other, I believe that neither is “better,” but each has strengths that make it better in one situation or another.
The more time intensive of the two techniques, manual editing can provide the most natural sound when able to be used. I say “when” because tracks that need their notes to be moved further than shorter, manual editing may not be able to do it.
*side note*: When editing drums, make sure you ALWAYS edit them together in a group. View them as one instrument, since all microphones were recorded at the same time (one performance of one instrument). Editing only one track of the drums (i.e. ONLY the kick or snare) will sound very bad and cause lots of rhythm problems.
Manual/hand editing consists of cutting your recorded audio file and dragging it to where you want it to be. When doing this, make sure you cut both ends of the note you want to move, or else you will end up moving your entire track.
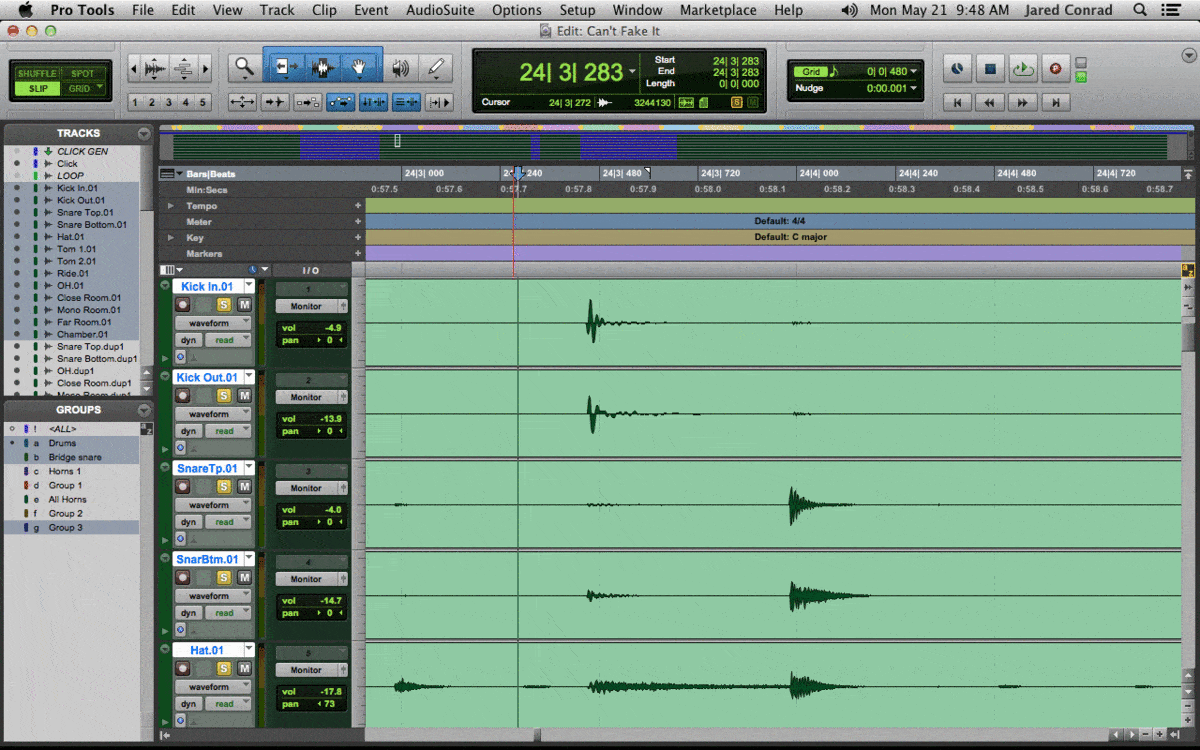
Once your audio file clip is moved to the desired timing, trim the ends of all the surrounding clips to make sure no notes are cut off and there is no empty space. Then crossfade for a smooth transition.
I personally find this technique most useful on drums or other percussion related tracks, because they take to crossfades more naturally than trying to fade between chords or melodies on “note-based” instruments.
Technique #2: Elastic Editing
Elastic editing, or Warp/Flex/Time-Stretch editing (depending on what DAW you use), can allow for quicker and more drastic edits when needed, but can also degrade sound quality if done incorrectly or too far.
Elastic editing takes a computerized approach and digitally stretches your recorded audio file to make the notes on time. Think of a slinky and how you can stretch it out longer or compress it shorter to fit your needs.
Each DAW will have different names for their editing tools but all function essentially the same. The below examples are done with Pro Tools’ Elastic Audio on a bass track.
As with Hand Editing, don’t jump to moving the note you want to adjust, or it will shift the rest of your track. Make “Warp Markers” on each side of the area you want to edit – those are the small blue arrows and lines in the example.
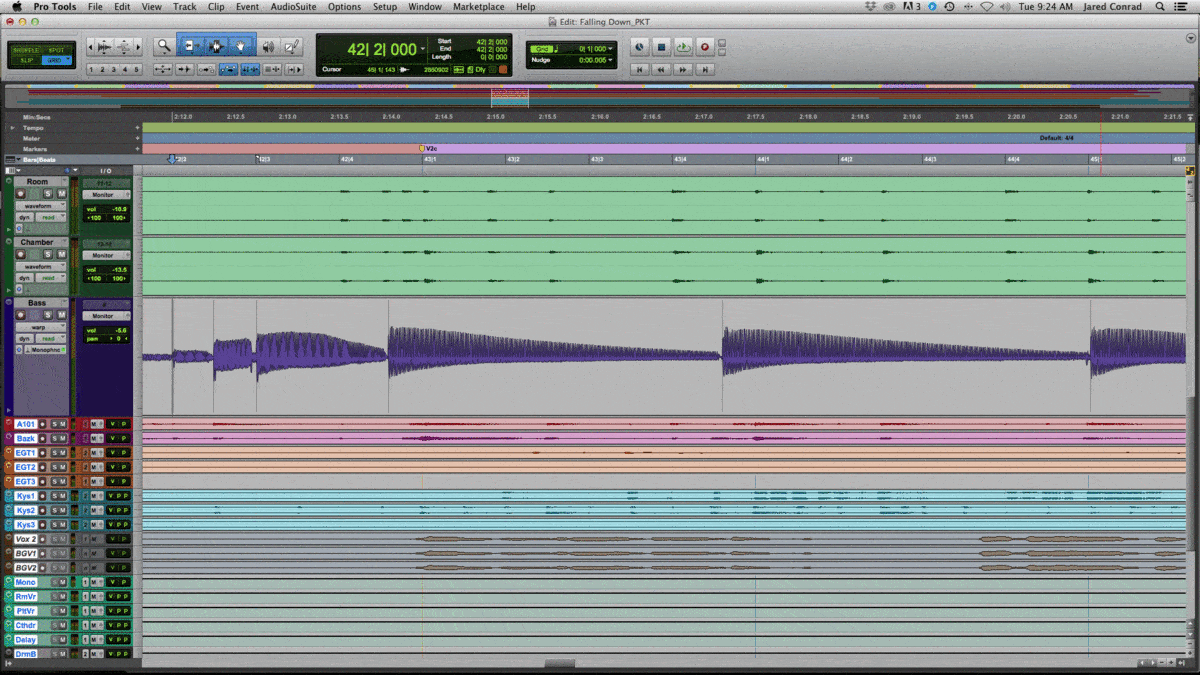
Then, create new warp markers on each note within that range you want to adjust.
Drag those warp markers to the desired timing.
Once you have your track edited, you can commit your elastic editing (which saves a new editing audio track in its place). Each DAW will have different ways of doing so, so do a quick google search to find out how your particular DAW does it.
What Algorithm Should I Use?
Each DAW will have different algorithms for their elastic editing program. Use the chart below to make sure you select the best one for the highest quality result:
| Elastic Type | Meaning | Usage |
| Rhythmic | Non-melodic, percussive | Drums, Tambourine, Shaker, any other percussion |
| Monophonic | 1 note at a time | Bass, Horns, Vocals |
| Polyphonic | multiple notes at a time | Guitars, Strings, Keys |
| X-Form (Pro Tools specific) | Avid’s real-time rendering algorithm – use ONLY for converting after editing | Converting any of the above after editing |
What is Quantizing? Should I Try It?
Once you get accustomed to elastic editing, I’d recommend experimenting with your DAW’s “Quantize” feature. As you feel comfortable and experienced with knowing what to look for and how to edit the “warp markers,” this will help save time and do some of it for you!
Warp markers are those “edit lines” we created in the previous segment when using elastic audio. They make start and stop points at transients (notes) to define where to stretch the audio clip.
Quantizing is a DAW’s automatic “one-step” command to move an entire recording exactly to the tempo grid. It automatically creates warp markers at each detected transient and moves it to the nearest grid value (which you can set to ¼ notes, ⅛ notes, 1/16th notes, and so on).
ALWAYS double check quantizing. It will get most of the notes on time, but without fail move some to the wrong spot/create warp markers in incorrect spots (ahead of the note usually, pushing the note off time).
It will also sometimes miss notes if the transient isn’t strong enough or too well-defined.
Quantizing also has a hard time with specific sources – especially strummed guitar chords or arpeggiated piano chords. It will pick one note out of the slowly played chord, and it might not be the note you want on the beat!
Also, quantizing is mainly useful for adjusting notes “to the grid” (including if your song is a swing or shuffle). If you’ve left notes on the drums or bass slightly off the grid to create the groove, make sure you’re manually dragging your warp markers to match those notes, not the grid.
Most DAWs (Logic and Pro Tools included) have a “Quantize Strength” feature that will move warp markers close to the grid but not ON it. This will make for a more natural performance, but won’t necessarily line up each instrument exactly with each other.
Experiment with this to see if a less-perfectly locked in performance fits the style of the song! If quantizing (either full strength or not) doesn’t get the feeling quite right, manually drag the warp markers on each track to match each other regardless of the grid.
UPDATE: We released a great video on how to use quantize strength:
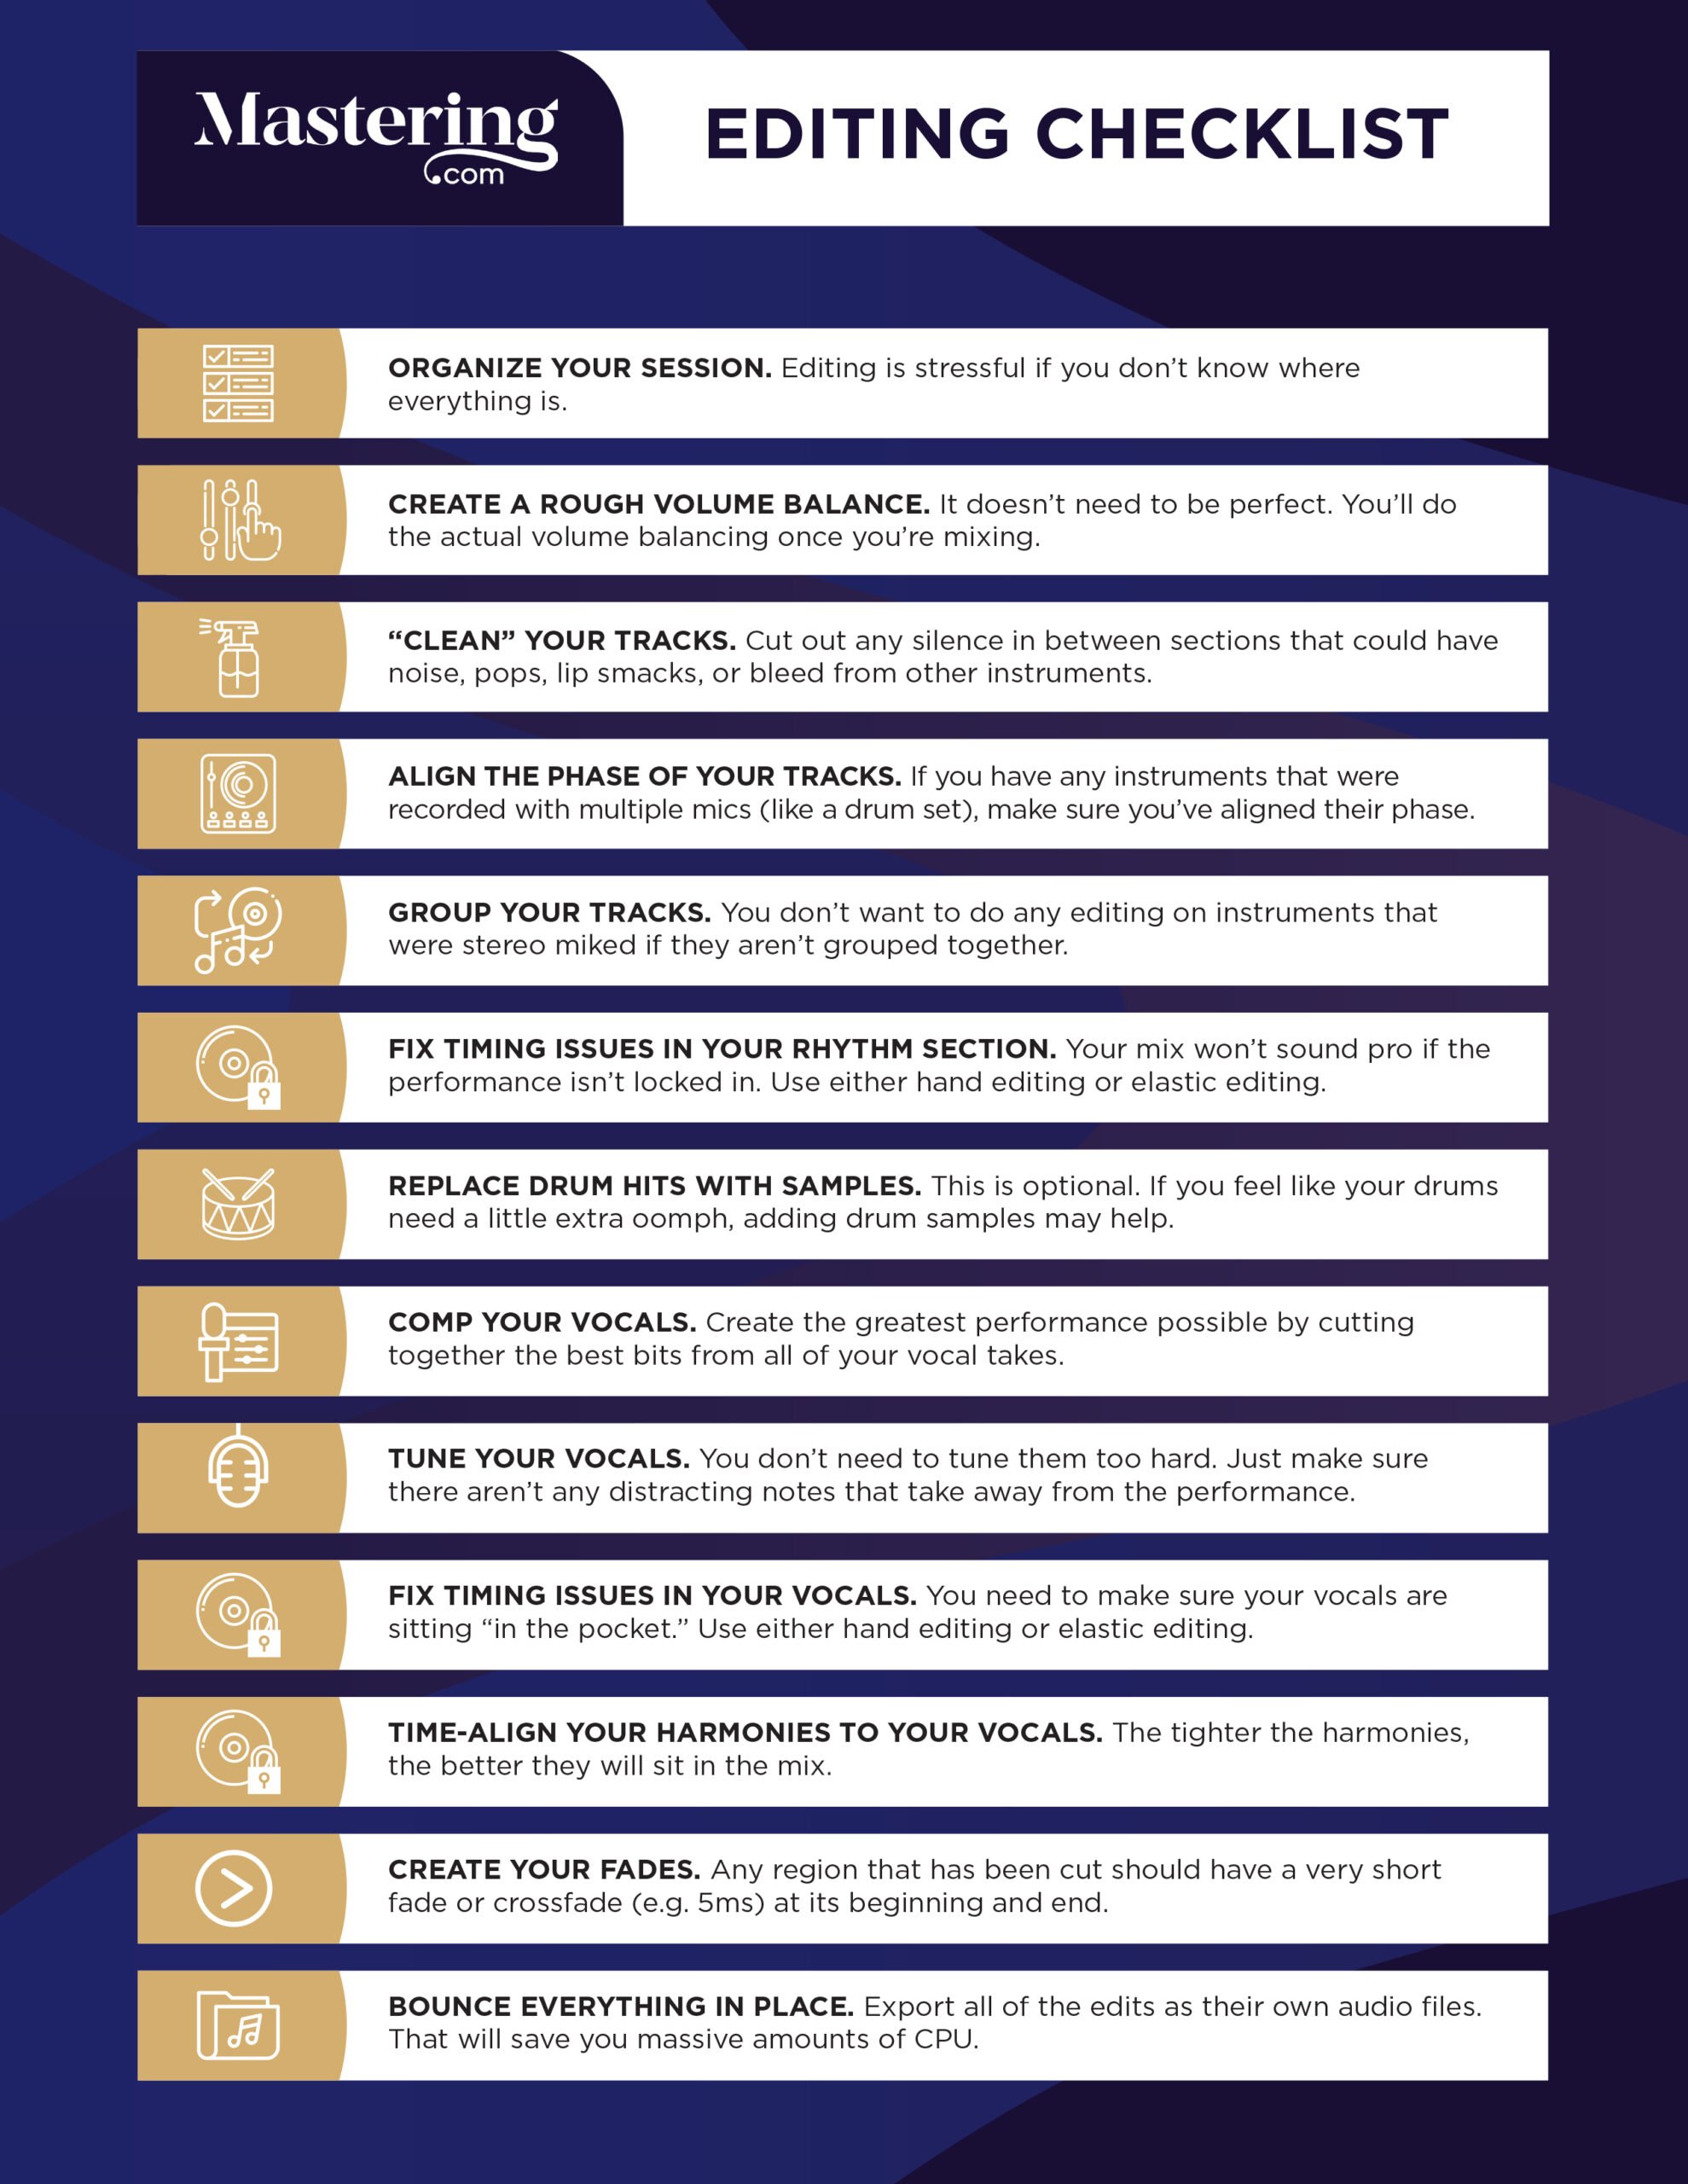
What Else Do I Need to Do to Finish Editing My Song?
Timing your tracks is only part of the battle. To finish editing your mix, make sure to complete this checklist:
Conclusion: Rhythmic Editing
Now that your band sounds TIGHT, let’s get that vocal sitting RIGHT! (Lame rhyme fully intended).
Check out our next article in this 3-part series, How to Tune Your Vocals.
Or head back to Part 1, The Importance of Editing.
Next Steps
If you want to dig deeper into music production and learn what it actually takes to make mixes that sound pro…
And you’re an intermediate or advanced producer…
Be sure to check out the free masterclass:
Enjoy!


