

Audio compression can be daunting. In this guide I want to teach you exactly how to use a compressor.
Some people find learning how to use compression problematic. But here’s the solution…
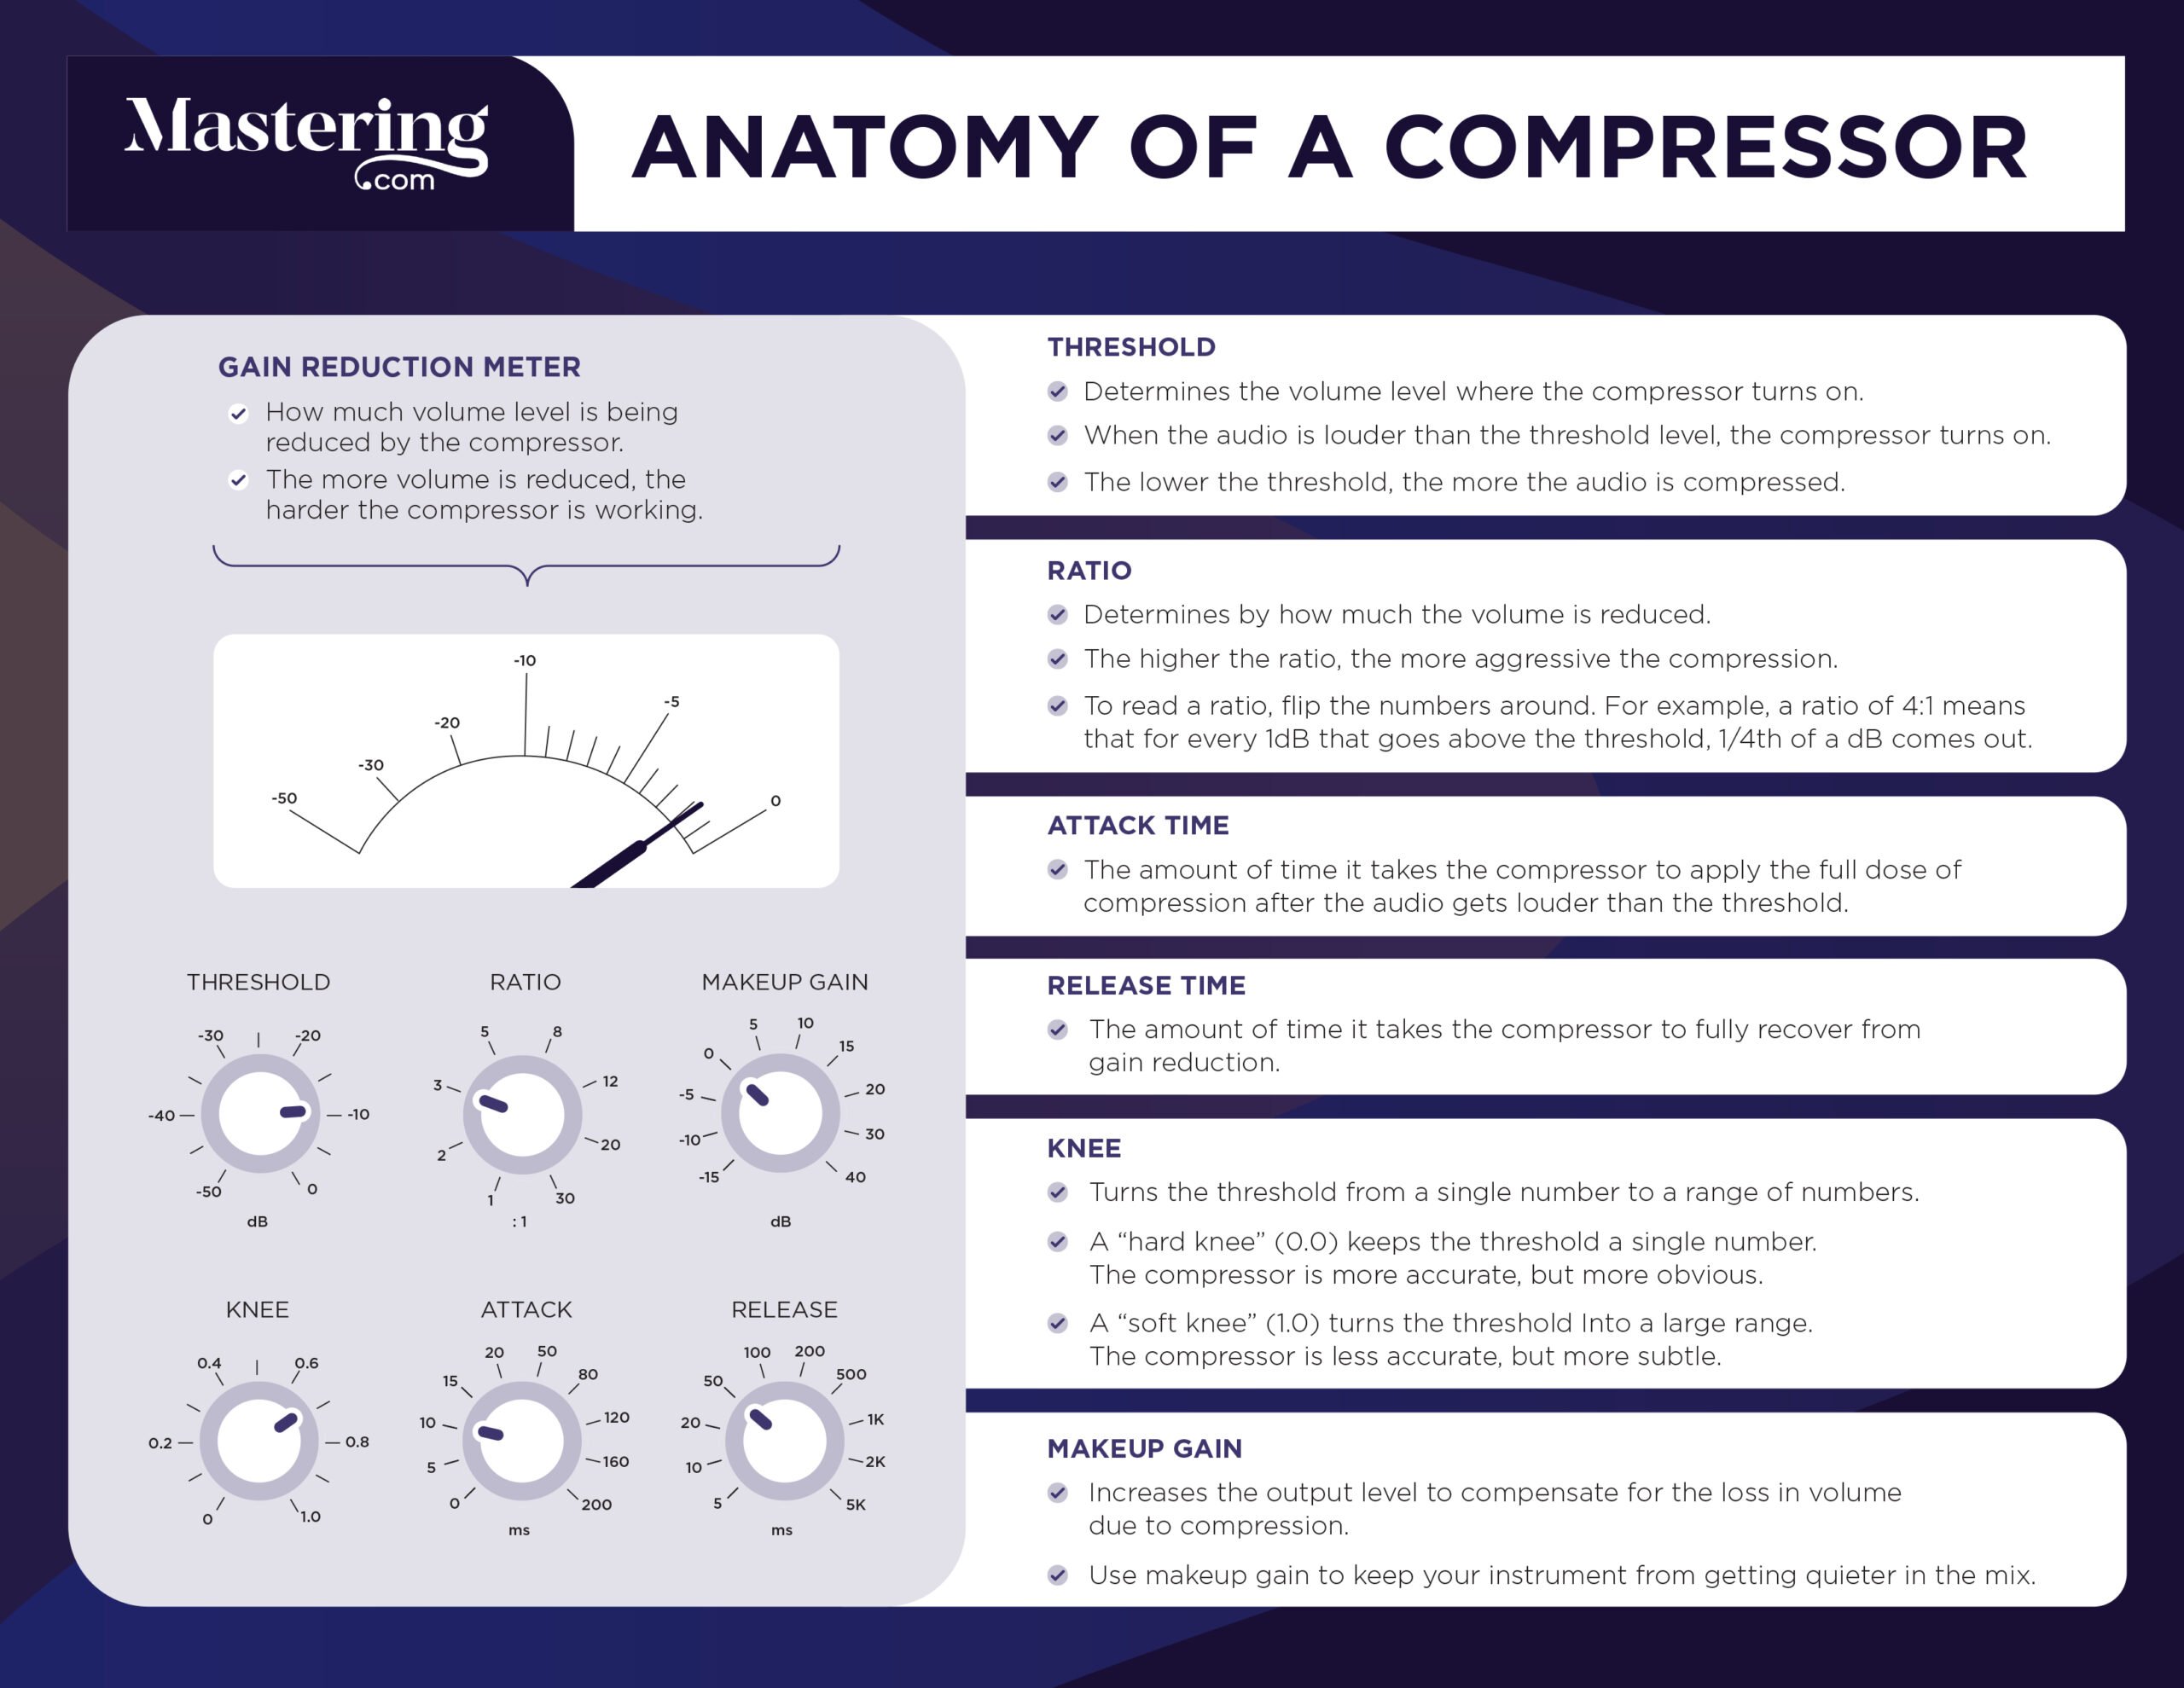
There are only five key parameters that matter when it comes to compression.
Ratio, threshold, attack, release and gain.
Learning how to use compressors become a lot less scary once you have an understanding of each of these settings. They become valuable, controllable tools.
It takes years to master compression. Don’t even get me started on multiband compression.
But it will only take a few minutes to understand how they work. And this will get you 80% of the way there.
I’m guessing you’re here because you want to make your mixes sound professional. We put together a brief training that covers a totally new approach to music production. Until now, everyone has been teaching production totally backward. Just click below to watch.Get industry-quality every time (steal this framework)
But if you just want to learn about compression specifically, keep reading.
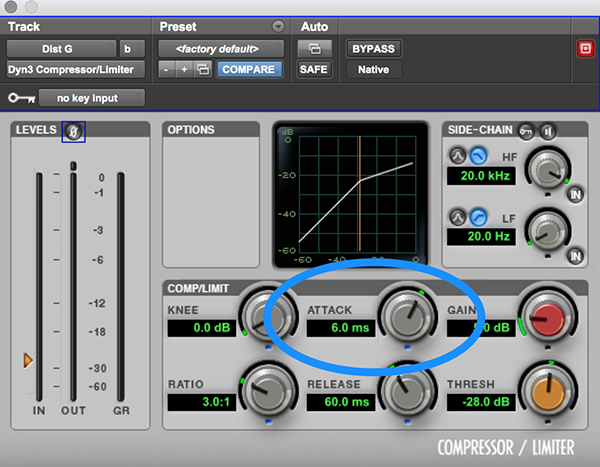
Anatomy of a Compressor
NOTE: If you prefer to learn by video, I created an extensive 40-minute guide to using compression:
When you first look at a compressor, your reaction is likely stress. What are these strange knobs and buttons? What does all of this jargon mean?
Luckily, I’ve made a little guide to decrease your overwhelm. Here’s the anatomy of a compressor:
UPDATE: I also put together this waveform demonstration video, so you can see exactly what compression does to an audio source:
How To Use Compressor Ratio
To understand ratio, we first need to understand what a compressor actually does.
The clue is in the name – it compresses the volume of audio (in layman’s terms).
When a sound gets too loud, the compressor kicks in and reduces the volume.
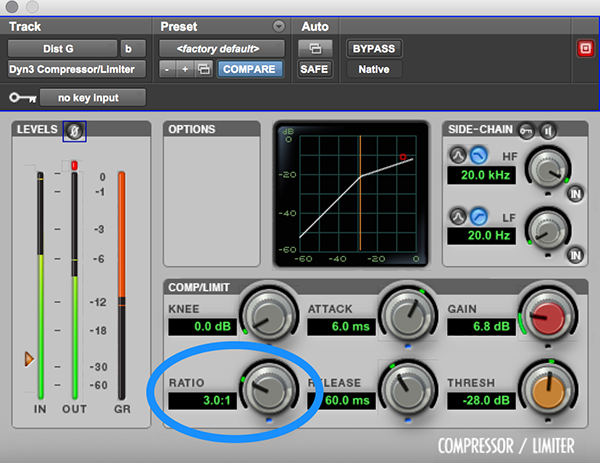
The ratio determines how much the volume is reduced by.
Let me give you an example:
You load up a compressor on the vocal and it goes over the threshold by 10dB (more on the threshold in a second).
We have set the ratio to 2:1. This means that the sound will be reduced in volume by a factor of 2.
So, instead of getting 10dB louder, the vocal now gets 5dB louder. With me?
Here’s another one:
If we set the ratio to 4:1, the sound would be reduced in volume by a factor of 4.
10 divided by 4 is… 2.5. So our sound now only gets 2.5db louder.
A ratio of 10:1? Our sound now only gets 1dB louder!
Once again – the ratio determines how much the sound is compressed (reduced in volume).
But at which point is the volume of the sound reduced? Is the whole track reduced?
No. Only when the sound hits the compressor threshold…
It’s All About The Threshold
This is the point that the compressor kicks in.
If we set the threshold to -24db, the compressor will not affect everything quieter than that.
BUT, as soon as the sound hits -24dB, the compressor will kick in and reduce the volume.
Here’s a graph that ties threshold and ratio all together:

You can clearly see how the threshold determines when the compressor kicks in, and the ratio determines how much the sound is compressed.
If you set the threshold too low, the audio will be compressed all of the time and sound unnatural. Sometimes this is desirable, but in most cases it isn’t.
We usually use a compressor to catch the louder peaks and make the track more consistent in volume. So we adjust the threshold until the compressor only kicks in when our recording hits those peaks.
On the other hand, if we set our threshold too high, the compressor won’t do anything at all!
Dial In The Attack Time
We have our audio and our threshold is set to catch the loudest peaks.
But what happens when those peaks hit the compressor? Is the volume just instantly reduced?
Attack time is how quickly the compressor engages and reduces the volume of the audio.
If our attack is set to 10ms, and the audio rises above our threshold of -24db, it will take 10 milliseconds for the compressor to fully kick in.
Different attack times can make a HUGE difference.
And it all depends on the instrument that you’re compressing, the pace of the song, and tons of other factors.
But in general, go with a slower attack time. You should be closer to 40ms than 4ms.
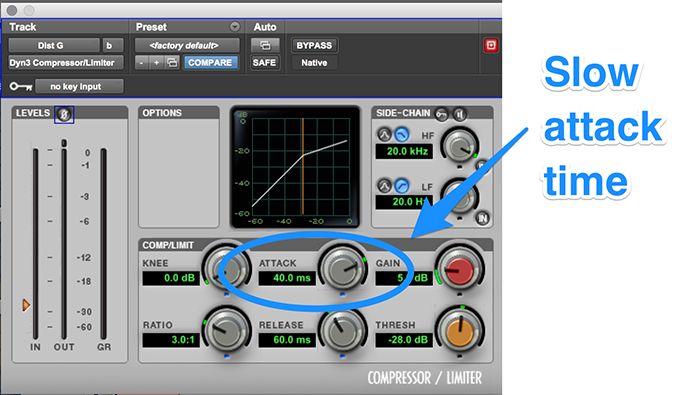
This means that the whole note is compressed, rather than the attack of the note (the plectrum hitting the string of a guitar, for example).
Because we are talking about milliseconds, everything is happening on a very small scale.
If your attack is set to 5ms, the compressor is going to kick in quickly and affect the initial attack of the note. But if we use a slow attack time, the transient (start) of the note will slip through and the sustain (the rest of the note) will be compressed.
Sometimes you might want a fast attack e.g. a guitarist that picks really hard. Use shorter attack times to when you want to compress the transient as well as the sustain.
But in most cases, a slow attack will sound a lot more natural and musical.
With vocals, it works slightly differently. Slow attack sometimes sounds unnatural and odd (as does a very fast attack time). Stay around 2-10ms for vocals and voice.
For an in-depth guide to getting the attack time right…
Watch this video, where I share 3 simple tips:
ARVE Error: src mismatchprovider: youtube
url: https://www.youtube.com/watch?v=tMnNkrMZsIU&t=62s
src in org: https://www.youtube-nocookie.com/embed/tMnNkrMZsIU?start=62&feature=oembed
src in mod: https://www.youtube-nocookie.com/embed/tMnNkrMZsIU?start=62
src gen org: https://www.youtube-nocookie.com/embed/tMnNkrMZsIU
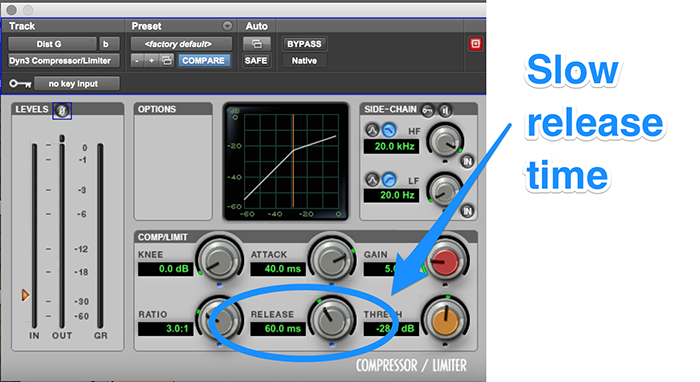
Don’t Forget The Release Time
This is sometimes referred to as decay.
This is how long it takes the compressor to dis-engage.
It’s the exact opposite of attack.
Once the audio drops back below the threshold, this is how long it takes for the compressor to return the audio to its normal volume.
Release time is just as important as attack time.
You need to be careful – if the release time is too quick, the audio will sound very unnatural. If it’s too slow, the compressor never turns off!
The best way to adjust release time is to tweak it until the audio feels right with the rhythm and tempo of the song.
There is no exact setting that suits every song or instrument.
Use your ears, and trust them.
If it sounds unnatural or odd, tweak the release time with the whole song up (not with the track solo’d).
Start around 60ms and work from there.
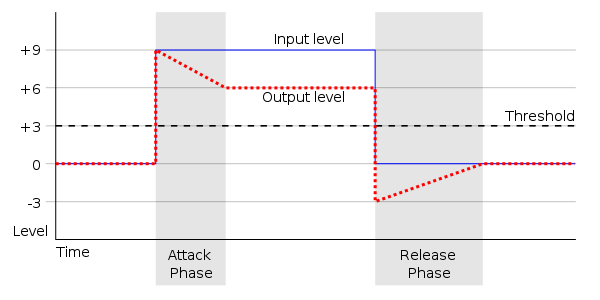
Here’s another chart, this time depicting how attack and release time affect the gain reduction.
The blue line is the original audio, and the red line is the audio coming out of the compressor (that has been reduced in volume).
Notice how the output lags behind the input due to the attack and release time of the compressor:
A lot of people struggle with this…
But there are only really TWO ways to set the release time:
ARVE Error: src mismatchprovider: youtube
url: https://www.youtube.com/watch?v=aJUZZ8QZrK8&t=1s
src in org: https://www.youtube-nocookie.com/embed/aJUZZ8QZrK8?start=1&feature=oembed
src in mod: https://www.youtube-nocookie.com/embed/aJUZZ8QZrK8?start=1
src gen org: https://www.youtube-nocookie.com/embed/aJUZZ8QZrK8
Always Add Some Gain
All of this compression and volume reduction will, of course, make the track sound quieter.
To compensate we use the ‘make-up gain’ or ‘output gain’ control to increase the volume of the audio coming out of the compressor.
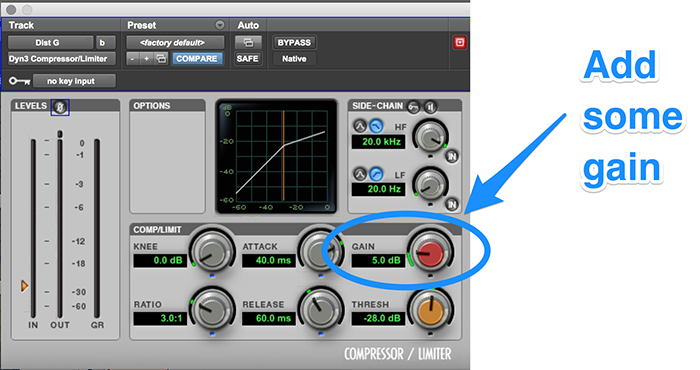
A lot of compressors have an ‘auto-gain’ feature, but you should avoid this.
Instead, increase the gain until your level coming out is the same as your level going in (most compressors have dB meters to help you do this).
Of course, you can increase the gain even further so that the output is louder than the original track.
This is one of the main reasons for you to use compression…
Because we are reducing the volume of the loudest peaks, we can increase the overall volume of the track.
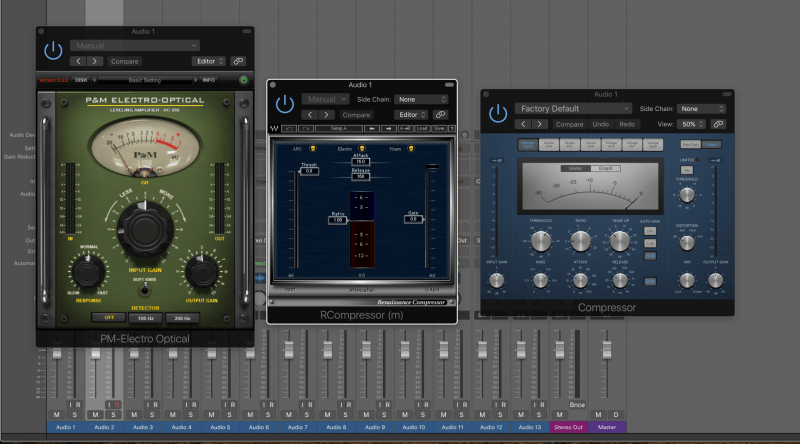
How to Use a Compressor
Now that you understand what each of the knobs does, let’s go through how to set up a compressor, step-by-step:
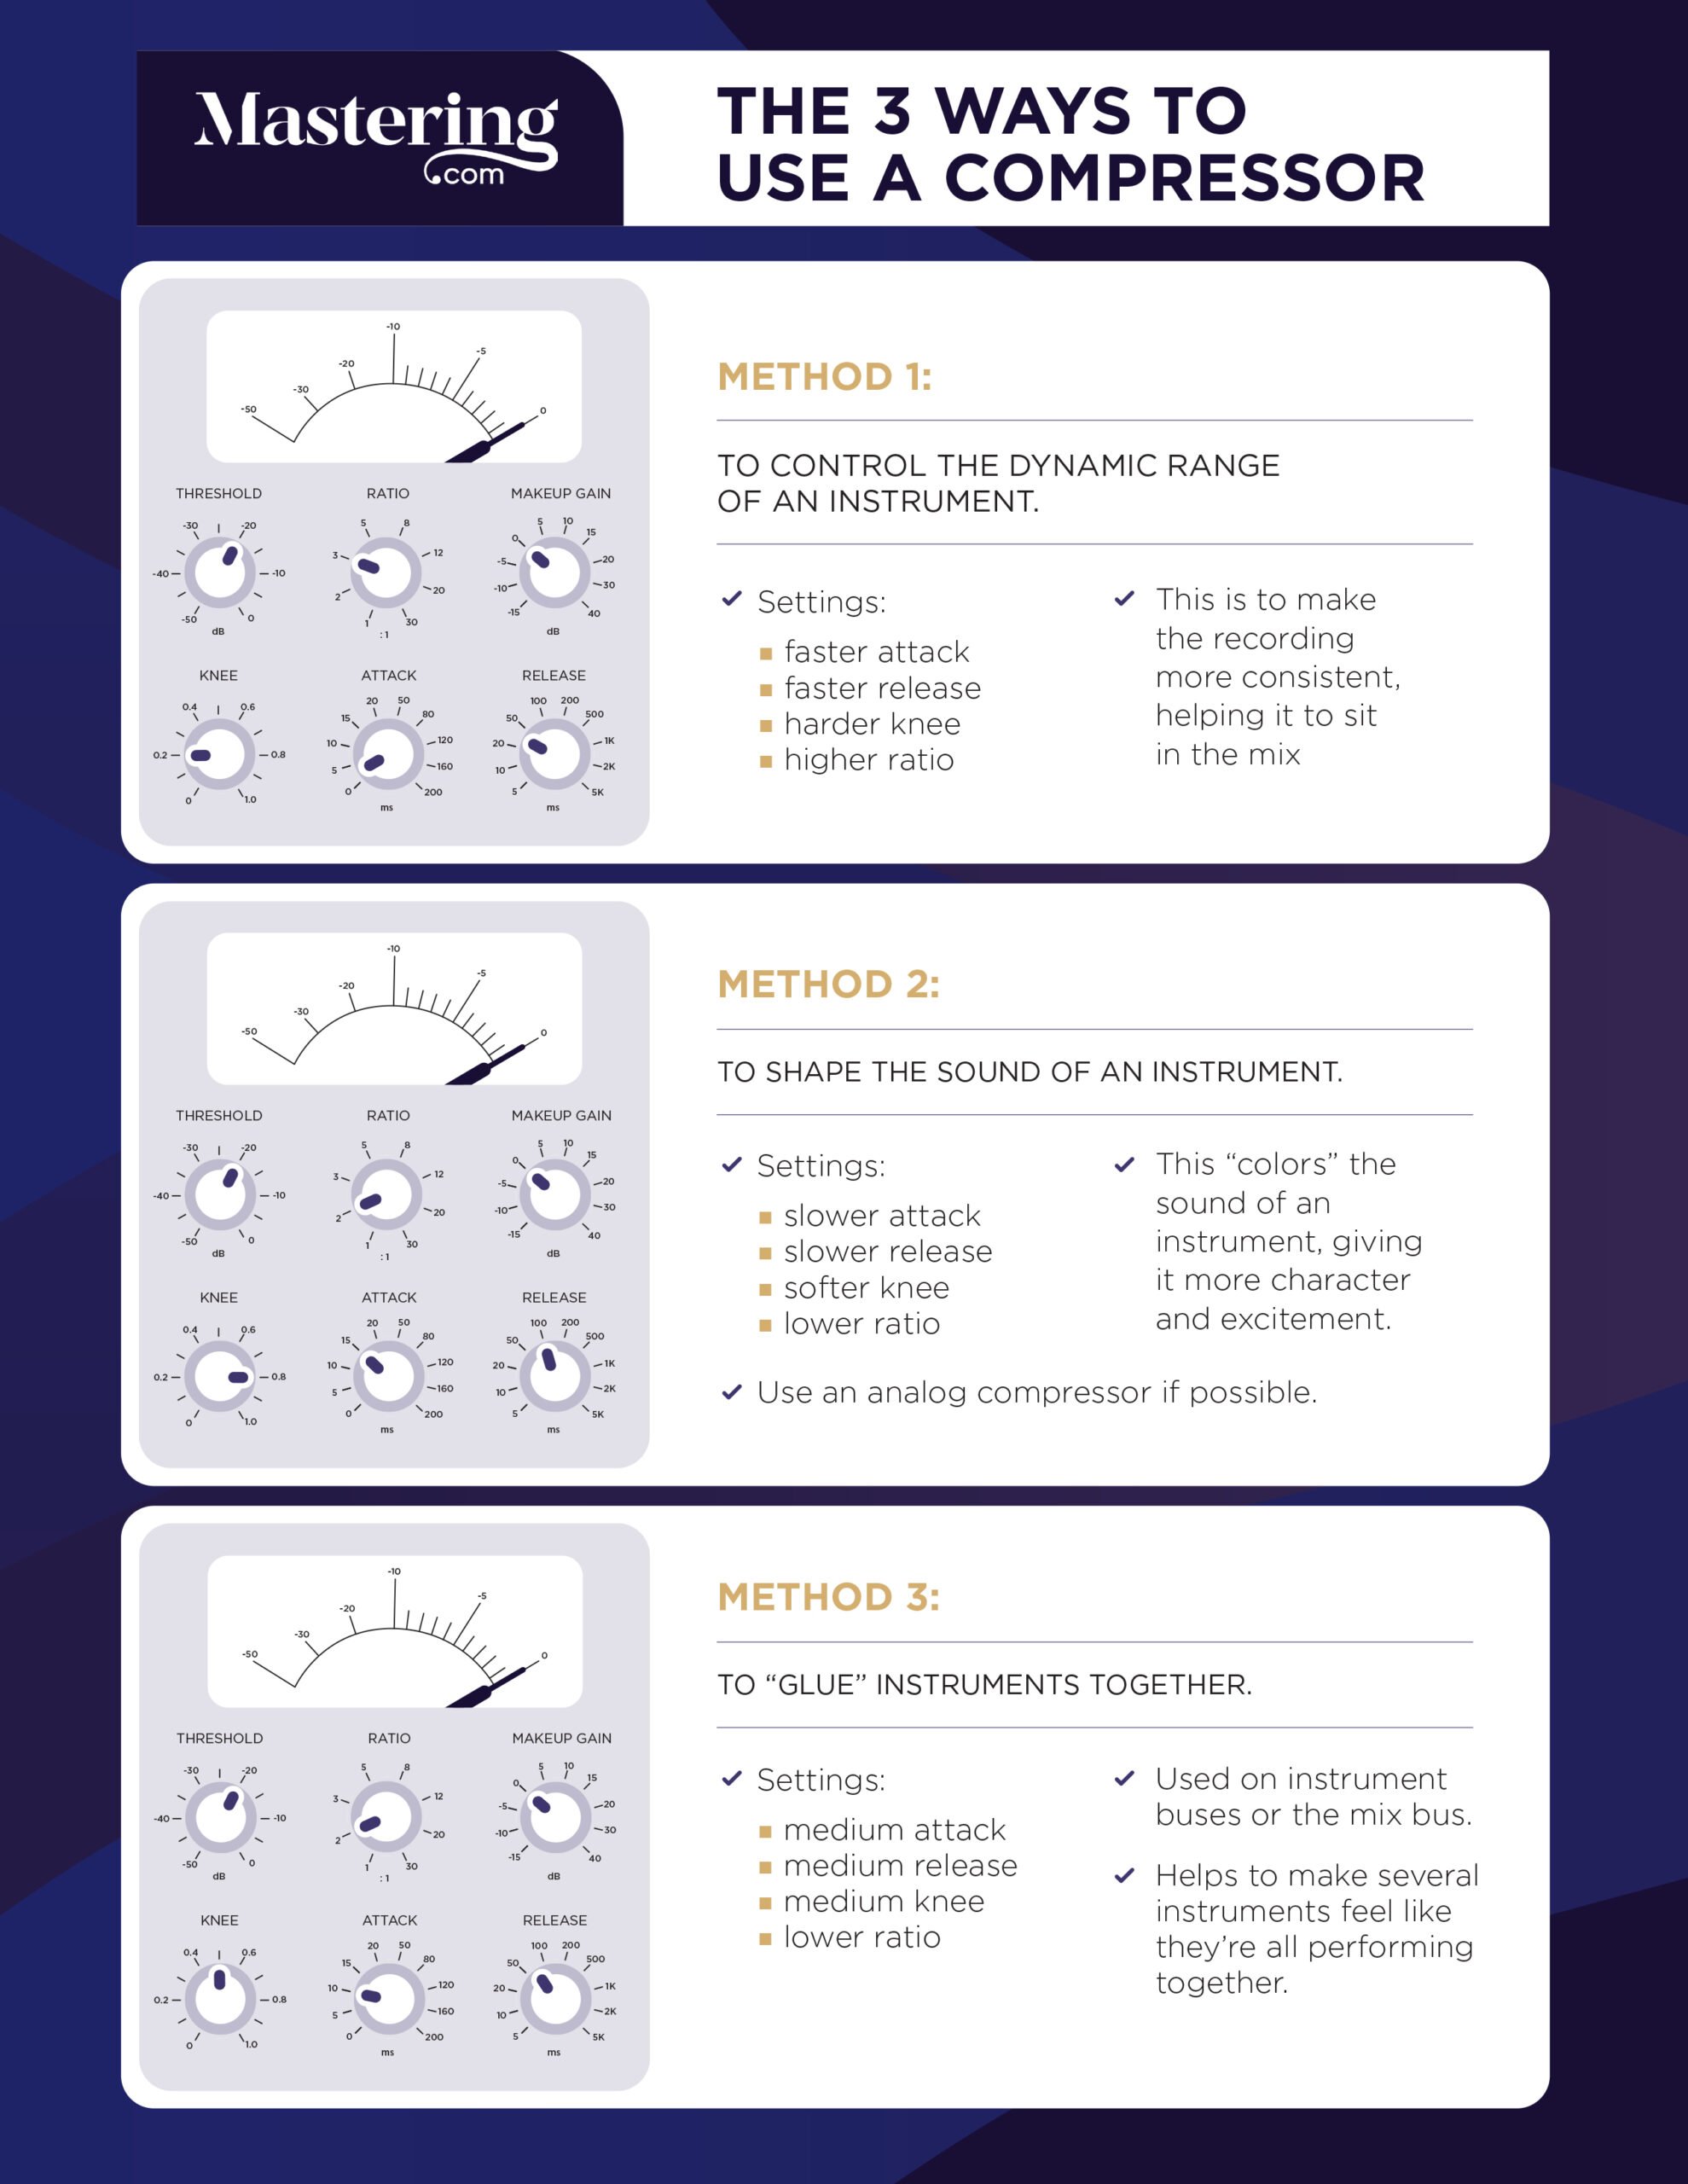
Now that you understand how to set up your compressor, let’s talk about my favorite compression tips for mixers.
NOTE: Watch Dylan explain exactly why we need compression:
My 10 Top Tips for Audio Compression
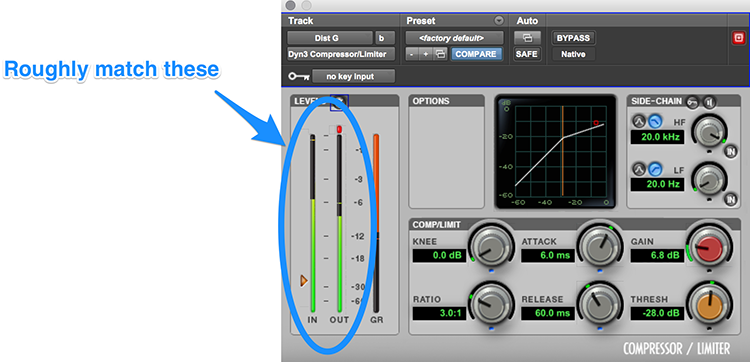
Tip #1 – Try using an attack time around 40ms and a release time around 60ms (if it’s an instrument).
Now, these are just guidelines.
And yes, I have already mentioned these figures. But I just wanted to bring them up again.
In no way will these settings work for every instrument.
But it’s a good starting point. You’re not going to mess anything up too much with these settings.

Tip #2 – Try using an attack time of 6ms for vocals.
You should approach vocals and voice differently when you apply compression.
Lower your attack time to around 6ms and tweak from there.
You can start with a release time around 60ms on vocals too, though!
Tip #3 – You don’t always have to use compression…
Use compression for a reason.
Don’t just use compression for the sake of it.
There are two main reasons you would use compression – to control dynamics or to change the tone.
If you don’t have a clear intention or a clear problem that needs fixing, don’t reach for the compressor.
Tip #4 – Stack compressors for more control.
Let me tell you a secret…
You can use more than one compressor on a channel!
Using multiple subtle compressors in a row (especially on vocals) can sound more musical.
Rather than forcing one compressor to do all the heavy lifting, each plugin does its bit.
Tip #5 – Compress the bass guitar and kick together.
This is a great little trick that I like to use.
The bass guitar and kick drum are usually the most heavily compressed instruments on a track.
They provide the bottom end and usually anchor the song.
This trick doesn’t always work. Depending on the song, you might not want to apply heavy compression to both of these instruments. You might want the bass guitar to have a high dynamic range.
BUT, if you have a song where you want the bass and the kick to be pretty consistent, try compressing them together.
Send them both to a stereo buss/aux and apply compression to both of them at the same time.
This really helps them to work together and form a solid, hard-hitting wall of bass. Awesome!
Tip #6 – Parallel compression on drums is more subtle.
If you want to compress the whole drum kit (not just the kick drum), you need to very careful.
Applying compression directly to the drum overheads can quickly lead to disaster.
There is a way around this though – use parallel compression.
What is parallel compression? It’s when you mix the original, uncompressed audio with the new, compressed audio.
For example, you might want to have 50% uncompressed drums and 50% compressed drums.
This sounds a lot more natural and maintains the natural dynamics of the drums. But at the same time it makes the drums sound bigger and heavier.
Give it a go!
Some compressors have this ability built in. If yours doesn’t, it’s easy to do.
Send all your drums tracks to a stereo buss/aux (and maybe even the bass too). Make sure you do this with sends, not by changing the output of the tracks. You still want the original tracks going to your master output.
Then, apply heavy compression to this new stereo buss/aux. Aim for 8dB reduction or more.
Slowly bring up this new ‘compression’ buss/aux until you can just about hear it and it sits nicely under the rhythm section. Experiment with EQ (trying boosting the lows and highs) and different compressor settings.
Bobby Owsinki talks about this trick a lot, and has coined it ‘The New York Compression Trick’.
Tip #7 – Apply subtractive EQ before compression.
Low frequencies carry a lot more power than high frequencies. They’re a lot harder for a compressor to work with.
You should always put your subtractive EQ and high pass filters before the compressor.
This way, the compressor doesn’t have to deal with these unwanted frequencies!
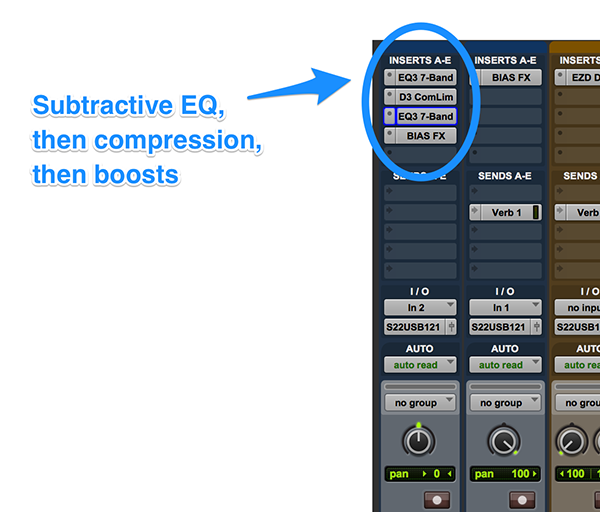
Plugin order really doesn’t matter that much. Play around with it, but don’t obsesses over it.
Tip #8 – Pick a plugin and stick with it.
Although compressors always have those 5 key parameters, they vary a lot in their extra features.
It’s best to settle on one compressor and get used to it.
The one that comes with your DAW will be more than sufficient in most cases.
Don’t confuse yourself by using different plugins every time. Stick to one and learn it inside out!
Tip #9 – Watch the meters.
Most compressors have a graphic representation of how much the audio is being compressed.
If the compressor doesn’t frequently dis-engage and return the audio to normal, your threshold is too low.
Watch the meter and make sure the compressor isn’t constantly on.
Tip #10 – Match the output gain to the input.
This is a common problem in mixing (and mastering).
To our ears, an increase in volume sounds pleasant.
We perceive louder volume as better.
You should frequently compare your new compressed audio to the original audio to see if you have made an improvement.
If your output is louder than the original audio, you will always perceive the compressed audio as better.
To avoid this, it is important to match the output volume to the input volume when you are tweaking the compressor.
Then, when you are satisfied with the changes, boost the gain if you need more volume on the track. But only after you’ve adjusted the parameters.
BONUS TIP (Knee)
Aren’t you lucky! Here’s a free bonus tip!
You may have noticed another setting on your compressor called ‘knee’.
By default, most compressors have what we would call a ‘hard knee’ (low number). This means that as soon as the audio hits the threshold, the compressor kicks in and reduces the gain at the ratio that we set.
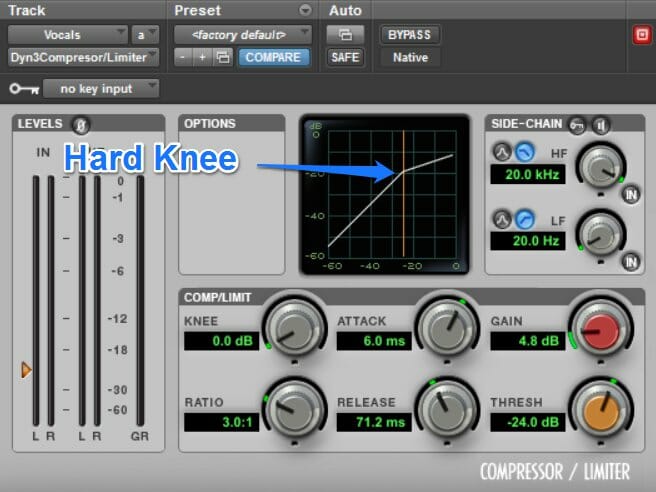
But what if we want the compressor to act more subtly and gradually increase gain reduction as the level of the incoming signal increases?
We can achieve this by using a ‘soft knee’ (high number).

Using a soft knee on vocals, piano and melodic instruments can make compression less obvious and more natural. But on a more rhythmic instrument, such as drums, you should use a hard knee.
If you want to dig deeper into music production and learn what it actually takes to make mixes that sound pro… And you’re an intermediate or advanced producer… Be sure to check out the free masterclass: Enjoy!Next Steps


