


Trying to learn to use Logic Pro X? You’re in luck.
It may seem complicated right now, but by reading this guide, you’ll learn everything you need to know to turn your ideas into full songs.
We’re covering ALL the basics of this incredible DAW.
I’m guessing you’re here because you want to make your mixes sound professional. Well, you don’t need expensive gear or software to do that – you just need the right knowledge. We put together a brief training that covers a totally new approach to music production. Until now, everyone has been teaching production totally backward. Just click below to watch. Get industry-quality every time (steal this framework)
But if you just want to learn about Logic Pro specifically, keep reading.
Logic Pro X Tutorial (Everything You Need To Know)
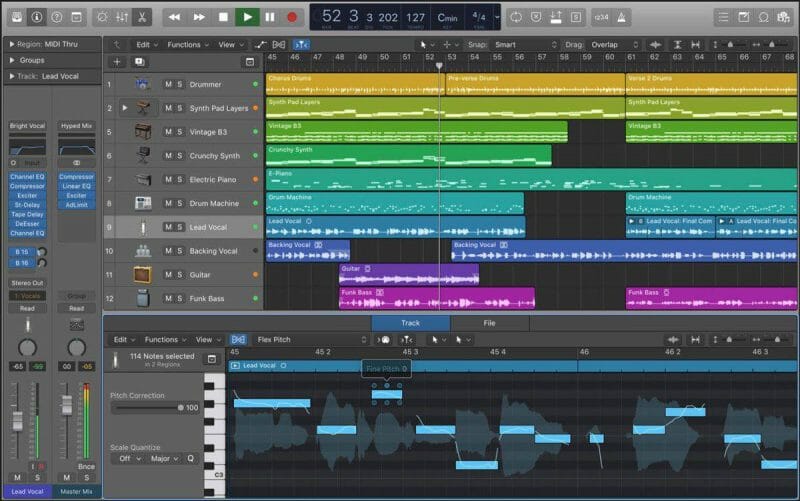
Part 1: Getting Comfortable with Logic’s Visual Interface
It’s easy to be intimidated when you open Logic Pro X for the first time.
There are a lot of buttons and screens. Where do you even start?
But don’t worry! It’s not as complex as it first seems.
Let’s break down the interface step by step so you know exactly what you’re looking at when you open a project.
We’ll start with the main interface.
The Main Interface
Just below the navigation dropdowns is the main interface.
This is where you’ll make changes that affect your entire project. One example is changing the tempo of your song.
There’s a lot to look at here, but we’re just going to focus on the necessities.
First things first, check out the “Quick Help” button on the left side of the screen.

Quick Help gives you a brief description of what everything on your screen does. So if you’re new to Logic Pro, you’ll want to have it on.
Just hover your mouse over a button you don’t understand, and Quick Help will tell you exactly what it does.
To the right of Quick Help is the playback transport. This is where you start and stop your song and even begin recording.

I prefer to use key commands for all these functions. We’ll dig into key commands at the end of this section!
In the middle of the main interface is the LCD. If you want to change the tempo, key, or time signature of the song, you can do that in this center section.
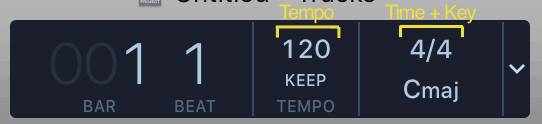
You can make this window bigger if you’d like. Click the dropdown to the right and select “Beats & Project (Large).”
You can change your metronome settings to the right of the LCD window. Clicking the metronome image will turn the metronome on and off.
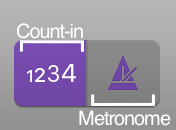
I usually leave the metronome on while recording and turn it off while listening back.
The “1234” next to the metronome is your count-in. When count-in is turned on, you’ll have an extra measure of lead-up before Logic Pro starts recording.
The File Menu
If you want to start a new project or save your current one, this is where you’ll do it.
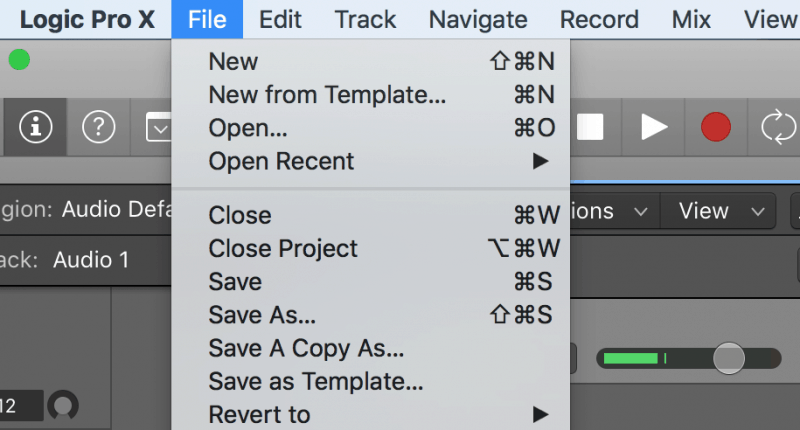
The file menu is also where you’ll bounce your track. Bounce is just a fancy word for exporting your project into a regular audio file.
You might think you’d hit the “Export” button to export your track. But for some reason, “Bounce” is the actual export button.
Why? Sometimes the world is a lawless and irrational place.
NOTE: You can save a bunch of setup time for each new project by making a template:
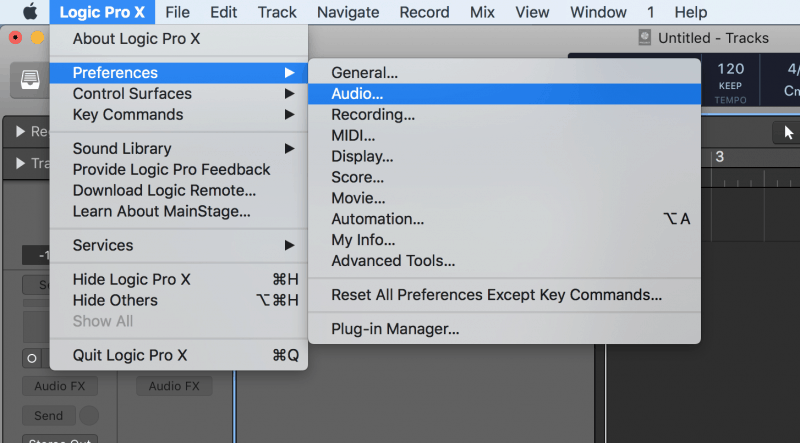
Next, Check Your Audio Preferences
Open the “Logic Pro X” dropdown at the top left of your screen, open the “Preferences” menu, and select “Audio.”
This’ll open the audio preferences window. This is where you can change your input and output devices, which is what you’re using to record and listen through.
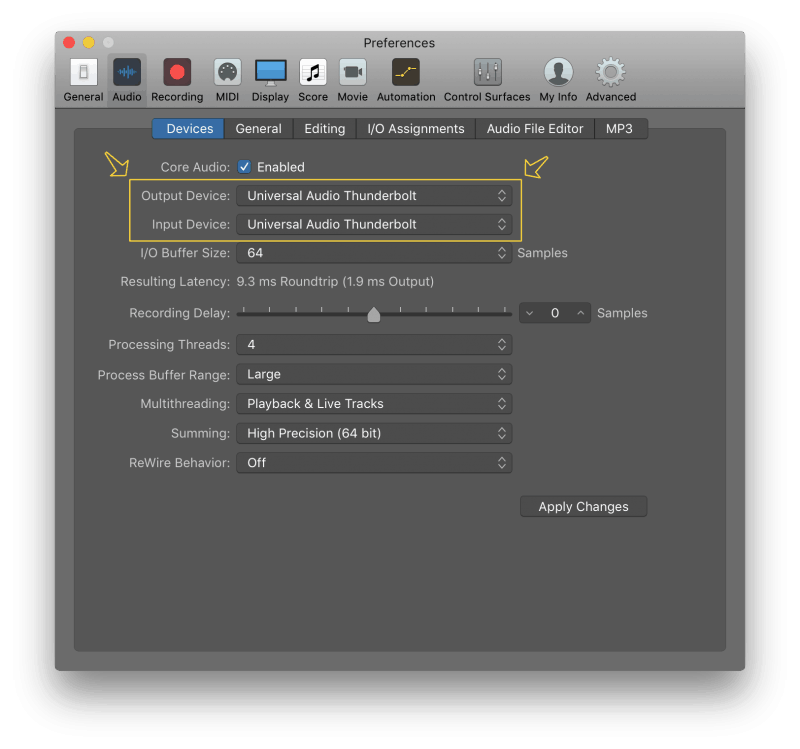
If I’m recording with an audio interface, I’ll select my interface as my input and output device.
If you’re listening through your computer’s speakers, you’ll want to make sure those are set as the output device.
The audio preferences window is also where you can change the buffer size. The higher the buffer size, the more time your computer will spend processing the audio.
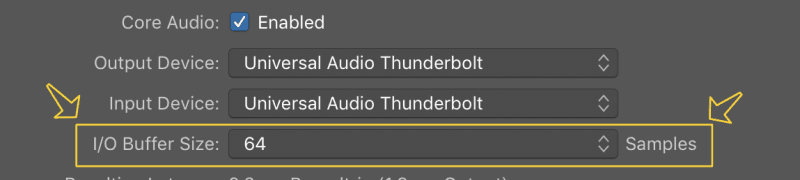
Pick the lowest buffer size possible while recording. A higher buffer size will cause latency, which can really throw off a musical performance.
But be careful! Not all computers can handle extremely low buffer sizes. If you hear pops in your recording, your buffer size might be too low.
Pick a buffer size that’s low enough to avoid latency but also isn’t so low your computer can’t keep up. I usually go with a buffer size of 64 samples per second.
When you’re mixing, you’ll want to turn the buffer size up. You want the best audio quality possible for your mix, so pick the highest buffer size available.
Key Commands: The Ultimate Time Saver
We won’t go too far in depth on these. A key command is a key (or set of keys) on your computer’s keyboard that completes a specific function when pressed.
For example, pressing the command + Z buttons at the same time will undo your previous action.
Logic Pro has a lot of key commands. Learning them will help you work quicker, but they can take some time to get the hang of.
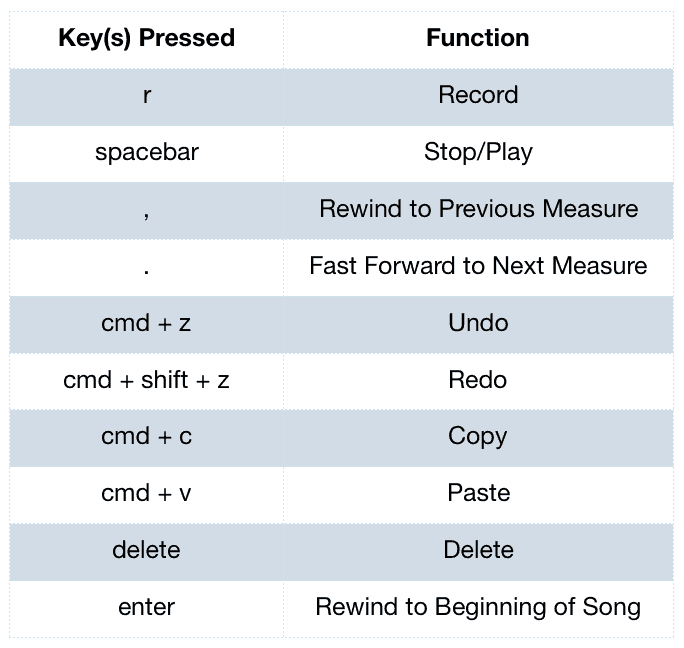
Below is a list of the most important key commands you should know when you’re getting started in Logic Pro.
Using key commands, you can start recording just by pressing R.
You can play and pause your song by pressing the spacebar instead of hitting the play and stop buttons in Logic Pro.
Get comfortable with these basic key commands, and Logic Pro will feel a lot more intuitive.
NOTE: We just released a great new video on how to solve Logic’s stupidest problem, with PlugSearch:
Part 2: Recording Audio Tracks Logic Pro X
Now that you know what you’re looking at here, it’s time to start making some tracks.
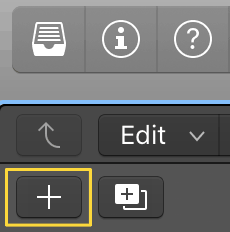
Good news, making new tracks is super easy! Just click the “+” button that’s below the main interface.
A new window will pop up where you can choose to create an audio track or a software instrument (i.e., a MIDI channel).
For now, we’re going to focus on audio channels. Make sure to double check that the input is correct.
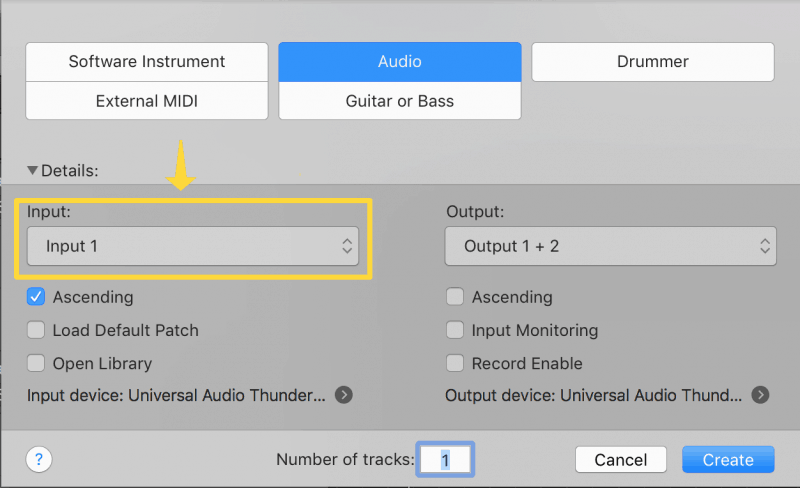
Under the word “Input,” there’ll be a button where you can change your audio input. If your mic is plugged into the first input of your audio interface, you’ll pick input 1.
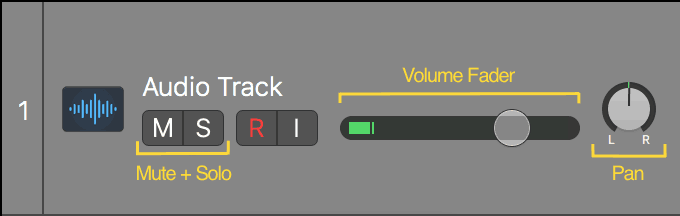
Now you have an audio track in your project!
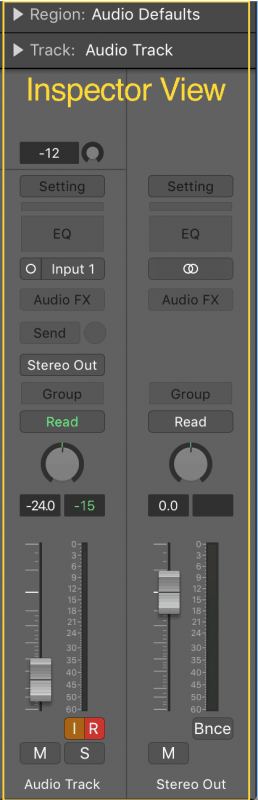
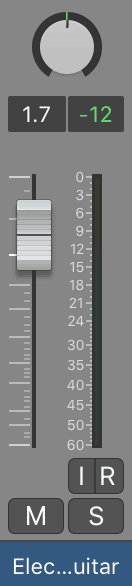
You can mute and solo this channel with the “M” and “S” buttons. Change the volume with the fader and place the track further in the left or right with the pan knob.
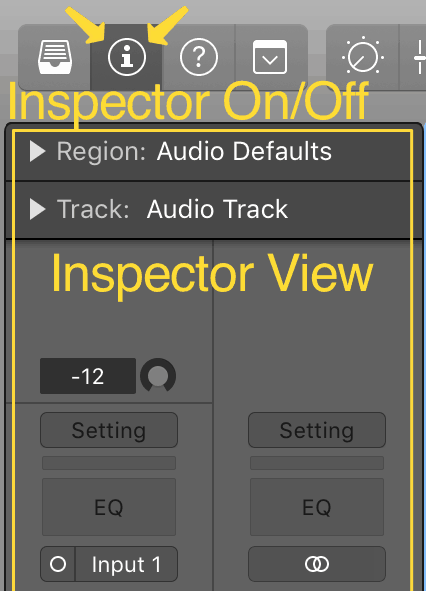
When working with an audio track, I like to leave the Inspector window open.
This window gives us a ton of other options for effects. But we’ll talk about that more later.
IMPORTANT: Record Enabling and Input Monitoring
Before you start recording, make sure your track is record enabled. Before Logic Pro can record anything, you have to tell it what track(s) you want to record with.
All you have to do is click the “R” on your audio track. If it’s red, your track is ready to record!
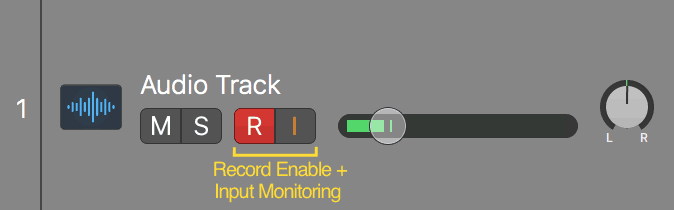
Just hit R on your computer’s keyboard and now you’re tracking!
![]()
If you want to hear what you’re recording as you record it, make sure the “I” button on your audio track is on. You’ll know it’s on when it lights up orange.
This is the Input Monitoring button. It plays the audio you’re recording through your output device.
While recording audio, listen to your song through headphones. If you’re listening through speakers, you’ll get a lot of extra noise in your recording. You may even create a feedback loop.
Recording Multiple Takes
Logic Pro makes it super easy to record multiple takes.
Recording over an existing audio clip won’t get rid of it. It’ll add the new recording to a list of takes that you can choose from.
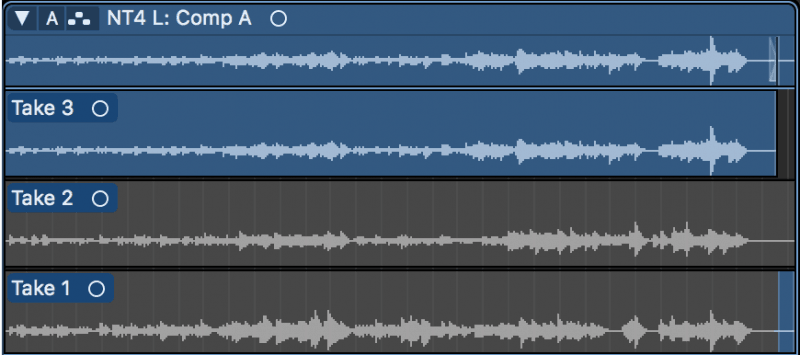
If you’re having trouble nailing a performance, try recording it multiple times.
Say you mess up at the beginning of one take and at the end of another. You can cut the two together to create one solid recording.
To see all of the takes you’ve recorded, just click the dropdown arrow on the track.

This arrow will automatically show up once you’ve recorded multiple takes. Clicking on a take will change which one you’re listening to.
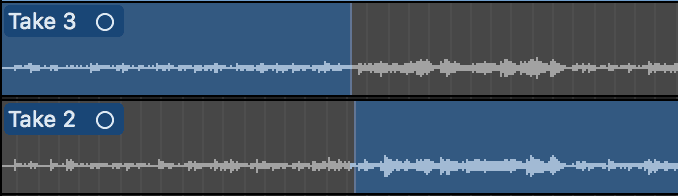
To combine recordings, click and drag on the sections of each take you want to keep. Blue sections are audible while gray sections are muted.
Once you’re happy with a combination of takes, you can merge them into a single audio file. Just click the capital “A” on the track and select “Flatten and Merge.”
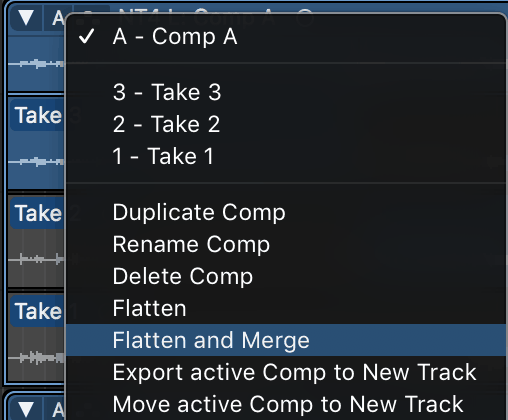
This’ll get rid of all the other takes you recorded, so make sure you’re happy with the way your track’s sounding!
Part 3: Editing Audio Tracks Logic Pro X
Once you’ve laid down some audio tracks, you may want to change them.
For example, you may decide that your guitar part sounds better in the chorus instead of the verse.
To separate one section of a recording from the rest of the region, set your playback head where you want to split it. It’s best to split regions in places where the audio is mostly silent.
Then, split the region by pressing command + T at the same time. Make sure the region you’re splitting is highlighted, otherwise Logic Pro won’t know what you’re trying to cut!
You can easily move a recording by clicking on it and dragging it to the left or right. Once you’ve cut out the section you want to move, drag it where you want it to go.
If the guitar part you’ve recorded only fills up half of the section it’s in, you don’t need to rerecord it. You can loop the part by clicking on the top right corner of the region and pulling it out to the right.

You can also shorten the length of the audio file. Click on the left or right ends of the region and pull it towards the middle of the region.
This can come in handy when you have some extra noise at the beginning or end of a recording that you want to get rid of.
The Inspector View
The Inspector View has some incredibly powerful options for editing your audio.
To get the most out of Inspector View, click on the arrow next to the word “Region.” This’ll show you a ton of editing options.
If you want to change the pitch of your sound, you can do so by dragging up or down on the “Transpose” option. Each number is a semitone, so if you want to make a recording a full step lower, you’d pull the transposition down to -2.
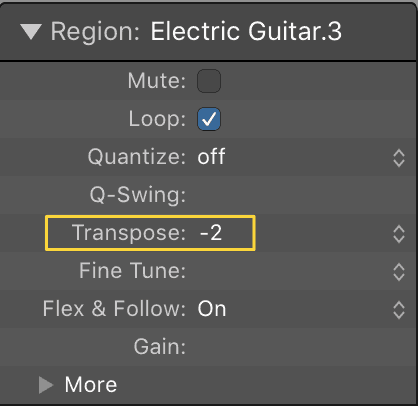
Usually I use this as an effect. Transposing audio typically makes the sound feel a little more digital.
This is also where you can add fades to your recordings.
Click the “More” button at the bottom of the list of region options. There you’ll find more tools, including fading in and fading out.
Adding Fades in Logic Pro X
Let’s say that guitar track we were talking about earlier has a gross buzz at the beginning. You’ll probably want to add a fade in at the beginning to cut out some of that buzz.
To do this, just click and drag up next to the words “Fade In.” The more you drag it up, the longer your fade will be.
If you decide the fade is too long, you can make it shorter by dragging the value down.

By default, the fade is linear. Usually this is fine, but sometimes you may want the fade to be less gradual.
By changing the curve (located just below the fade in section), you can make the sound fade in slowly or suddenly.
A negative curve will fade in most of the way at the beginning, taking a little more time to reach full volume.

A positive curve will be silent for most of the fade and will reach full volume quickly once it does fade in.

If your fade is the right length, but doesn’t quite sound right, try changing its curve.
All this info is exactly the same for fading out. Just move down to the “Fade Out” section and apply your fade there.
If you’re splicing two audio regions together, you’ll want to apply a crossfade. A crossfade will fade out the audio clip on the left at the same time as it fades in the clip on the right.
Without a crossfade, you’ll hear a nasty pop where the two audio regions meet.
To add a crossfade, highlight the regions you want to combine. Then click on the “Type” button under the Inspector View’s Fade Out.
There are a few different crossfading options. I usually stick with the equal power crossfade.
Then just drag the Fade Out up, and you’ll see a fade applied to both the audio regions you’ve selected.

If you want to learn more about how you can get the most out of fading, check out this article.
Bonus Tip: Adjusting the Waveform View
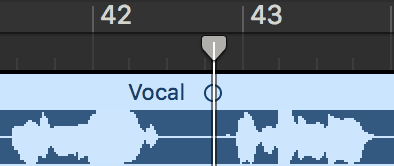
In the upper right-hand corner of Logic Pro, you’ll see a blue button with the image of a waveform in it.
By clicking and holding this button, you can drag a slider up and down. This will change the size of the audio waveforms in your project.
This really comes in handy while editing. If one phrase of a vocal part is slightly behind the beat, you can easily see where the singer starts and stops singing.
That way you can split the region without cutting off any important audio!
Part 4: Mixing Audio Tracks Logic Pro X
Now that you’ve recorded and edited some tracks, it’s time to start thinking about effects.
I’ve got a session pulled up in front of me that’s sounding all right. The electric guitar is having some trouble cutting through the rest of the noise.
To help it shine, I want to add some distortion and EQ.
First, open the Mix View by pressing command + 2. Here’s what the Mix View looks like:
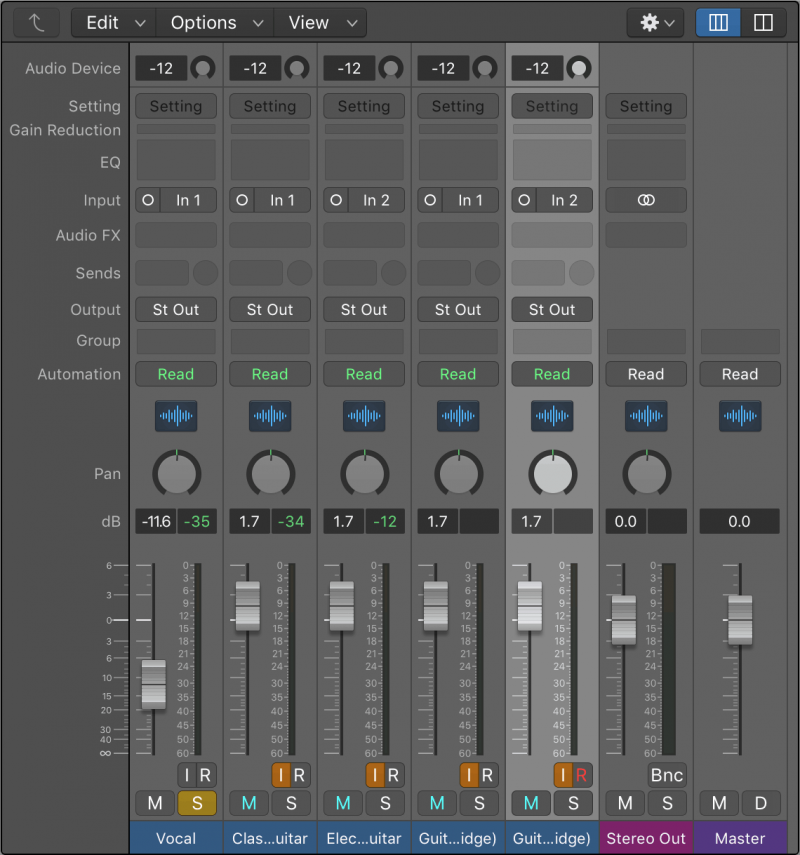
It looks like a lot at first but isn’t as complicated as you might think. Each of these vertical sections is a track, and each track has the same mixing options.
You’re really just learning a few things that apply to every track.
For now, we’re just going to cover the basics of how Logic Pro’s mixing interface works. We have tons of articles designed to help you hone your mixing chops.
If you want to get the most out of mixing, be sure to check out some other articles and videos from Musician on a Mission. I recommend starting here.
First off, let’s check out the bottom of a channel. Here you’ll find your track name, solo and mute buttons, as well as the channel’s fader.
To rename a track, just double click the current name and type in a new one.
As you might expect, pulling the channel fader up or down will increase or decrease the volume. In my case, I’m going to turn the guitar track up so it’s more noticeable.
Right above the volume fader is a pan knob. By moving this knob all the way to the left, we’ll only hear it out of the left speaker. Pulling it all the way to the right will make it only audible from the right.
I’m going to place this guitar part midway between the middle and the far right. That way it isn’t fighting with the vocal for attention.
Now that the volume and panning are where I want them, let’s add an EQ to the guitar.
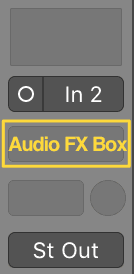
To put Logic Pro’s stock EQ to the track, click on the channel’s Audio FX box. This’ll open a list of different plugins you can use.
You can find the EQ plugin in the EQ section.
This guitar is sounding kind of muddy and isn’t cutting through. To help with that, I’m going to take out some of the low frequencies and add presence to the upper mids.
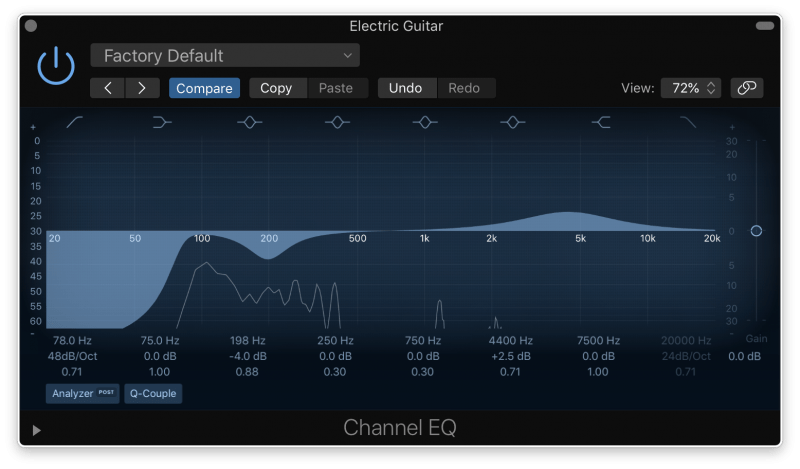
Need more tips on EQing? Check out this tutorial on EQing different instruments and this list of common EQ mistakes.
The EQ sounds all right, but I still want to make the guitar a little crunchier. By clicking below the blue box that opens up the EQ, you’ll see a dropdown list of different mixing plugins you can use.
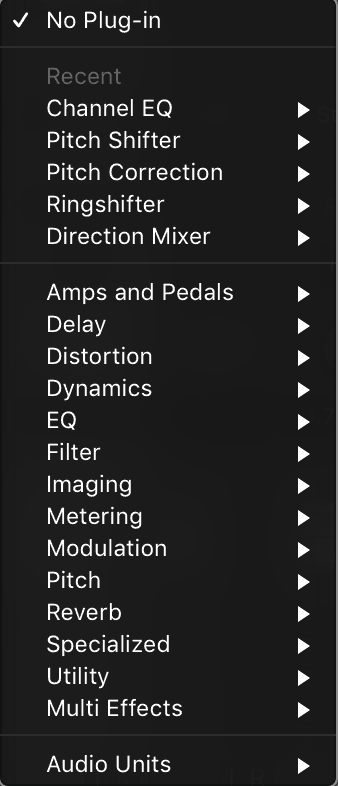
Logic Pro comes with a ton of stock plugins that are really great.
I’ve picked out the “Bright Funky Crunch” preset from Logic Pro’s Clip Distortion plugin for this track.
I’m happy with how this guitar sounds, but it feels too close to the listener. To push the guitar back in the mix, I’m going to add some reverb.
But instead of putting a reverb directly on this channel, I’m going to use a send.
Sends and Aux Tracks
Sends do exactly what they sound like. They send a copy of the audio from one channel to another.
Sends are great when you want to put the same effect on multiple instruments.
To create a send, click on the box below the plugin box. This’ll pull up a list of buses that you can send the audio to.
Clicking on an empty bus creates a new aux track for you to put effects on. Aux tracks are a lot like audio tracks, but you can’t record onto them.
Since I want to put some reverb on this guitar, I’m going to put the Space Designer plugin on my aux track.
Make sure you turn up the output from your send. If you don’t do this, you won’t actually send any sound to your aux track.
To do this, click and drag the circle next to the send. That’s the knob that increases the volume of the output of your send. The greener the circle, the louder the send.
I like the reverb I’ve put on this guitar, but it’s a bit too much. To make it less abrasive, I’ve turned down the volume of the aux channel.
If you want to make an aux effect more subtle, you can turn the fader of the aux channel down.
Part 5: Using the Stereo Output Channel
As you look at your various channels, you’ll notice one called the Stereo Output.
By default, all channels have this set as their output. Anything you do to this channel will affect how your entire song sounds.
If your entire mix is too quiet, you can turn it up here.
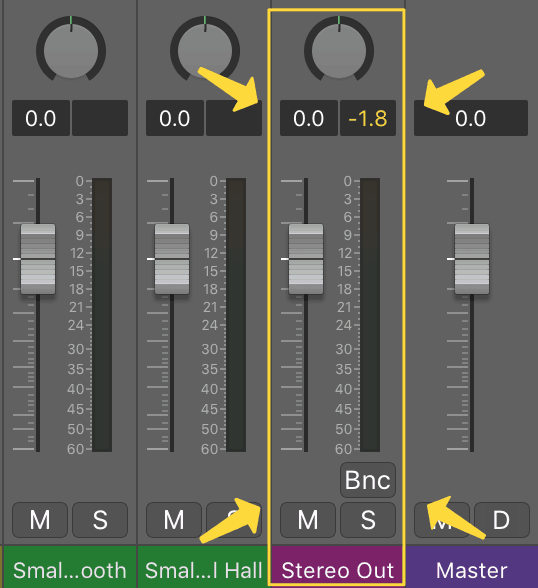
Also, you can add plugins that will affect the entire mix. For example, if the entire song needs to sound darker, cut some of the high frequencies using an EQ on this channel.
Be careful with what you put here, though. If you make a bad mix decision on the Stereo Output, your entire song mix is going to suffer.
Part 6: Recording MIDI
To create a MIDI track, click that “+” button we used earlier. This time, instead of clicking on “Audio,” select “Software Instrument.”
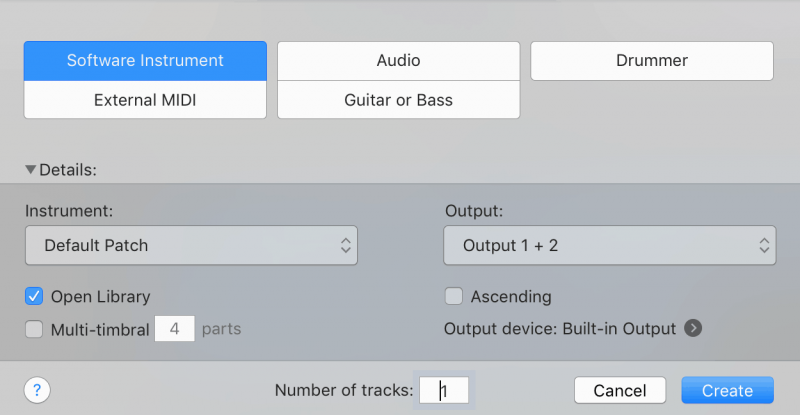
Under “Instrument.” you can choose what kind of instrument you want to use. For now, just open one of the default instrument patches.
Audio engineers insist on having a fancy word for everything. Patches are the MIDI version of plugin presets.
Don’t let the jargon scare you off! It’s confusing, but after a while it’ll become second nature.
You’ll see that you have all the same volume and panning functions as an audio channel. You’ll also need to record enable MIDI tracks before recording with them.
The default patch is a nice electric piano, but what if we want to use something else? There are a couple ways you can change instruments.
The easiest is to open the sound library. Clicking the library button at the top left of the screen will show you a ton of different MIDI patches you can use.
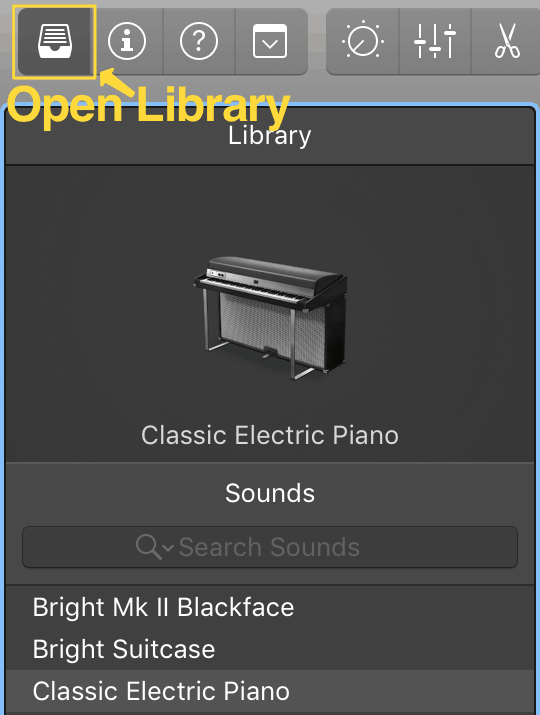
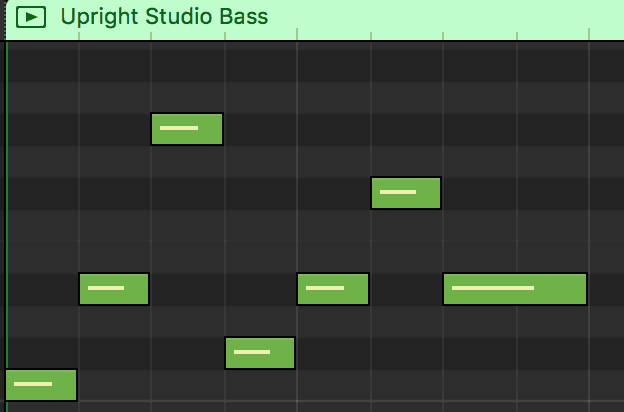
Let’s open a bass sound to play with.
Click on the category in the library view and open the Upright Studio Bass preset. I use this sound all the time when I want a jazzy upright bass.
Now you can lay down some bass parts!
If you don’t have a MIDI keyboard to record with, hit command + K on your computer’s keyboard. This opens Musical Typing, which’ll let you play the part on your computer keyboard.
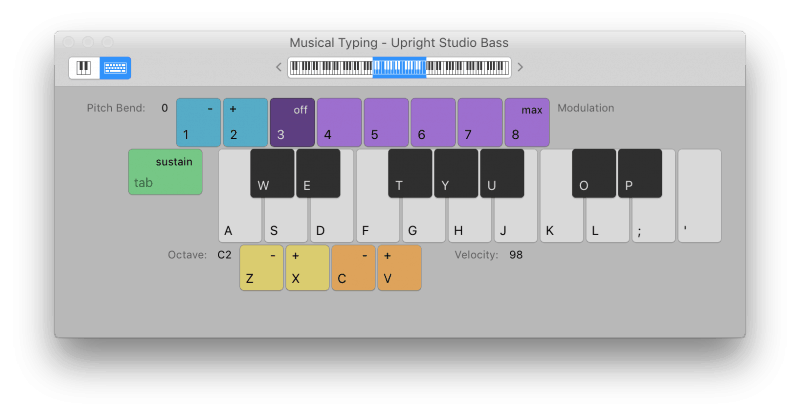
I travel a lot, so I use Musical Typing all the time to jot ideas down while I’m on the road.
By default, Musical Typing records all the notes at the same velocity. You’ll need to manually edit the velocities so the part doesn’t sound robotic.
But once you get used to writing with Musical Typing, it’s honestly a great way to throw ideas down quickly.
If you’d rather add MIDI notes in by hand, click on the scissors button in the main transport. This opens the MIDI editor window.
Part 7: Using the MIDI Editor Window
This is the MIDI Editor Window. By default, it shows the Piano Roll, but you can also look at the Score and Step Editor if you prefer to notate with those.
If you want to do any MIDI editing, this is where you’ll usually do it. Here you can add in MIDI notes by hand.
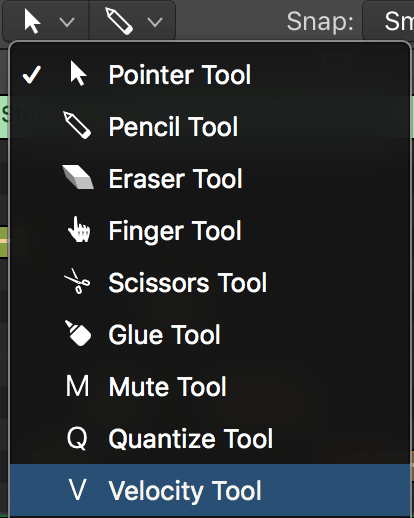
By clicking on the image of a cursor in the editor window (or hitting T on your keyboard), you can select the pencil and eraser tools. These’ll let you add and delete notes.
The brush tool is handy if you want to add a lot of short notes in quick succession.
When the pointer tool is selected, you can move notes around by dragging them up or down.
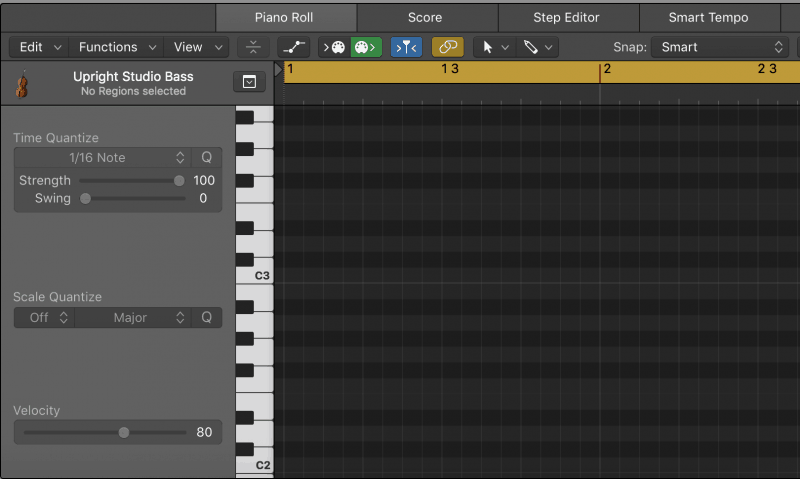
A huge part of MIDI editing is quantizing. Quantizing automatically time-aligns MIDI notes so you don’t have to spend forever dragging them into place.
Quantizing MIDI
If your MIDI notes are out of time, try quantizing them. Select all the notes you want to move and hit Q on your keyboard. When you do, watch the notes snap to the grid.

You can even change the subdivision you want to quantize at. With a part that changes notes quickly, you might want to set the subdivision to 1/32 Note. For a slow part, 1/8 Note might be better.
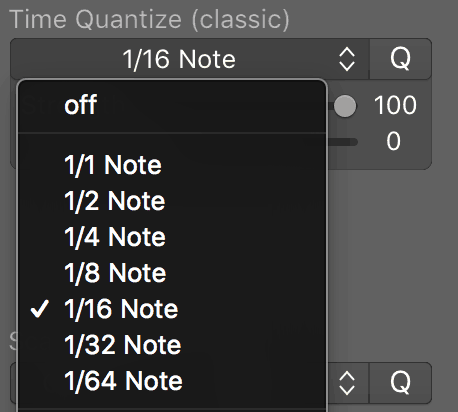
Setting the right note value will make sure your notes snap to the right part of the grid.
Part 8: Making MIDI Sound Realistic
MIDI is an incredible tool, but if you aren’t careful, your MIDI parts can end up sounding robotic.

Fortunately, there are a few tools we can use to make a MIDI instrument sound more like the real thing.
Quantization Strength
While quantization is great for tightening up a performance, it sounds a bit too flawless. After all, a human wouldn’t be able to play every note perfectly on beat. To make quantized MIDI sound more human, you’ll want to turn down the quantization “Strength.”
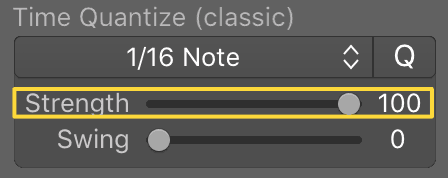
By default, the quantization Strength is set at 100. This means the MIDI notes are 100% on the beat. By turning the Strength down, the notes will still be mostly in time, but won’t be so robotic.
I usually set quantization Strength around 80. If I want a part to sound more loose, I’ll set it somewhere between 50 and 70.
Another crucial part of making realistic MIDI is velocity.
Changing the Velocity of MIDI Notes
Velocity is just a fancy music word for volume. The velocity of a MIDI note determines how loudly and how intensely the MIDI note is played.
The higher the velocity, the louder the note. When playing instruments, people naturally play each note at different velocities.
So to make a MIDI part sound more realistic, it’s super important that we vary the velocity.
There are a couple of different ways to change the velocity of MIDI notes. One is by opening the MIDI Automation Window.
With the Piano Roll selected, press A. You’ll see an automation window open at the bottom of the screen.
This window has a dropdown menu with a ton of things you can automate. For now, we’ll just focus on the “Note Velocity” option.
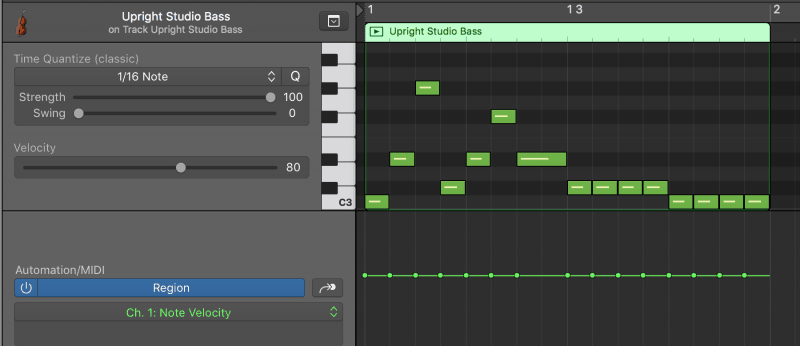
By clicking and dragging the green bars here, you can change the velocity of your MIDI notes. You can even draw crescendos and decrescendos by drawing a line moving up or down!
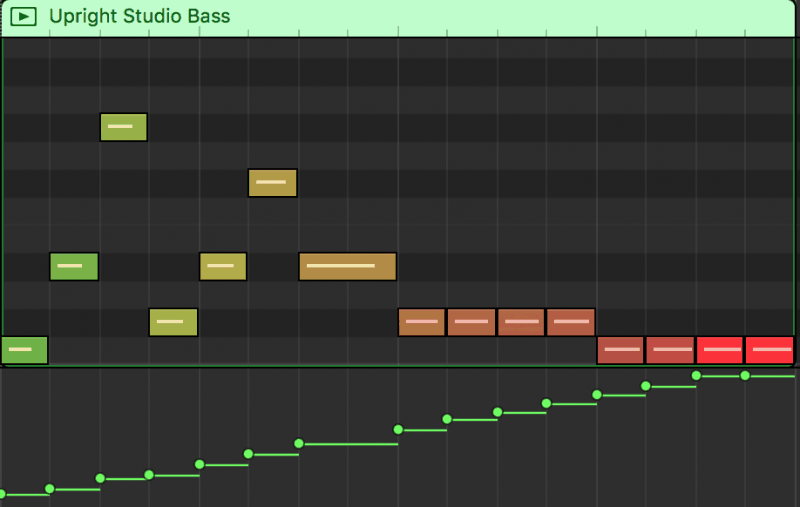
This is great for editing a lot of notes at once. If you just want to edit the velocity of a couple notes, select the “Velocity Tool” in the MIDI Editor.
With the Velocity Tool on, drag the note up to increase the velocity or down to decrease it.
Humanization
Humanization automatically makes small changes to the timing and velocity of MIDI notes. To quickly get a realistic sounding performance, humanize your MIDI.
Right click on the MIDI region you want to humanize and scroll down to the MIDI folder. Then go to the MIDI Transform folder and select “Humanize.”
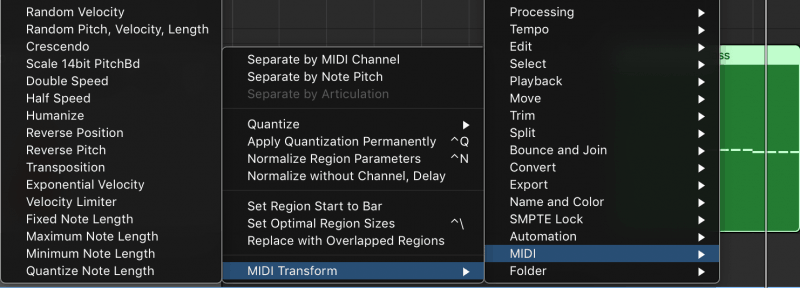
A window should open that looks like this:

By clicking “Select and Operate” at the bottom right, you’ll humanize your MIDI region.
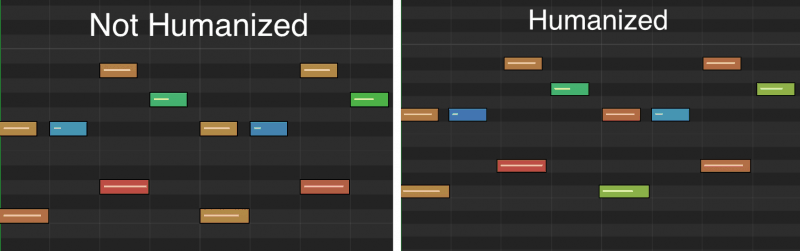
The difference is subtle, but it goes a long way.
Part 9: Quick and Easy Drums with Logic Pro’s Drummer
If writing drum parts isn’t your forte, Logic Pro’s Drummer is a great way to get a solid beat for your song in no time at all.
Logic Drummer is a rhythm instrument that comes with premade patterns you can use to spice your song up.
To create a Drummer track, hit the “+” button again and select the “Drummer” on the right.
Drummer is really powerful with plenty of flexibility. The first thing you’ll notice when you open Drummer is the drummer library.
Drummer comes with a bunch of different drummer profiles.
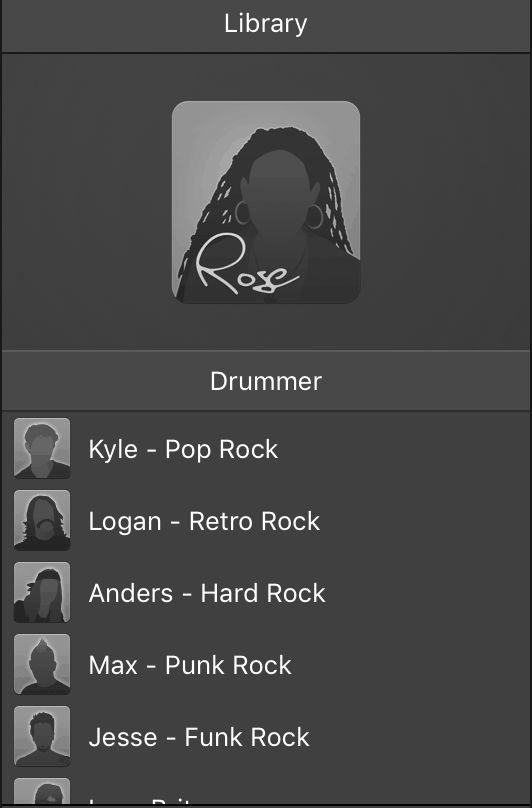
These drummers have personalities and styles. Like Rose who specializes in Modern R&B, or Aiden who plays Indie Pop.
Each drummer also has their own unique patterns. Rose’s patterns are tight and minimalistic, while Aiden’s rhythms are loose and busier. You can cycle through each drummer’s patterns by clicking on the different beat presets.
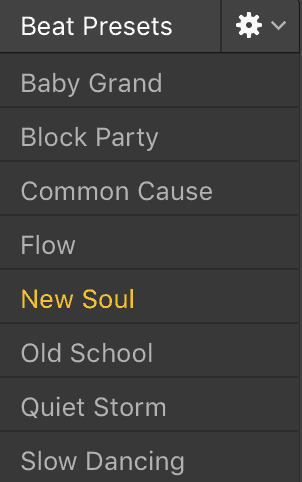
I’m a big fan of tight drum sounds, so I’ve chosen Rose as my drummer.
Once you’ve picked a drummer, you can change what kit they’re playing.
Right below the list of drummers is a list of drum kits. Listen through all of them and decide which one works for you.
By default, Rose uses the “Slow Jam” kit, but I want a drum kit with a boomier kick. After listening through a few options, I like how the “Roots” kit sounds.
(I also chose this kit because I’m in love with QuestLove. QuestLove, if you’re reading this, call me).
To the right of the beat patterns, you can change the dynamics and complexity of your pattern.
For a simple, quiet rhythm, move the yellow circle down and to the left. If you want a really bombastic part, pull the yellow circle up and to the right.
Making Your Drummer Track Feel More Lifelike
Drummer is a wonderful tool. But if you just keep looping the same pattern, it’ll become obvious that it’s not a real drummer.
Here are a few things you can do to make Drummer sound more like the real thing.
A real drummer won’t play the same pattern throughout the entire song. Using a different pattern for the verse than the chorus is a good way to push the song forward.
You can even make the first half of one section different from the second half. Imagine you have a verse that’s quiet and laid back for the first 8 bars but picks up steam for the second 8.
Press the yellow plus sign to the right of your pattern. This’ll copy the pattern over.

Highlight the 2nd pattern. Then move the yellow circle from the dynamics and complexity grid.
This’ll make a slightly different pattern play during the 2nd half of the verse, building energy.
You can also add occasional fills by turning up the “Fills” knob. Changing the fill knob from pattern to pattern will also add some nice variation to your drum part.
To get more out of Logic Pro’s Drummer, check out this tutorial that covers all of Drummer’s basic features.
UPDATE: Here’s a great tutorial on how to make a beat in Logic Pro X:
Part 10: Using Your Own Samples in Logic
Logic Pro X comes with a ton of great synths and samples for you to play around with. But sometimes you may want to use your own samples that you’ve recorded or downloaded from the internet.
And Logic’s 10.5 update has made sampling easier than ever!
Just open up a software instrument and select “Quick Sampler” from the instrument panel.
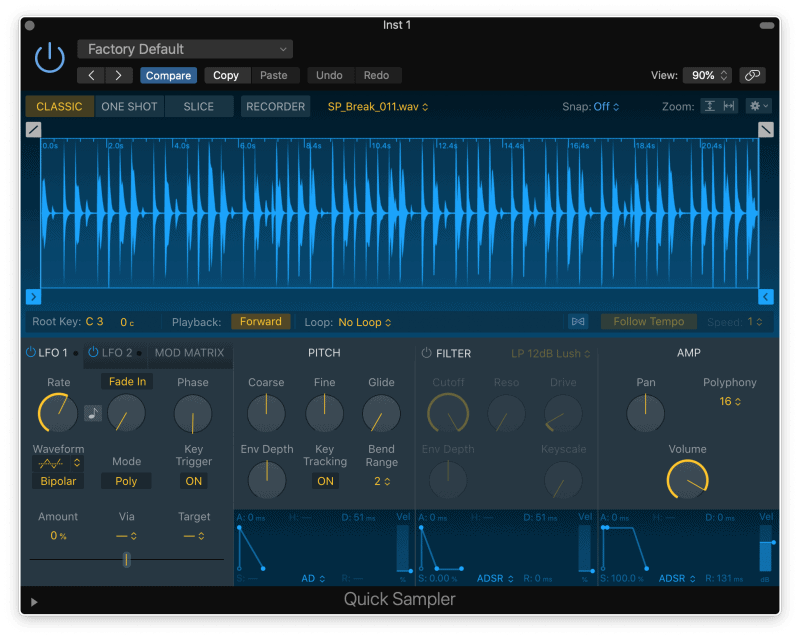
Quick Sampler lets you drag and drop samples right into it. It’ll automatically pitch the sample up and down. So if you load a keyboard sample in, you can play it back at different notes.
The “Slice” feature is also very handy. It automatically chops the sample up into bite sized chunks.

This makes it super easy to create your own beat out of a drum loop, or chop and screw some vocals.
Unlike Quick Sampler, the regular “Sampler” plugin will let you use multiple samples at once.
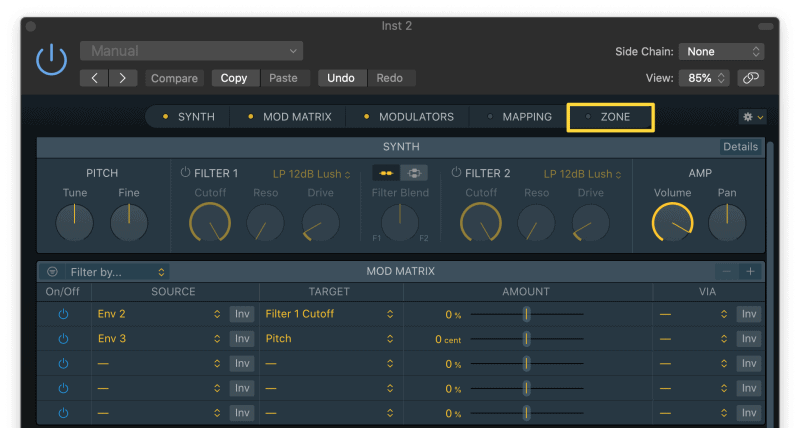
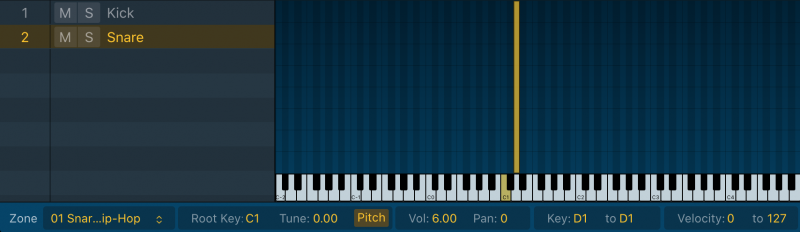
First, you’ll want to click on “Zone.”
Then, just drag and drop your sample into the zone window.
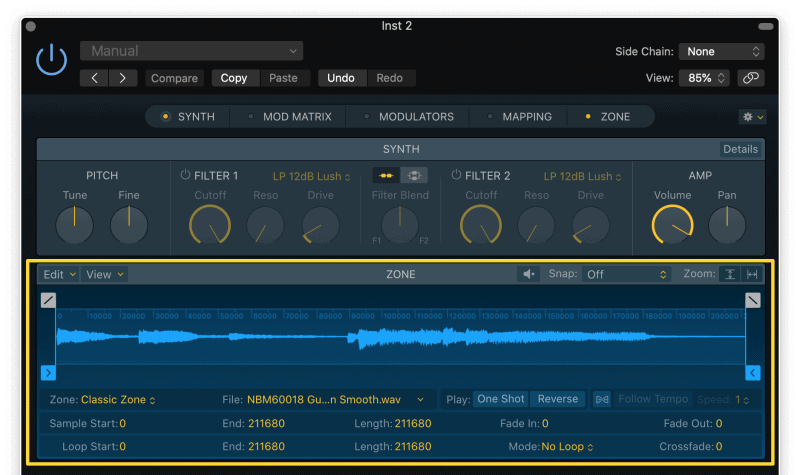
If you want to load multiple sounds into the sampler, you’ll need to map each sound to specific keys.
For example, say you load a kick and a snare. You’ll probably want the kick to trigger when you play C1 and the snare to trigger when you play D1.
Open up the “Mapping” menu. Drag and drop the samples in.
Then set the “Key” where you want it. In this case, I’ll make sure the Kick is set to C1 and the Snare is on D1.
I also recommend checking out everything else in Sampler.
Some of the presets are absolutely stellar. The solo clarinet is fire. I recommend looking through its entire library.
Part 11: Getting Creative with Apple Loops
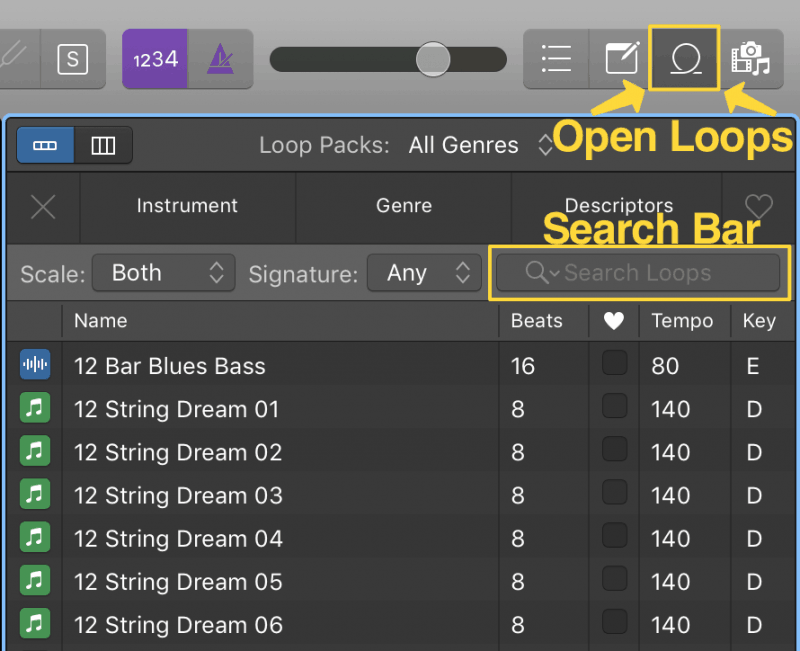
Another way to get great sounds quickly is by using Apple Loops.
Logic Pro comes loaded with a bunch of nice loops that automatically match your project’s tempo. Whether your song is 80 BPM or 140, Apple Loops will match the tempo seamlessly.
To check out these loops, click on the Loop Browser button in the top right. This’ll pop open a library of loops that you can use in any song.
If you’re looking for something in particular, just type it into the loops search bar.
Pro tip: the shakers in Apple Loops are top notch. Feel like your chorus needs some more energy? Throw a shaker loop on that bad boy and mix it in so you barely hear it. BAM. You’ve got an instant hit.
You can get extra creative by loading these loops into EXS24. Here you can change the filtering, envelopes, and LFO settings of the loop.
Mangle these settings enough, and you might end up with a completely new sound!
And that’s just the beginning!
Logic’s 10.5 update brought tons of exciting new features to the DAW. Take a look at all of the new ways to make music in Logic 10.5:
Conclusion: Logic Pro Tutorial
And there you have it! Everything you need to know to harness your creativity in Logic Pro X.
If you find yourself confused about any of Logic’s features, check back over the relevant section from this guide:
- Getting Comfortable with Logic Pro’s Visual Interface
- How to Record Audio Tracks
- Editing Audio Tracks
- Mixing Audio in the Mix View
- Logic Pro’s Stereo Output Channel
- Recording MIDI
- Editing MIDI
- Making MIDI Sound Realistic
- Using Logic Pro’s Drummer for Quick and Easy Drums
- Importing Your Own Samples into Logic Pro
- Getting Creative with Apple Loops
If you want to dig deeper into music production and learn what it actually takes to make mixes that sound pro… And you’re an intermediate or advanced producer… Be sure to check out the free masterclass: Enjoy!Next Steps


