


Punchy drums play a HUGE role in rock and metal music. But it’s easy to get overwhelmed when it comes to the mixing process.
That’s why I’m sharing my personal step-by-step system for mixing punchy drums. Follow this roadmap for a massive punchy drum mix every time.
But if you want to learn about punchy drums specifically, keep reading.
If It Sounds Right, It IS Right
When it comes to music production and mixing, there’s more than one way to skin a cat.
My method for mixing punchy drums certainly isn’t the only way, but if you want that modern, hard-hitting rock drum sound, it’s quick, easy, and just plain works.
Some of the techniques in this article may seem contrary to what you’ve done in the past or what you’ve read or learned elsewhere.
But let me ask you… how’s that been working for you so far? If you were satisfied with your drum mixes you probably wouldn’t be reading this article!

The point is, conventional mixing “rules” or “beliefs” could be what’s holding you back from getting the sound you want.
Don’t be afraid to try new things, experiment with new methods, and think outside the box.
Replacing Drums With Samples
The purists will hate me for this, but I stand by it 100%….
Drum replacement is the secret to quickly and easily getting that punchy sound we all know and love.
Should You Use Drum Samples?
I love replacing drums with samples. Why?
Firstly, the right drum samples already sound amazing and require very little processing, if any.
This is especially true for mixing badly recorded drums.
Why pull your hair out trying to wrangle a terrible-sounding drum with loads of EQ when you can just replace it and have a usable track INSTANTLY?

Secondly, how many times have you had to try to noise gate the hi-hat out of the snare mic?
Even when you get the settings “close enough” there’s always some kind of bleed that can only be handled with convoluted editing, multiband compression, or other techniques from the dark depths of YouTube.
Why not take the easy way? Choose a sample that resembles the original drum tone and voila! You’ve got a cleanly isolated track with zero bleed.
Thirdly, instead of carving out EQ pocket after EQ pocket to get all the instruments playing nicely with one another, drum replacement allows you the flexibility of choosing the right sound to begin with.
If a kick drum isn’t working with the bass? You can try a different kick sound. If the toms don’t cut through the guitars? Replace them with toms that DO. Easy peasy.
Is Drum Replacement Cheating?
Purists might tell you drum replacement is cheating. They’ll say, “you should get it right at the source and you won’t have to work so hard in the mixing process”.
But what if you don’t have control over the recording process? What if you’ve received unusable tracks from a client? Or what if you’re like me and you’d rather just simplify the process and get to the intended sound as quickly and efficiently as possible?

Bottom line, drum replacement is NOT cheating, it’s an art. And don’t let anyone tell you otherwise. Ultimately, they’ll be the ones asking YOU how you got your drums to sound so incredibly massive and bombastic in the mix.
How To Use Drum Samples
First, get an initial balance of your entire mix using nothing but faders and panning. Then do your drum replacement.
When I’m choosing drum samples, I like to keep a few things in mind:
First, I like to choose a kick that sits well with everything else in the mix. That means listening to the full mix (all the instruments) and choosing a sound IN CONTEXT.
Listen to the low-end first. For example, if the bass sits a little deeper on the frequency spectrum (maybe around the 60hz range) then I’ll choose a kick that isn’t as deep.
This is a principle called range allocation which you can learn more about in this video:
Then, I listen to what’s going on in the higher range of the frequency spectrum. Is the attack of the kick cutting through the guitars? How does it sit with the vocals? Is it too clicky, or not clicky enough? Engineer’s choice.
The main point here is to choose your drum replacement in context.
Now, I approach snare and toms a little differently. I like to use samples that are similar to the tone of the originally recorded drum. That way it’s similar to what the drummer and the recording engineer originally intended.
I don’t like to stray too far from the original tone, but if it just doesn’t fit in context for whatever reason (not cutting through, fighting with other instruments, sounds annoying, etc.) I’ll opt for a different sample entirely.
That’s the beauty of drum replacement. Mixing is a game of Tetris, and if a piece doesn’t fit, you can easily swap it out for one that DOES.

QUICK TIP: You only need one track to trigger a sample. For example, if you’ve got a track for the top of the snare and one for the bottom, you can delete the snare bottom and just replace the snare top. Same goes for multiple kick mics inside and outside the drum. “Kick In” tracks usually have harder transients which is better for triggering your samples.
What Is The Best Drum Sample Replacement Plugin?
Some DAWs have drum replacement functionality. You’ll have to do some research to see how it works in your DAW specifically, but here’s how to do it with the stock sounds inside Logic Pro X:
If you’ve got some money to invest, a third party plugin is the way to go. The samples are the highest quality and they’re easy to dial in.
There is no “best plugin” per say, but here are my top picks from companies I trust:
- Trigger 2 by Steven Slate Drums (Jake’s pick)
- Addictive Trigger by XLN
- Drumagog 5 by Wavemachine Labs
- Superior Drummer 3 by Toontrack
Mix Prep For Drums
Now that samples are sorted, it’s time to prep the drums for mixing.
How To Pan Toms And Cymbals
Kick and snare are easy, they can just get panned straight up the middle. But toms and cymbals should follow the overheads.
Start by bringing up the overheads and panning them hard left and hard right. You can pan them narrower if you want, but I just think they sound bigger and wider panned 100% to either side. Same with room mics.
From there, you’ll have a good idea of where the toms and cymbals should be panned. Mute them and unmute them a few times to make sure they line up with the stereo image of the overheads.
How To Set Drum Levels
As a general rule of thumb, I like to keep the shells (kick, snare, and toms) hitting the same level on the meters.
For example, if my kick hits consistently around -9db, then that’s where I want my snare and toms to sit as well.
Cymbals can be a bit trickier. I start with the overheads, and usually bring up the level to where they are much quieter than the shells.
For example, in my last mix I had my shells hitting at -12db and my overheads averaging at -24db. Feel free to use this as a starting point, but there are no hard and fast rules here…
Some engineers like louder cymbals, some like them to sit back a bit more in the mix. Use your reference tracks to help guide you. Here’s how:
After you’ve settled on a level for your overheads, you can blend in any close-miked cymbals to taste.
Next, I bring in the room mics. There should be a nice amount of space and depth without overtaking the overheads and the rest of the instrumentation (guitars and bass).
QUICK TIP: Don’t ignore the room mics! This is where a ton of energy and excitement will come from when we apply processing to them later.
Mixing Rock Drums
Now that the drums are prepped and ready for mixing, I like to start by making sure the shells are punchy, fat, and slamming!
My thought process for mixing rock drums goes something like this:
- Clean – Subtractive EQ or other processing as needed to “tighten up” the sound. If you’ve chosen the right samples, you shouldn’t have to do much of this, if any.
- Punch – Compression for more… well… punch!
Once I’m done dialing in these attributes drum-by-drum, I’ll apply some limiting or clipping for fatness and consistency, followed by additive EQ as needed to get the drums to cut through the mix.
But we’ll get to that in a bit. First things first…
How To Make The Kick Drum More Punchy
If you’ve replaced your kick like we talked about, don’t be surprised if you don’t have to mess with it’s frequencies.
The right sample shouldn’t NEED any subtractive EQ… that’s why we use drum replacement in the first place!
Are there times when I might cut a bit of 400hz if the kick is too boxy or 50hz if it’s too boomy? Sure, but VERY rarely. If it’s too boomy, try a different sample. Too boxy? Try a different sample. Too much click? Well… you get the idea.
The point is, sample selection is key. In my experience, it pretty much alleviates the need to do a bunch of heavy lifting with EQ.
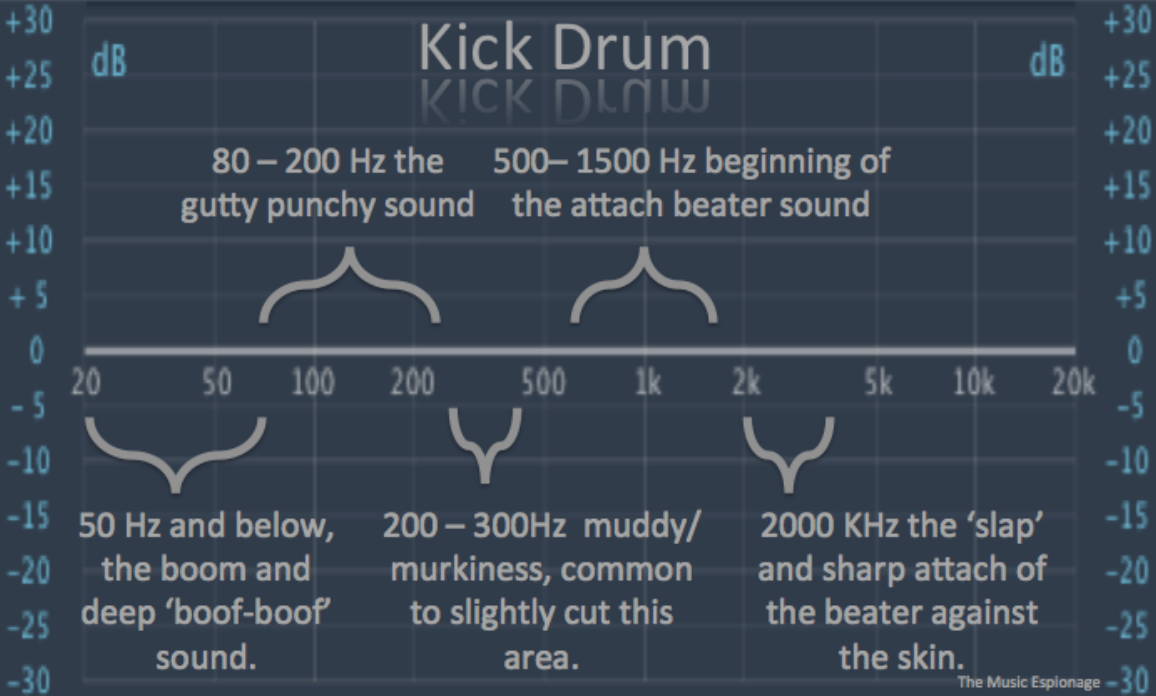
That being said, it’s still important to know which frequency ranges to watch out for. Check out this kick drum eq cheat sheet for an overview:
So with subtractive EQ out of the way, we can start thinking about how punchy we want our kick to be.
Again, the right sample should already BE punchy. This is just to KICK it up a notch. (Ha! See what I did there?)
I like to start with a VCA compressor with the following settings:
- Slowest attack
- Fastest release
- 6:1 ratio
The slow attack allows the initial hit (the ‘transient’) to pass through before turning down the tail end of the drum. This makes for a really up-front and in-your-face impact.
The fast release allows the compressor to deactivate quickly, which keeps quick double-kick hits from getting mushy and makes for a more aggressive kind of sound.
I like to start with a 6:1 ratio, then adjust the threshold until I get at least 5db of gain reduction. Sometimes I end up with more, but I think 5-7db is a good starting point.
Then I’ll adjust the makeup gain and bypass the plugin a few times to make sure my compressed signal is level matched with the uncompressed signal.
Next, I’ll play with different ratios to see how it affects the sound. I like to think of the ratio as an “intensity” knob. It’s not uncommon for me to end up with ratios as high as 10:1. It depends on how intensely I want the drum to punch.
Once I’m satisfied with the impact the kick is making, it’s time to move on to the snare.
How To Get A Punchy Snare Sound
Snare processing is pretty similar to the kick. Very little subtractive EQ, maybe just a high-pass filter to clean up any unwanted low-end rumble, but that’s typically it. Again, the right sample shouldn’t need much adjustment, if anything at all.
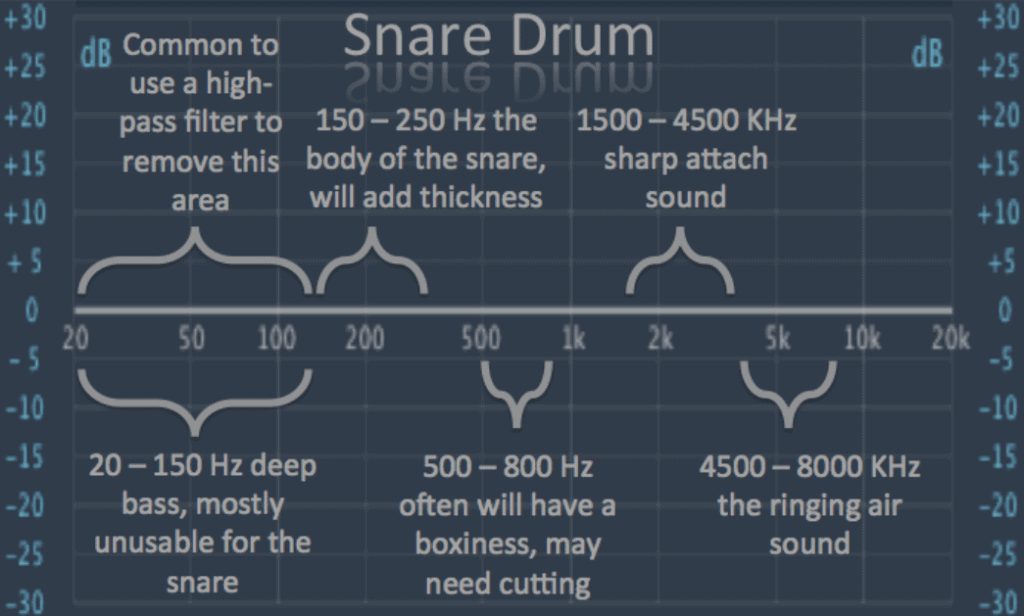
Again, here’s a snare EQ cheat sheet just in case:
Next, I’ll just copy over the compression settings that were used for the kick. From there, you can make adjustments to taste, but I’ve found that the same settings make me happy most of the time. No need to overcomplicate it.
QUICK TIP: One thing I WILL say about snare compression is the faster the attack time, the fatter the snare will sound. Again, I mostly just stick with the slowest attack, but it’s worth experimenting to see what you prefer.
How To Get Punchy Toms
Toms can be tricky, even when you’re working with samples.
I like to think about tom tone in terms of three things:
- Rumble
- Boxiness
- Ring
Let’s break it down…
First, there’s the matter of low-end. Even sampled toms tend to rumble, so filtering can really help tighten things up.
Find the fundamental on the frequency spectrum (usually the highest peak in the low end) and filter out everything just below it.
Then, if you want a tighter, more “scooped”-sounding tone, you can remove the boxiness.
You know that fundamental frequency you just found? Apply a cut on the OPPOSITE side to see how it affects the tone. Use a moderately narrow band so you don’t scoop out too many frequencies on either side.
For these clean-up EQ moves, start with the highest tom and repeat the process for each of the others. Keep in mind that every tom is a different note and will have a different fundamental frequency, so you can’t just copy over the same settings for each one.
Next, let’s talk about tom ring. It can sound great, or it can suck. It’s all up to you as the engineer to decide how much is acceptable for your track.
Most of the time, I just let the toms ring out. But sometimes, it just doesn’t sit well in the track or it distracts from something more important.
If tom ring is bumming you out, try throwing a noise gate on the track to control the tail-end of the signal. Adjust your threshold, release, and hold settings to minimize or eliminate the ring altogether.
NOW we can move on to creating more punch with compression.
Same idea as before, I’ll just copy over the compression settings that were used for the snare. They tend to work as-is most of the time, but I’ll adjust as needed to get them slamming as hard as the snare does.
How To Make Drums Sound Fatter
Clipping or limiting can be a phenomenal way to fatten up your drums, with an added benefit of keeping dynamics under control.
Limiters are a pretty widely used audio tool, but clippers are less common. Just in case you’re not familiar, you can check out this video outlining the primary differences between the two:
In my opinion, limiting and clipping are the most under-utilized tools in the mixing process. But that’s an article for another day… for now let’s just stick to how you can apply them in the context of mixing drums.
After cleaning and enhancing the punch of the shells, I like to brickwall limit or clip each one. This makes for a fat and controlled sound that maintains its punch and sits perfectly in the mix.
I suggest experimenting with both limiting and clipping, to see which you like best.
I personally prefer using a clipper, because it tends to sound more aggressive. If you push it too hard you’ll get distortion, but if you dial it back from that point where the drum just BARELY distorts, it can have a cool effect.
Every DAW comes with a limiter, but you may not have access to a clipper. So if you’re interested, I put together a list of options you may want to check out:
- JST Clip by Joey Sturgis Tones (Jake’s pick)
- DF-Clip by Drumforge
- Little Clipper by Boz Digital Labs
- Buzz Cut by GMH Audio (free)
How to Make Drums Cut Through The Mix
At this point we’ve got our shells sounding punchy and fat, and they actually might already be perfectly-seated in the mix!
But in the case that they need to cut through a little more, some additive EQ can help.
Check out this video for some best EQ advice and practices:
QUICK TIP: Be careful not to go overboard with boosting! I know I’m repeating myself at this point, but if you’ve chosen the right samples, you won’t need massive amounts of EQ. Keep it simple. A strategic 2db boost at 7k may be all it takes for that snare to cut through. Use your reference tracks to help keep you in line.
How To Mix Cymbals
Now that the shells are taken care of, it’s time to move on to the cymbals. I like a more natural, open sound, so I take a less-is-more approach here.
First, to save time and keep things simple, I route all overheads, hi-hats, and close-miked cymbals to a stereo bus labelled “CYMBALS”, and I process them from there.
How Do You EQ Overheads, Hi-hats, and Cymbals?
I always start off by adding an EQ to the cymbal bus and aggressively filtering out the lows to keep things nice and tight, sometimes as high as 500hz.
The goal here is to remove any low-end bleed from the shells without affecting the tone of the cymbals.
Next, if I hear any kind of harshness or resonances that are obvious and distracting, I’ll go through and cut them.
I used to use the boost-and-sweep technique to locate these annoying frequencies, but these days I just use a plugin called Soothe2 by Oeksound that automatically detects and cuts them for you. It has definitely sped up my workflow. Check it out:
Then, if you’re still getting some boxiness from the drum bleed, sometimes an additional cut in the midrange can help.
Everyone’s overheads will sound different, so there’s no one-size-fits-all cut-point here. You’ll just have to sweep around to find the range that removes the shell bleed without cutting too much of the overall cymbal tone.
Finally, if you need to add a little high-end sparkle, boosting a high-shelf around 7 or 8k usually does the trick. Just be careful not to go overboard… keep an ear on your references!
How Do You Compress Cymbals?
I compress cymbals differently than most… I don’t!
You COULD add some fast-attack compression to help tame the peaks or enhance sustain, but I’m typically happy with natural and uncompressed cymbals. Mainly because of how I treat my room mics…
How To Mix Room Mics
Room mic processing plays a huge factor in how exciting and energetic your drums sound. Let’s break it down:
How To EQ Room Mics
I don’t like lows or highs in my room mics. I figure the kick (and to some extent the other shells) take up the low-end, and the cymbals can shimmer away in the high-end.
Therefore, let’s keep things tight and clean those areas out of the room mics altogether with some filtering.
I’ll high-pass pretty aggressively depending on how much low-end there is in the track, sometimes all the way up to 500hz. Then, I’ll low-pass to taste, sometimes all the way down to 5k if there’s a lot of high-end competing with the cymbals.
QUICK TIP: Filtering from both ends like this can help clear out space for reverb as well. It’s often referred to as the Abbey Road Reverb trick… check out this video to learn more:
How To Compress Room Mics
Aggressive compression is the name of the game. Smashing the room mics really brings out the energy, thickness, and power of the drums.
We’re talking high ratios (10:1 or higher) with at least 7-10db of gain reduction, fast attack, and fast release. Use a limiter if you have to. The smashier and squashier the better.
Remember, the goal is to really bring out the sustain and energy of the room… not the impact of the drums. Combine the sustain of the room mics with the impact of the shells for a massive punch in the face!
How To Make Drums Sound Bigger
If you want to take things to the next level, you can add some space and width to your shells by adding some reverb.
Reverbs with shorter decay times work best. Rooms, plates, even short halls can sound great, but my absolute favorite is chamber reverb.
You can set it up using auxes, busses, and sends if you want. Or, you can just add it to each track individually. Both ways work, it just depends on how you want to organize things. Engineer’s choice!
QUICK TIP: Lots of reverb on a kick drum can sound cluttered and weird. To keep things nice and tight, I like to leave the kick dry or add very subtle amounts of reverb.
Drum Bus Processing
Now that the individual tracks are processed, we can route them all to a stereo aux and label it “DRUM BUS”.
From here, you can process the entire kit as a whole.
Drum Bus Compression
I like to start with some aggressive yet subtle compression to glue everything together. Allow me to explain.
First, I’ll completely smash the drum bus with compression the same way we did for our overheads: high ratio, high gain reduction, fast attack, fast release.
Then, I’ll use the mix knob on the compressor to gently blend in the compression to taste. It just helps add a touch of extra thickness and energy to the kit.
Should I Use Parallel Compression on Drums?
By using a compressor with a mix knob, we technically HAVE used parallel compression on the drums.
You can absolutely use parallel compression (a.k.a. New York style compression) the traditional way with an aux, bus, and a send. I just prefer a compressor with a mix knob directly on the track to keep from cluttering up the mix window. Engineer’s choice.
There are also some other advantages to using parallel compression which you can check out in this video:
Drum Bus Saturation
If you’re feeling frisky, you can take things to the next level with some saturation directly on the drum bus.
I like to approach saturation in parallel-style as well, adding a saturator with a mix knob directly on the bus.
I’ll dial in disgustingly aggressive settings, then dial the mix knob way back. This does a few things…
- It adds some grit and character to the drums
- It creates a little bit more energy and character
- It naturally compresses the signal offering more dynamic control
Should I Put a Limiter on my Drum Bus?
A limiter or clipper on the drum bus is a great way to put a “ceiling” on the signal to keep the dynamics on a tight leash.
Since adding saturation can naturally do this for you, I typically don’t add limiting or clipping on the drum bus.
However, if you decide against saturation because you want a cleaner sound, you might consider adding a limiter or a clipper to keep things controlled and consistent.
Summary
So there you have it, my complete method for mixing punchy drums for rock and metal.
Here’s the short and sweet version, step-by-step:
- Replace the shells
- Level balance and pan
- Subtractive EQ > punchy compression > Clip/Limit each shell
- Additive EQ for each shell as needed
- Cymbal EQ
- Smash the room mics
- Chamber reverb on snare and toms
- Glue compression > Saturation on the drum bus
Does it work? Yep. Over and over. Give it a shot and thank me later :)


