


Vocals are the most important part of your mix. If you don’t nail it, your songs will always feel amateur. To learn more about how to write a song click here.
In this article, you’ll learn the secrets to creating radio-ready vocals.
Get industry-quality every time (steal this framework)
I’m guessing you’re here because you want to make your mixes sound professional.
We put together a brief training that covers a totally new approach to music production. Until now, everyone has been teaching production totally backward.
Just click below to watch.
But if you just want to learn about vocals specifically, keep reading.
Step 1: Get A Great Recording
You NEED a good recording if you ever want to produce a good mix.

The quality is decided in the recording phase. A good vocal is 80% recording and 20% mixing.
Spend plenty of time preparing to record. Try out a few different microphones if you can. We like SHURE SM57
Then, experiment with the distance and height of the mic until you find the right tone.
Don’t skimp on this part.
You can learn more in my definitive guide to recording vocals.
Step 2: Editing
Once you have an awesome recording, it’s time to edit.
I recommend editing the best parts of several different takes together to create the perfect performance.
This may seem fake or over the top, but it’s totally normal. Some pop songs will use a different take for every word. You don’t need to go that far, though.
Of course, if you want to maintain the original performance, that’s fine too – you can skip this.
Once you’re happy with your comp, it’s time to go through and check for any clicks or pops.
Sometimes editing can create clicks at your edit points. If this happens, add a short crossfade between the clips. Somewhere between 5 – 15 ms.

If there’s any background noise between phrases, you can simply cut this out.
Some people like to cut out the breaths, but I think this completely ruins the emotion of the performance. My advice is to leave the breaths in.
You can also go through and fix any timing issues. If a phrase comes in a little early or late – move it into place.
Apply Subtle Pitch Correction
Even after choosing the best take for each phrase or section, there can still be imperfections.
Imperfections aren’t always a bad thing – sometimes they add raw emotion and energy.
But other times you’ll need to use pitch correction to fix a rough note.
Tools like Melodyne and Antares Auto-Tune make it easy to add pitch correction that is subtle and unnoticeable.
When using these tools, I highly recommend that you go through and manually correct any rough notes, rather than using automatic pitch correction.
This may take more time, but the end result will way more musical.
To learn more about pitch correction, watch this video:
Step 3: Gain Automation (The Secret Sauce)
A singer can go from a whisper to a shout in seconds. Compared to other instrument, vocals have a huge dynamic range.
But modern production requires consistency. Every word needs to be intelligible and loud.
This is usually done with a combination of volume fader automation and compression.
You can turn the volume up and down by ‘riding the fader’ with live automation, or by drawing in lane automation in your DAW like Logic Pro X

I want to show you a better option… gain automation.
If you automate the gain at the BEGINNING of the channel, the level going into your compressor will always be consistent.
This’ll help you avoid over-compression.
Go through and adjust the gain of the gain so that all of the phrases are a similar level. Take a look at your channel meter and try to make it sit around -18dBFS (this is the gain sweet spot).
The idea here is to do all the heavy lifting with gain automation. Then you can use subtle compression to level out the volume even more but in a more subtle way.
Here’s a complete breakdown:
Step 4: Prepare the Session
At this point, I recommend bouncing the vocal down to a new channel. By committing to your edit, you’ll avoid constant tweaking.
Label and organize all your tracks.
Working With Different Genres
Depending on the genre, you may want to go for a different tone.

Here’s a brief overview of how to mix these different genres:
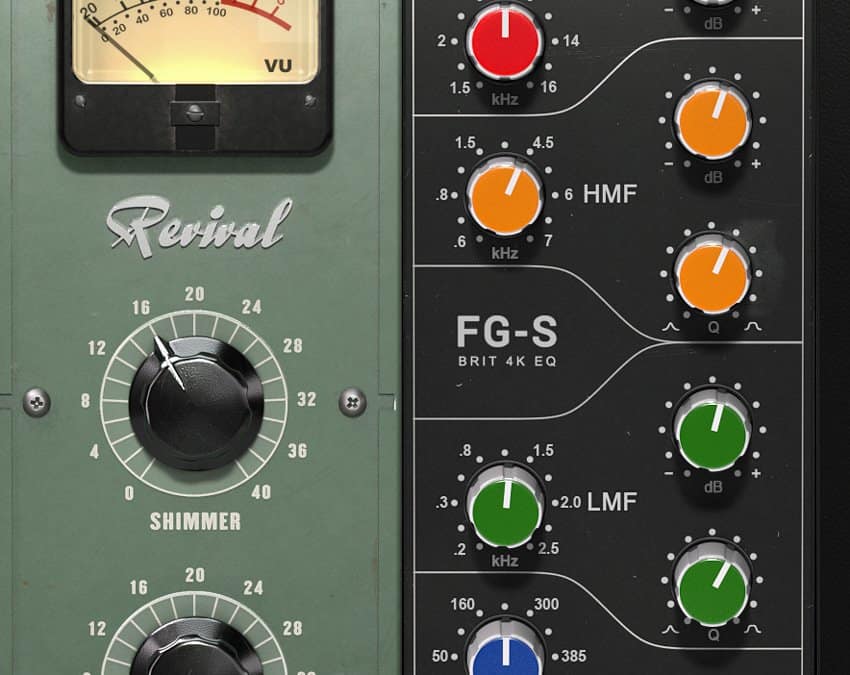
- Pop, R’n’B, Electronic music: In general, these genres are heavily processed. Lots of top-end shimmer, noticeable effects, and highly consistent dynamics are the norm.
- Hip Hop: Similar to Pop, but with less effects and less top-end. More presence and aggression in the upper mids. (Though the most mainstream of Hip Hop often has top-end shimmer more akin to Pop).
- Rock: Less top-end, more body and high mids. The vocal can sit a bit further back.
- Jazz: Approach with subtlety and taste. Avoid obvious processing and leave the dynamics mostly intact.
- Hardcore/Metal: Heavy compression (several rounds of 6-10dB gain reduction can be warranted) for an aggressive tone. Less low end, more body and high mids.
Never use effects for no reason.
Consider the style. You want your choices to compliment the genre.
You can learn more about using compression in different genres in this video:
Step 7: Gain Staging
If you automated the gain, it should already be sitting in that -18dBFS sweet spot.
If you didn’t bother with gain automation, now’s the time to add a gain plugin at the beginning of your plugin chain. Adjust it until the vocal sits around -18dBFS.
Want to learn how to gain stage properly? Check this guide out:
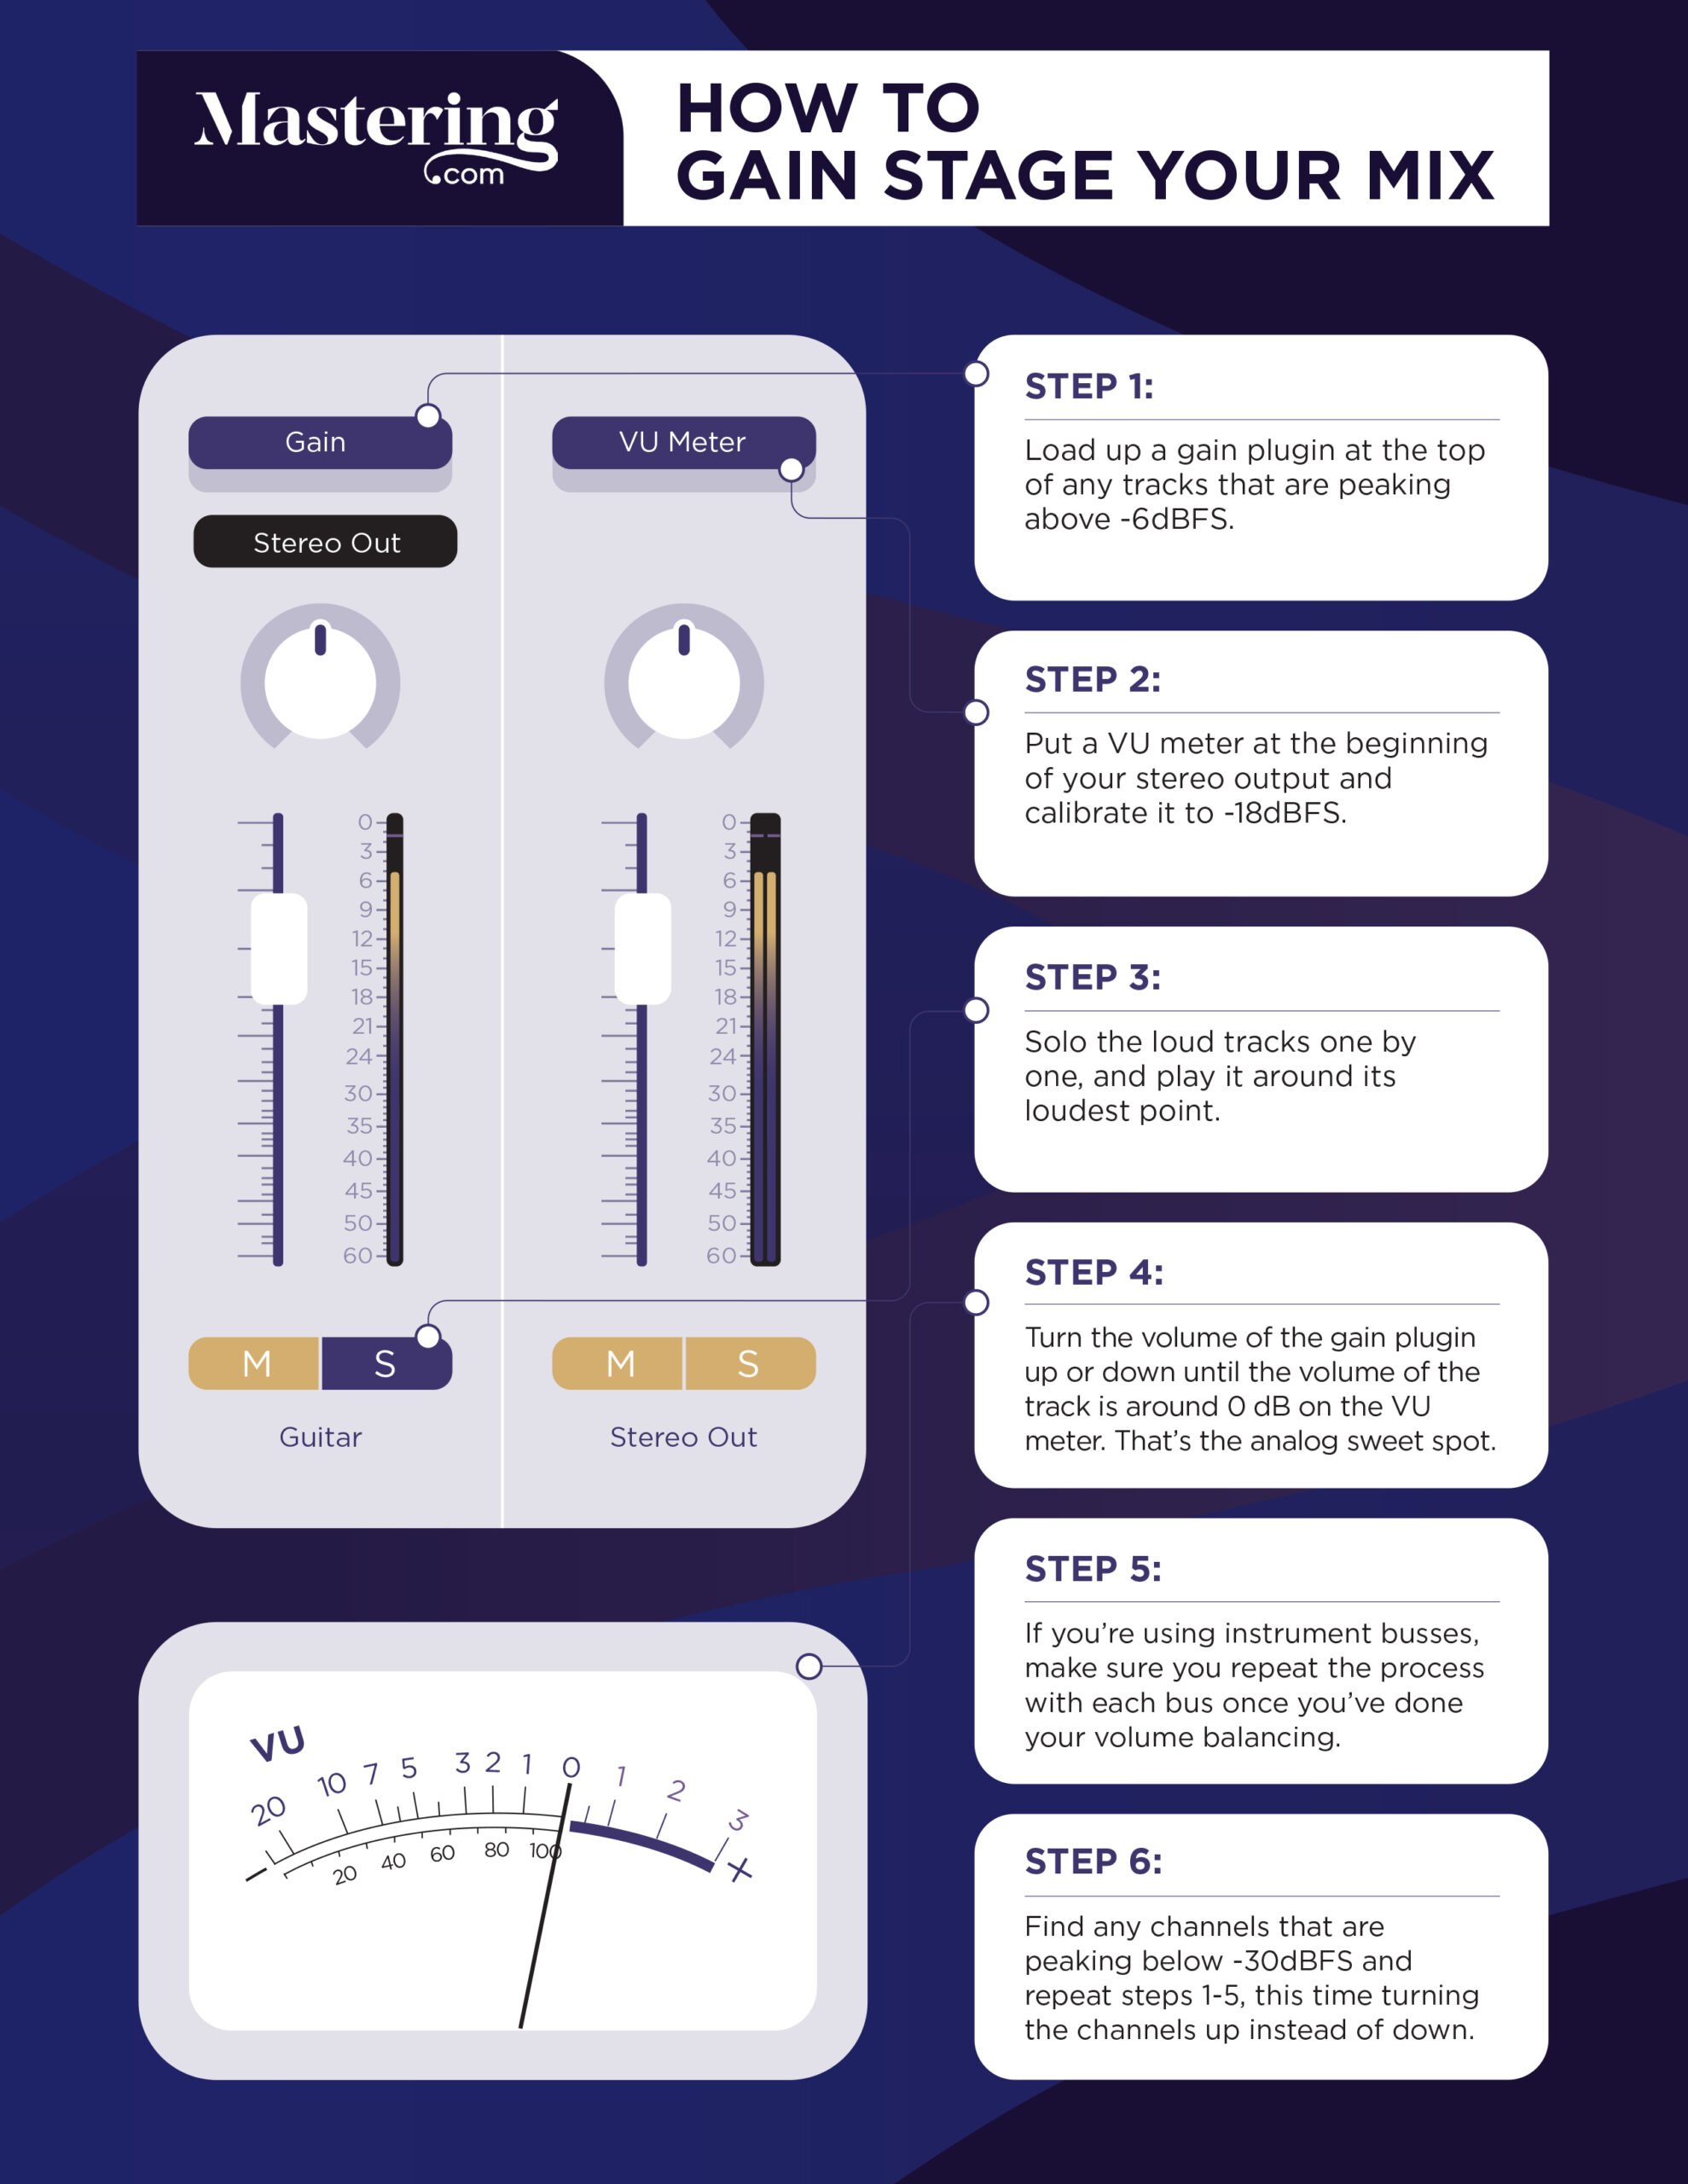
Curious why we use a VU meter to gain stage? That’s because most plugins are based on old analog technology, and their “sweet spot” was always around 0dBVU.
Gain staging is a crucial step that most people overlook. You should check the rest of the instruments too. Not everything has to sit at EXACTLY -18dBFS. Just check that nothing’s clipping. Your peaks should be below -6dBFS.
Step 5: Surgical EQ
A lot of people are unsure of whether to use EQ before or after compression. Well, I say do both.
Use EQ before to cut out any nasty elements. Then, add one after to shape the tone.
This way the compressor won’t exaggerate any of the ugly stuff, and it won’t mess with your tonal adjustments either.
I recommend using multiple compressors in series. Sometimes I use two compressors in a row, sometimes I use one after the tonal EQ. The key is to experiment and try swapping around the order.
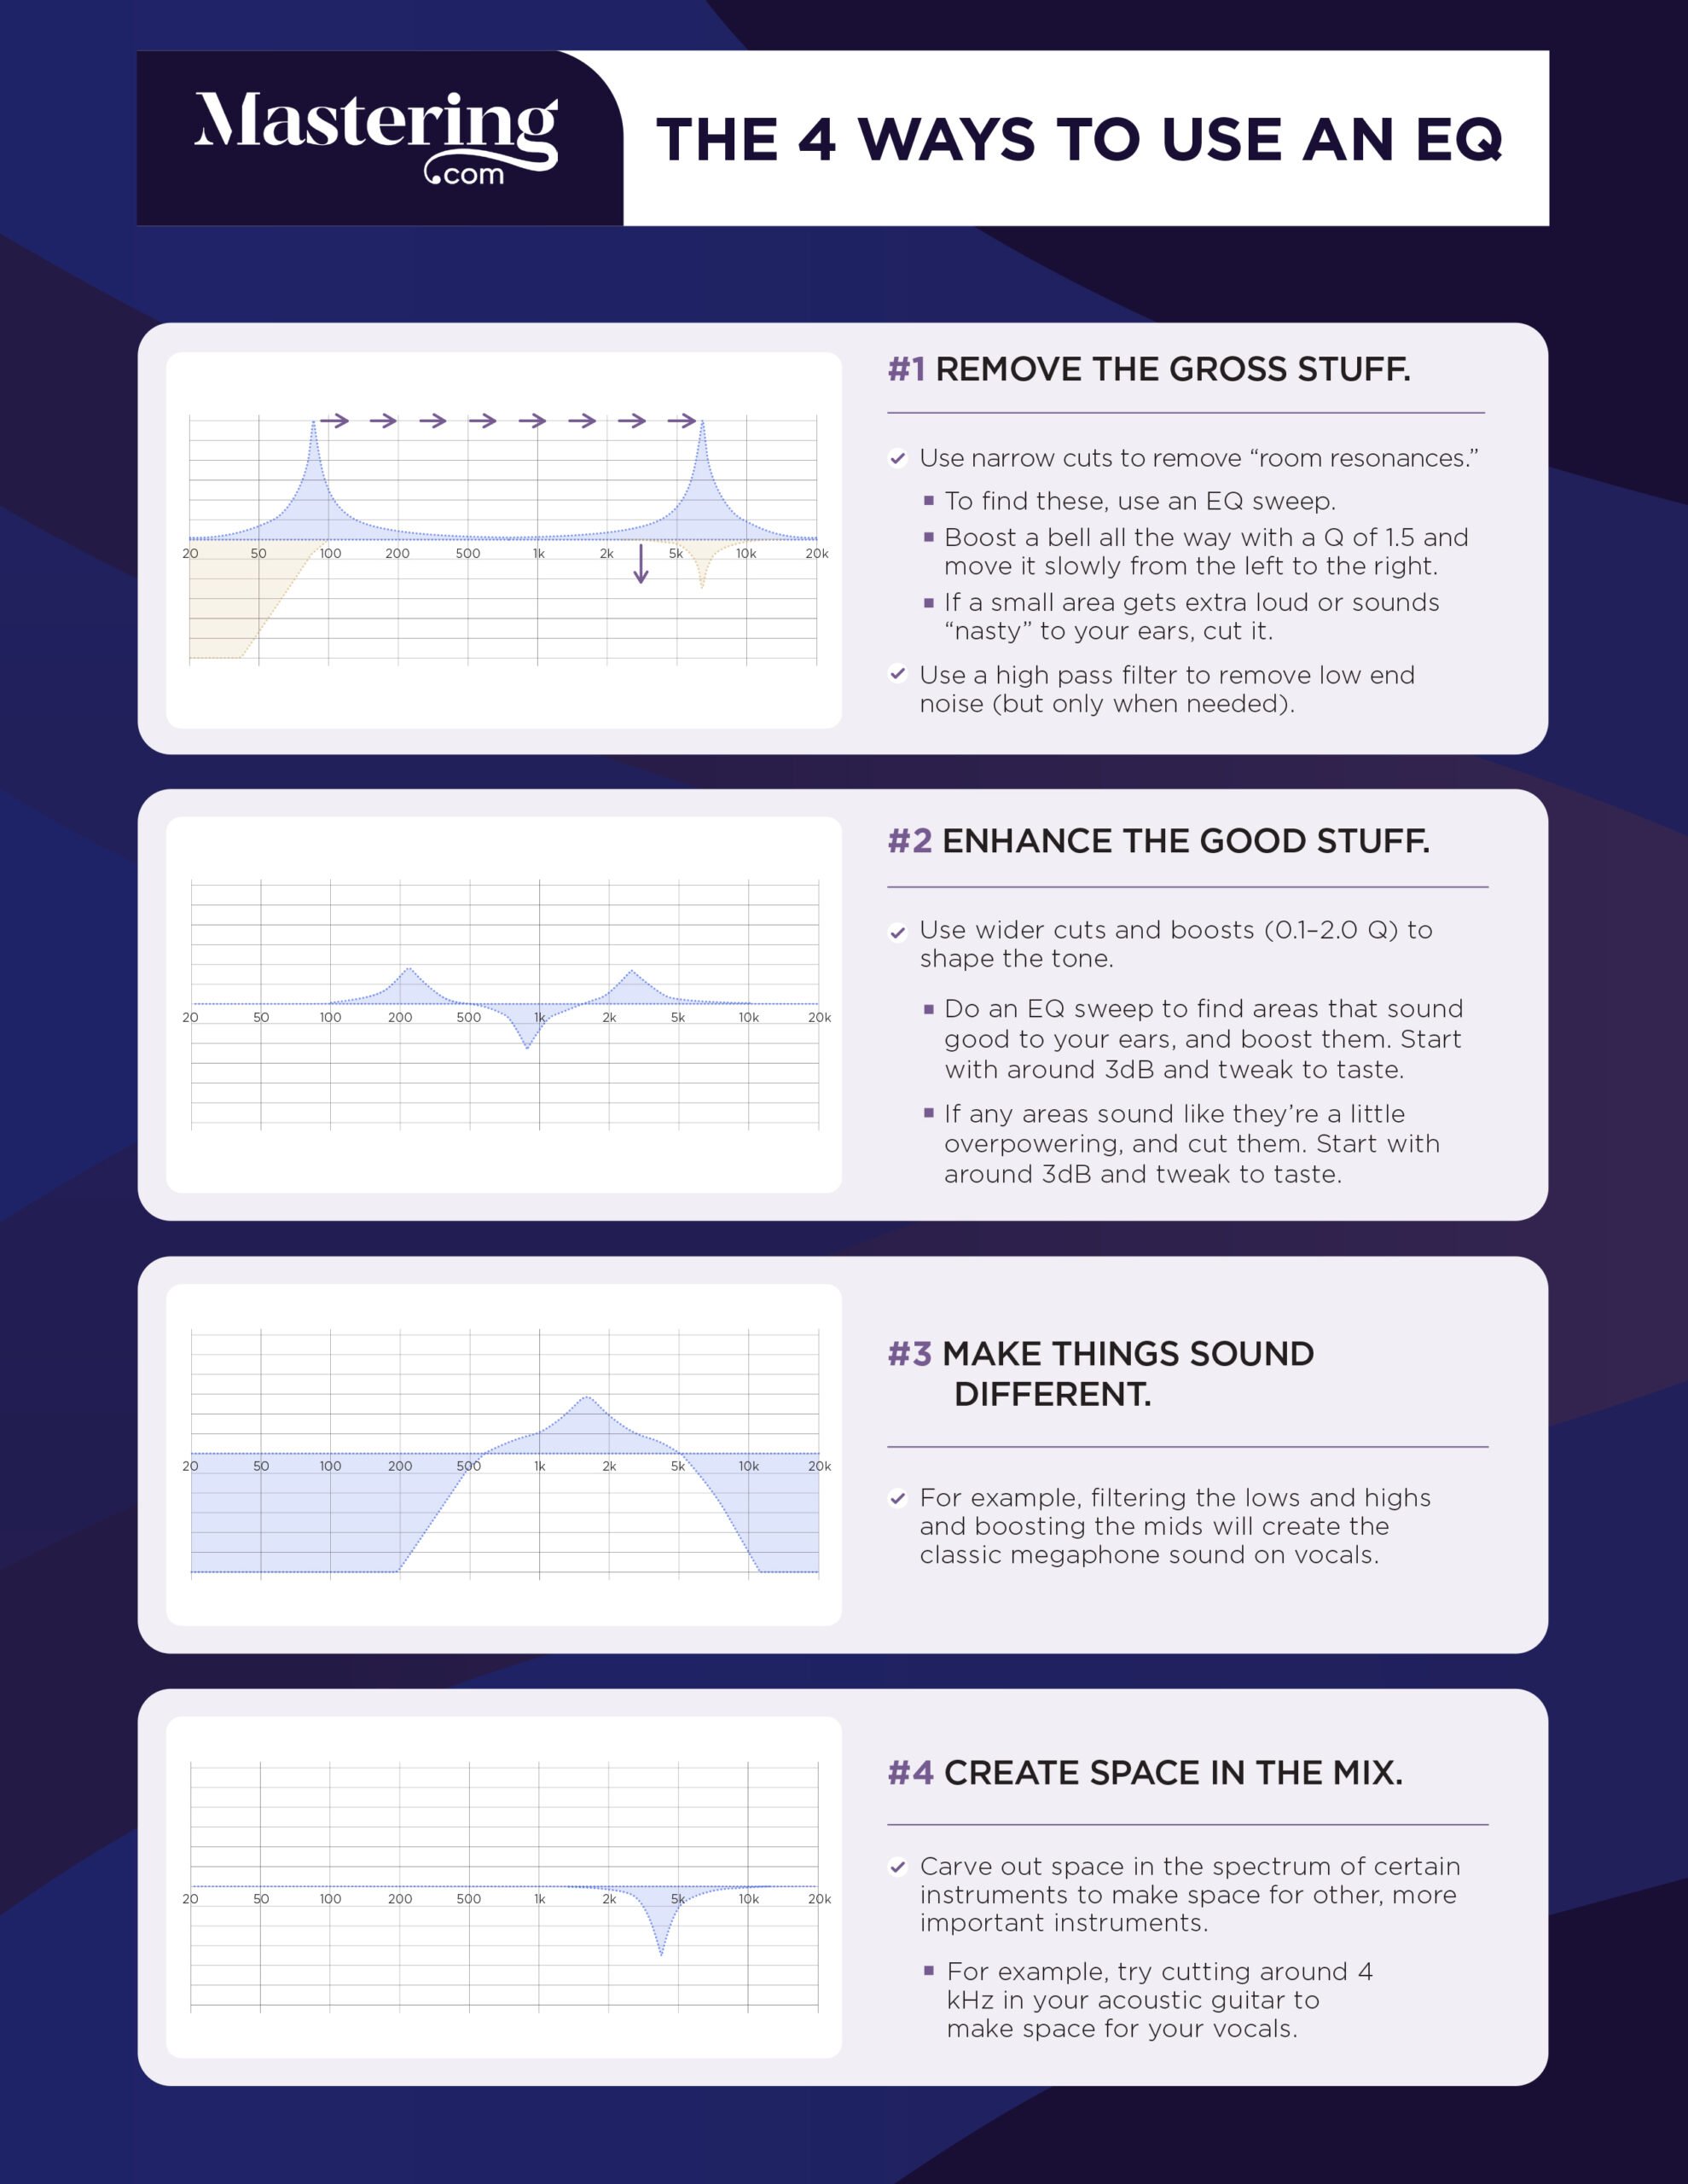
With surgical EQ, you want to hunt down any horrible room resonances and cut them out.
When recording in an untreated room, there’s usually some frequency buildup.
To find these buildups, you can use the good ol’ boost-and-sweep technique. I don’t recommend using this technique when applying tonal EQ (as it can warp your perception), but for finding problematic frequency buildups it’s perfectly fine.
The “EQ Sweep” technique is one the 4 ways you can use EQ:
In this video, I’ll show you how to find these nasty buildups and cut them out…
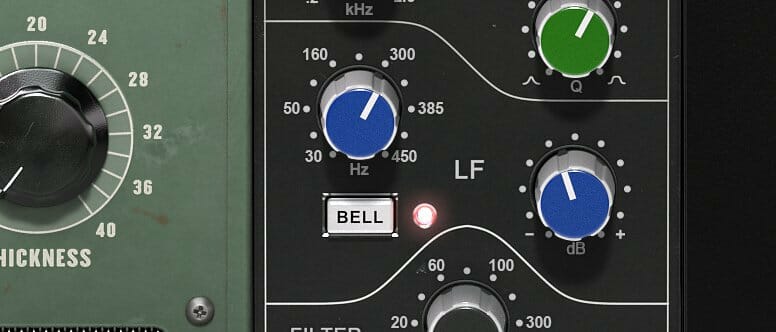
Next, use a high-pass filter to cut low-end rumble.
If you want the voice to be warm and full, I don’t recommend going above 50Hz with this filter.
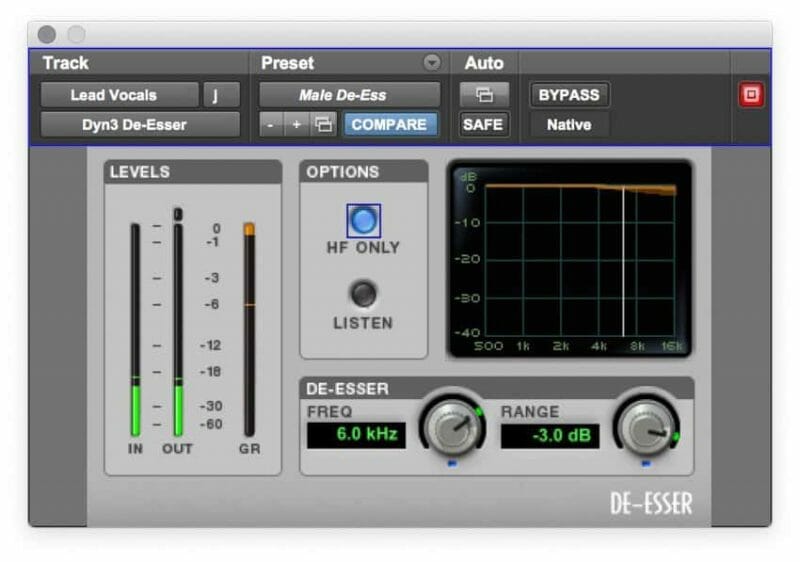
Step 6: De-Essing (Optional)
Placing a de-esser after your EQ usually works best. But adding a de-esser at the very end of the plugin chain can work well too.
Sibilance is a super common issue. “S” and “T” can be really harsh.
You can reduce it in the recording phase by placing the microphone slightly off axis, or by using a dynamic microphone.
You can also use a de-esser. This’ll keep them from getting too loud.
Most de-essers have a ‘listen’ mode that allows you to find the sibilant frequency range. Find the problematic frequencies and turn them down.
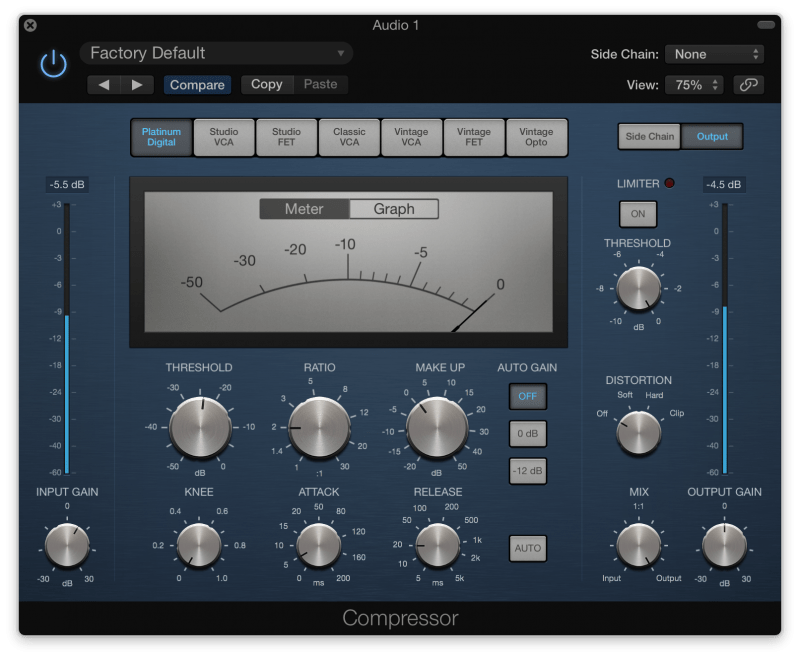
Step 7: The First Compressor
As I mentioned earlier, I prefer to add compression in several stages. This is called ‘serial compression’.
Rather than using a single compressor with aggressive settings, it’s better to use 2 or 3 with subtle settings. The end result is more subtle.
Sometimes, heavy compression is good (for example, in hardcore and metal) but most of the time you want it be pretty transparent.
Your goal with this first compressor is to shape the tone.
By adjusting the attack time you can make the tone more aggressive and punchy (slow attack) or thicker and heavier (fast attack).
Shaping the tone of an instrument is one of the 3 ways you can use compression. Check out our guide on different techniques:
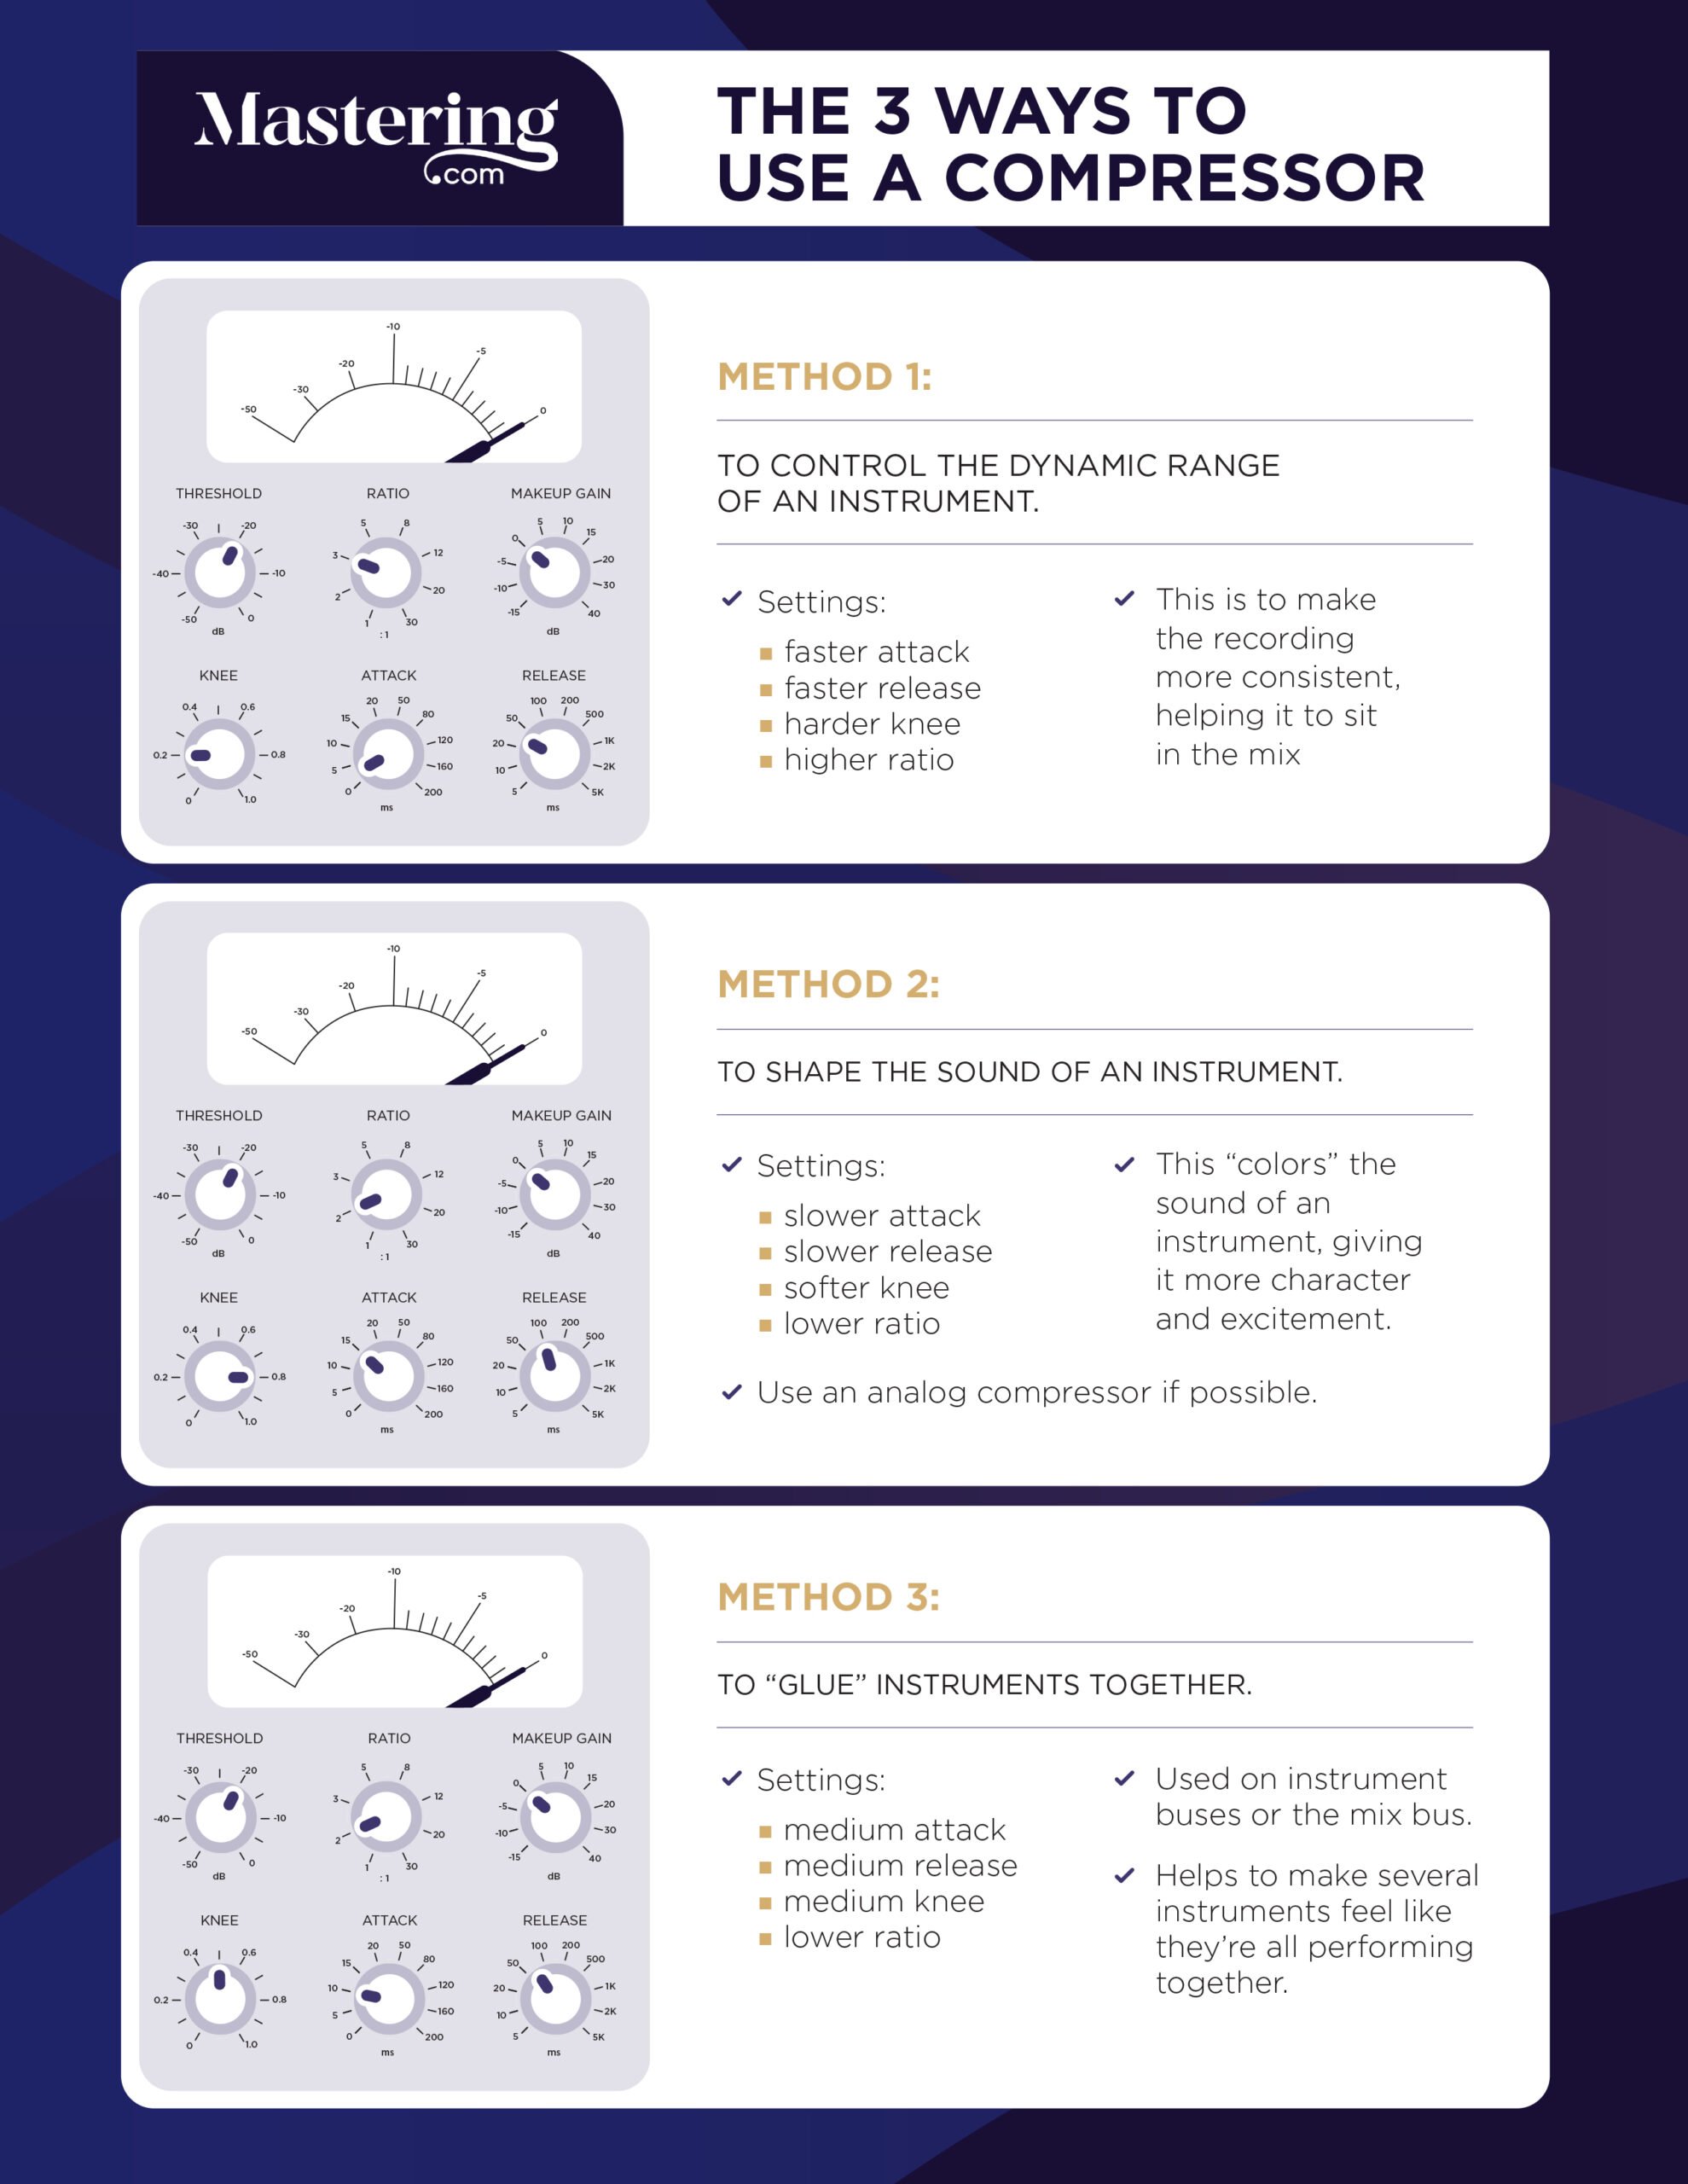
We’ll actually be using Method 1 in a moment. But first…
Avoid using really fast attacks (below 2ms). You want the lead to be right at the front. Using a super fast attack time will really squash the transients and beginning of words, making them sit further back in the mix.
Start with an attack of around 15ms. For punch, turn it down to around 5ms. Set the attack at or above 30ms if you want it to be thicker.
I find that a ratio between 1.5:1 and 3:1 works best. Set the threshold so that the compressor is engaging on pretty much every word (watch the gain reduction meter) and then adjust the ratio until you see 2-3dB of gain reduction.
You can learn a lot more in my definitive guide to vocal compression.
Step 8: Tonal EQ
Now it’s time to adjust the tone.
Start with boosts and cuts of around 3dB or less. We hear voices every day, so as soon as you start to use heavy EQ it’ll start to sound unnatural.
Top end boosts are the exception to this. When working with pop and other mainstream genres it’s common to add aggressive boosts to the top end. This adds air and makes them sound more expensive.
Use a high shelf for this rather than a bell curve, and use an analog modeling EQ if you have one.
I generally find myself adding a couple of boosts in the upper mids. This helps the voice cut through.
Step 9: The Next Compressor (Optional)
You can apply another round of compression after the tonal EQ for even more consistency.
But for lighter and rawer genres (like jazz, acoustic and alternative rock) it might be best to avoid using too much gain reduction.
This time you can use a slightly faster attack to catch the peaks. But be careful about going too fast.
Aim for another 2-3dB of gain reduction, but this time adjust the threshold until there’s only gain reduction on the loudest syllables. Then adjust the ratio until you see 2-3dB of gain reduction.
Depending on the genre, you could opt for more gain reduction here. Also, experiment with placing this compressor before EQ.
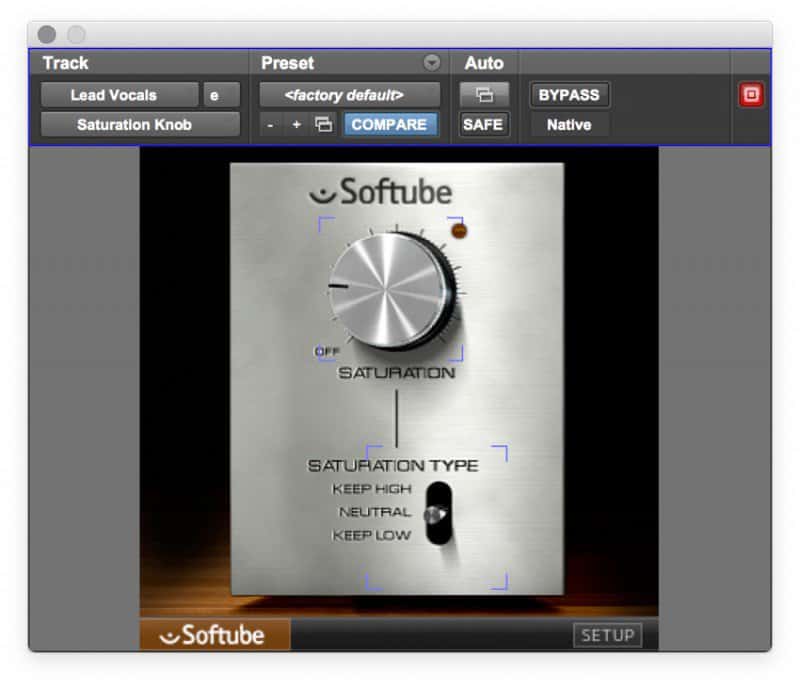
Step 10: Saturation (Optional)
Adding a small amount of saturation can make a voice brighter and more exciting.
Sometimes boosting the top end with an EQ just isn’t enough, and you need you use saturation to create some new harmonics on the top end.
I highly recommend Softube’s free Saturation Knob plugin. Dial in some subtle saturation for more air and excitement.
Step 11: Limiting (Optional)
Even after automation and compression, you can use limiting for extra consistency.
You only want to catch the very loudest peaks. If the limiter is engaging once every few words, you’re probably being too aggressive (although this does work for some genres where heavy processing is needed).
If the limiter is constantly engaged, you’ll cut off the transients and make the vocal dull and lifeless. Just like using a fast attack, it pushes things further back.
Adjust the threshold on the limiter so it only engages on the loudest peaks.For more apparent volume, opt for a fast release time. For more subtle limiting, use a slower release.
Congratulations! You have made it past the hard stuff. The bulk of your work is done.
By now you should have a vocal that’s clear and intelligible. Every word should be loud and consistent, and the voice should feel bright and expensive.
Now it’s time to use effects to create space and add stereo width.
Step 12: Reverb and Delay
Reverb
The current trend is vocals that are up front and in your face.
So reverb is counterproductive.

You’ll push the voice further away and make it less intelligible. Most of the time, this isn’t what you want.
Of course, for atmospheric styles or situations where reverb is used creatively, go crazy.
But if you want modern, radio-ready vocals, you don’t need reverb. At all.
Instead, you can use delays to add space without pushing it back (more on that in a second).
But first, there is one way you can use subtle reverb…
A short stereo reverb can add width and depth:
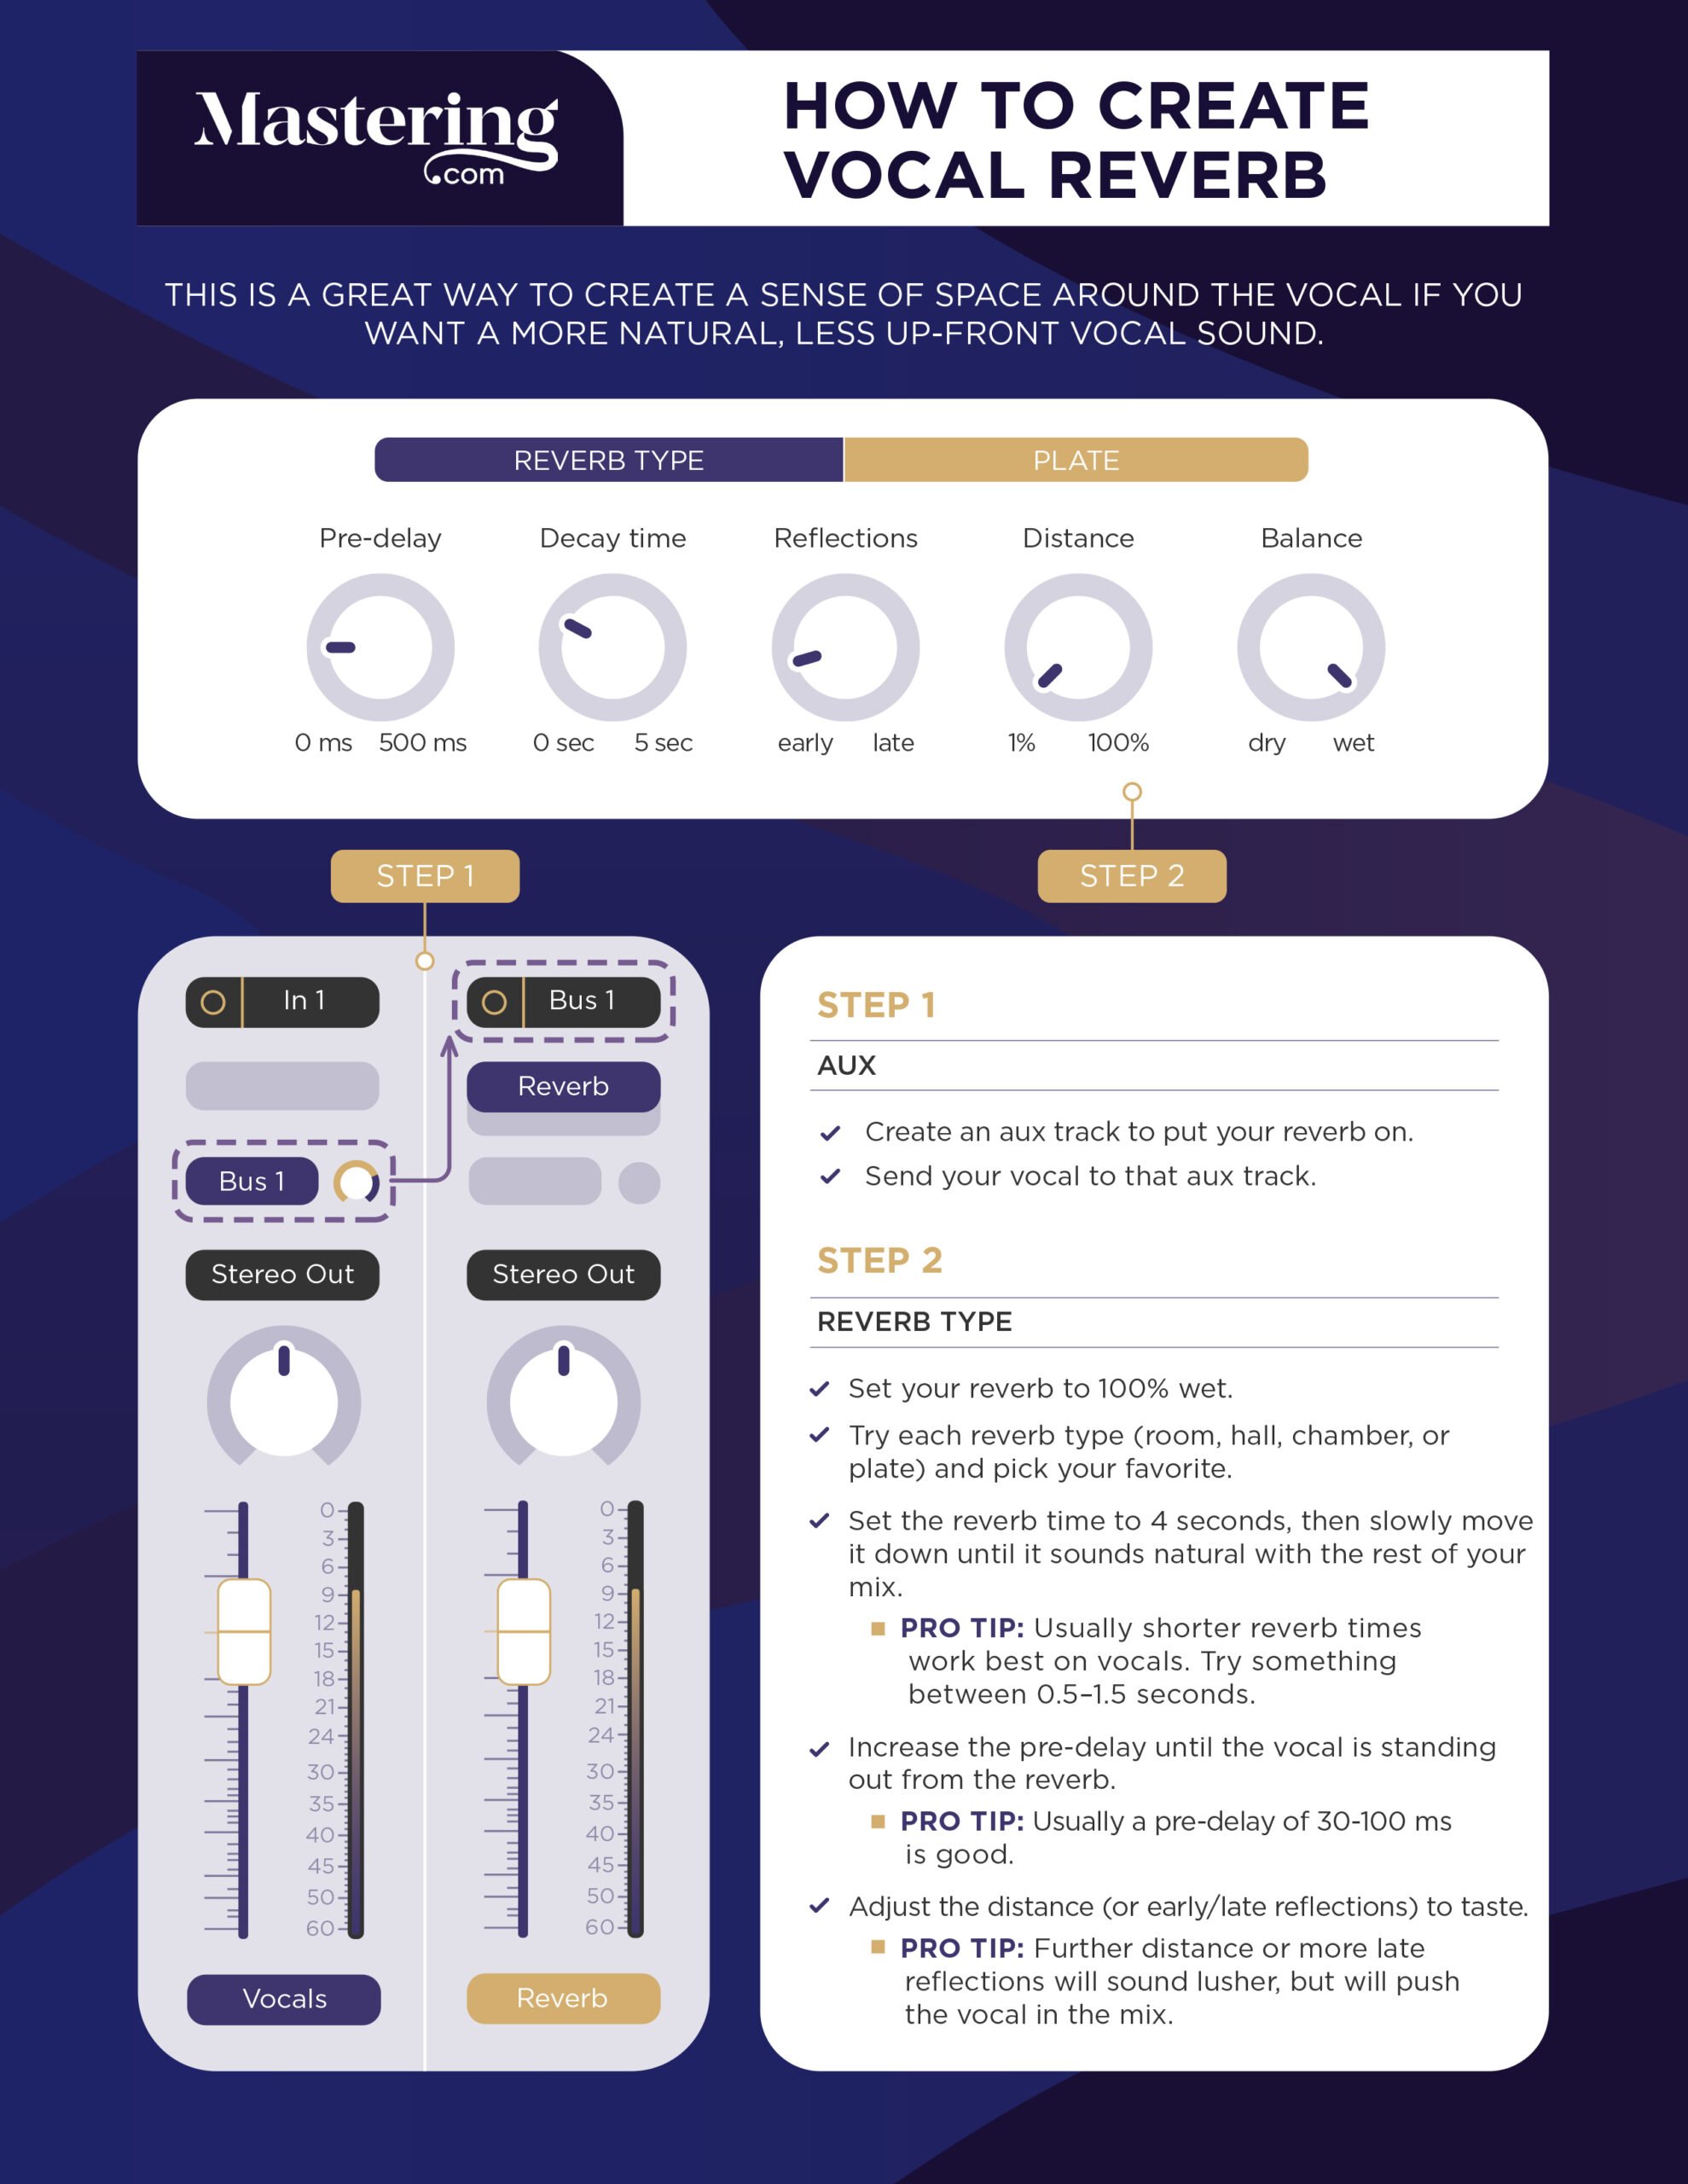

Check out how to do it here:
Delay
A great way to add space is to use a stereo slapback delay with different times on the left and right side:
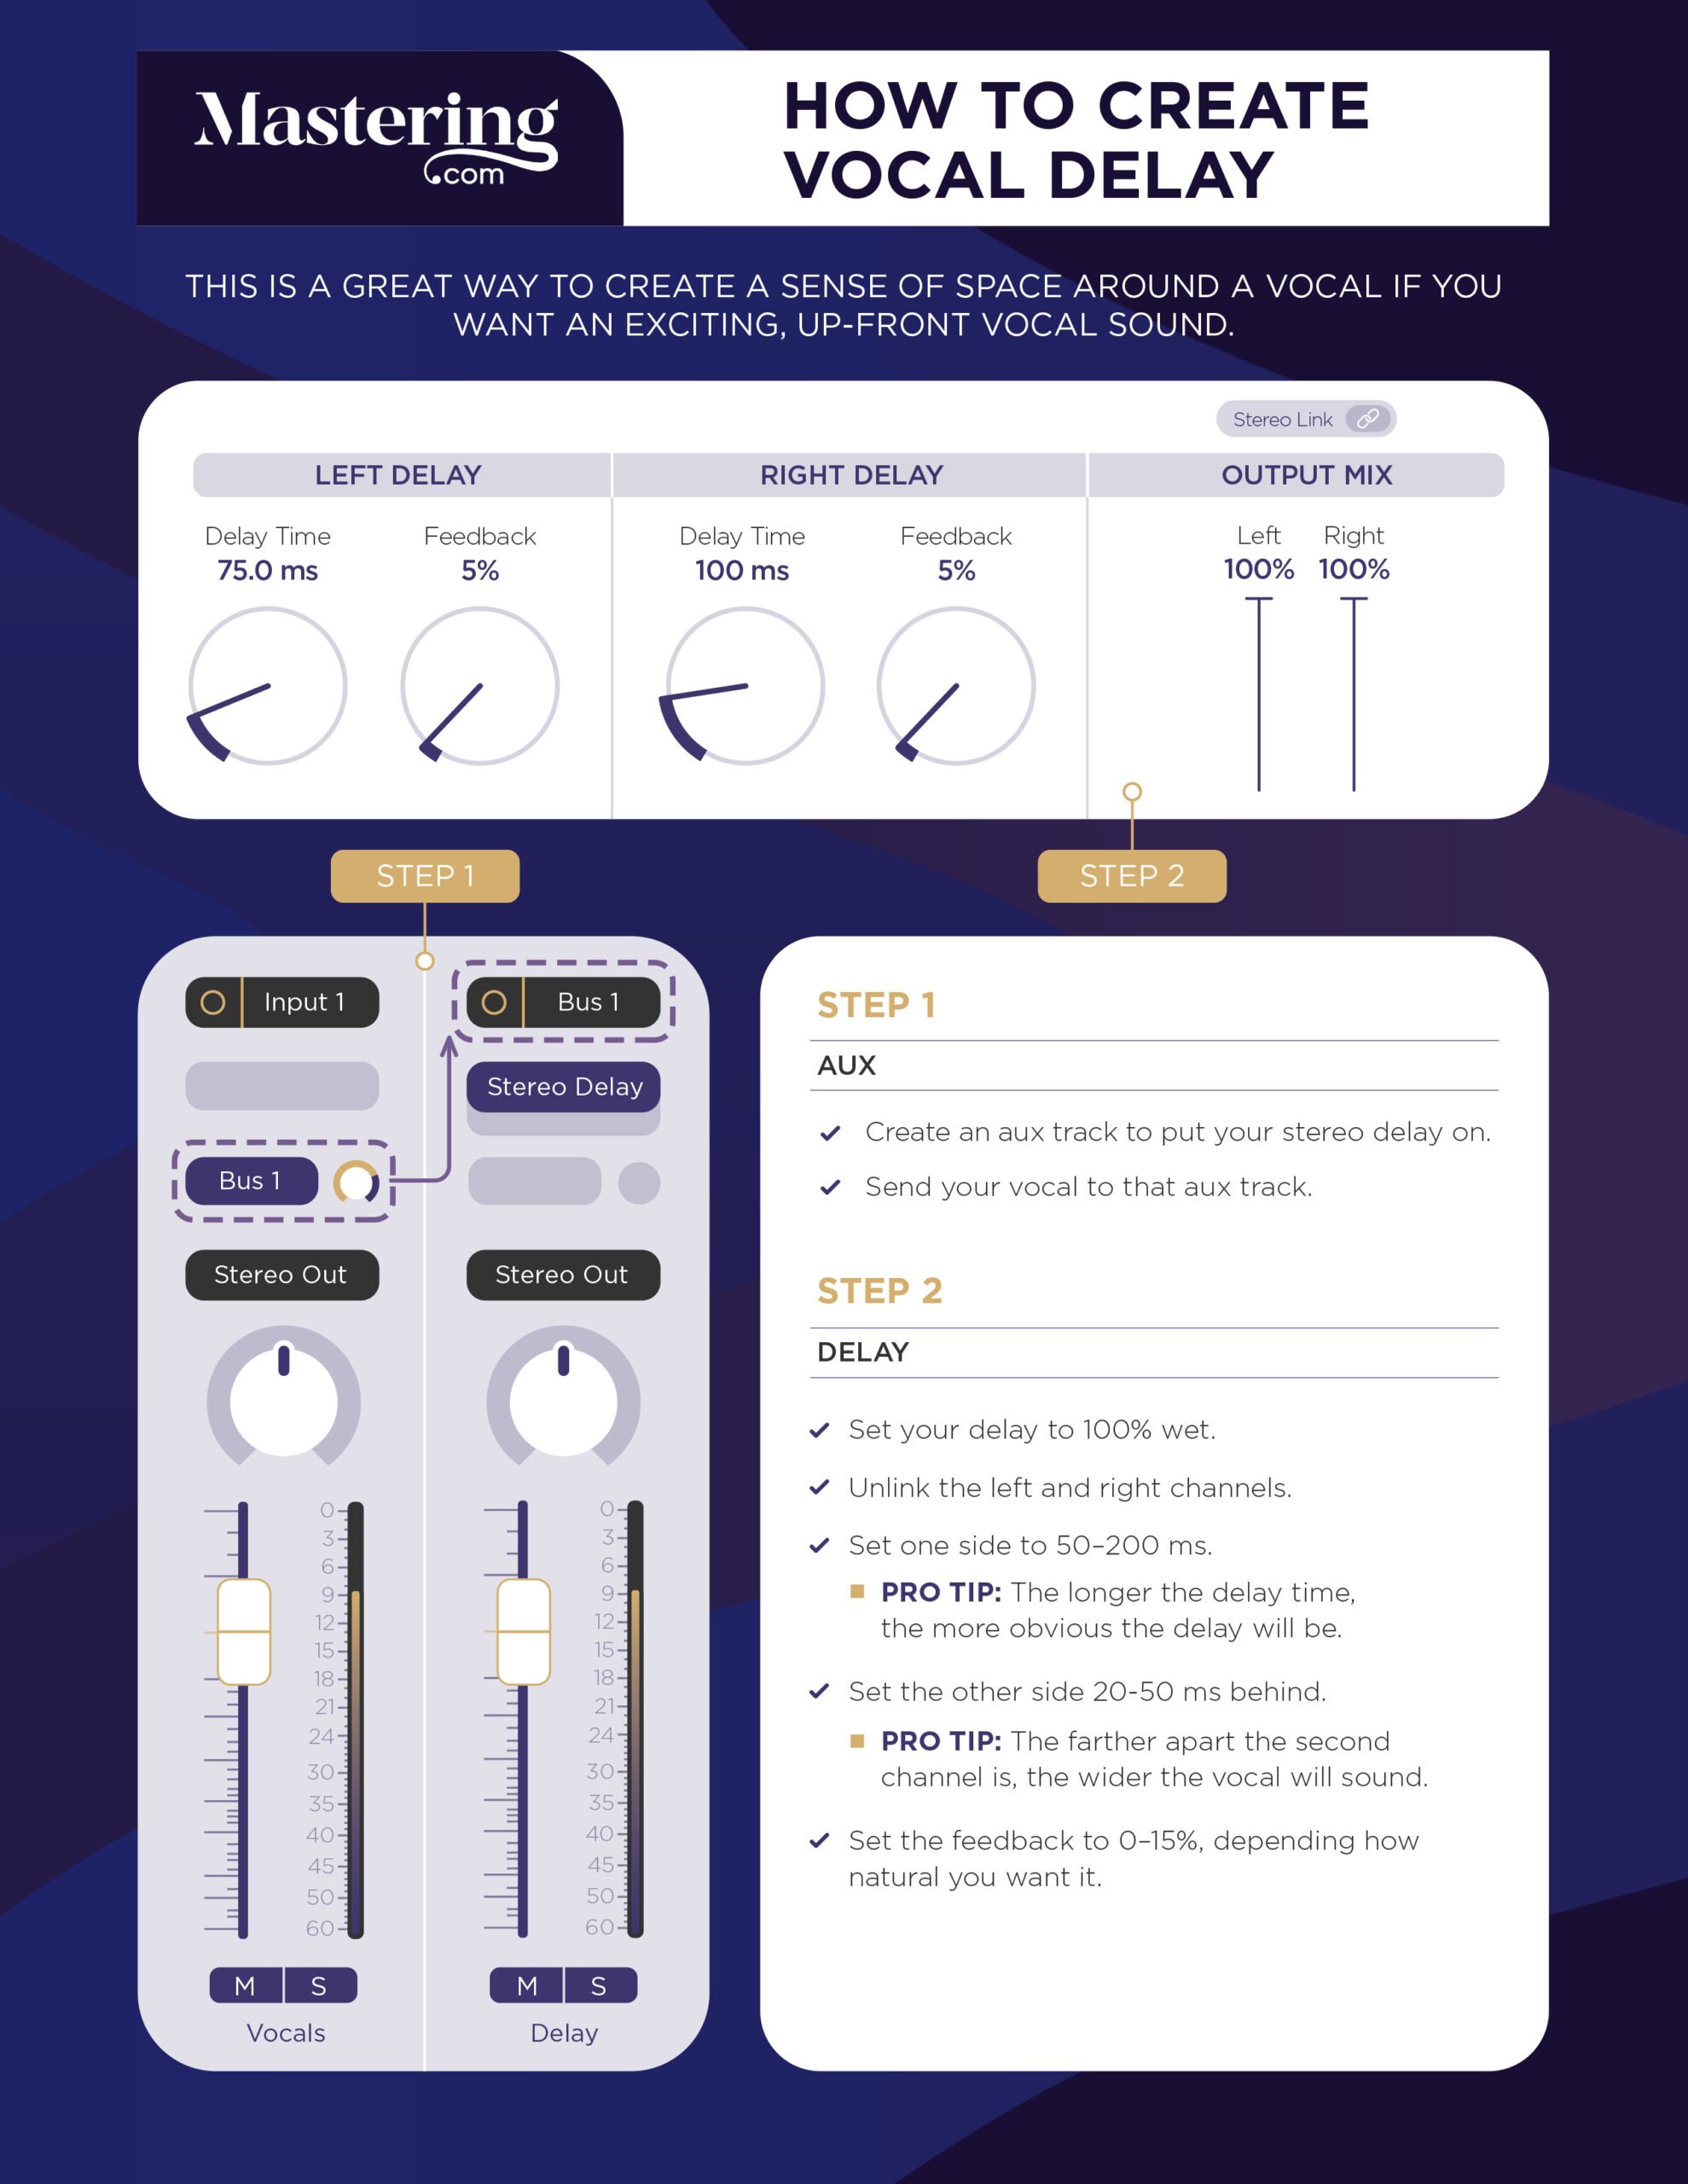
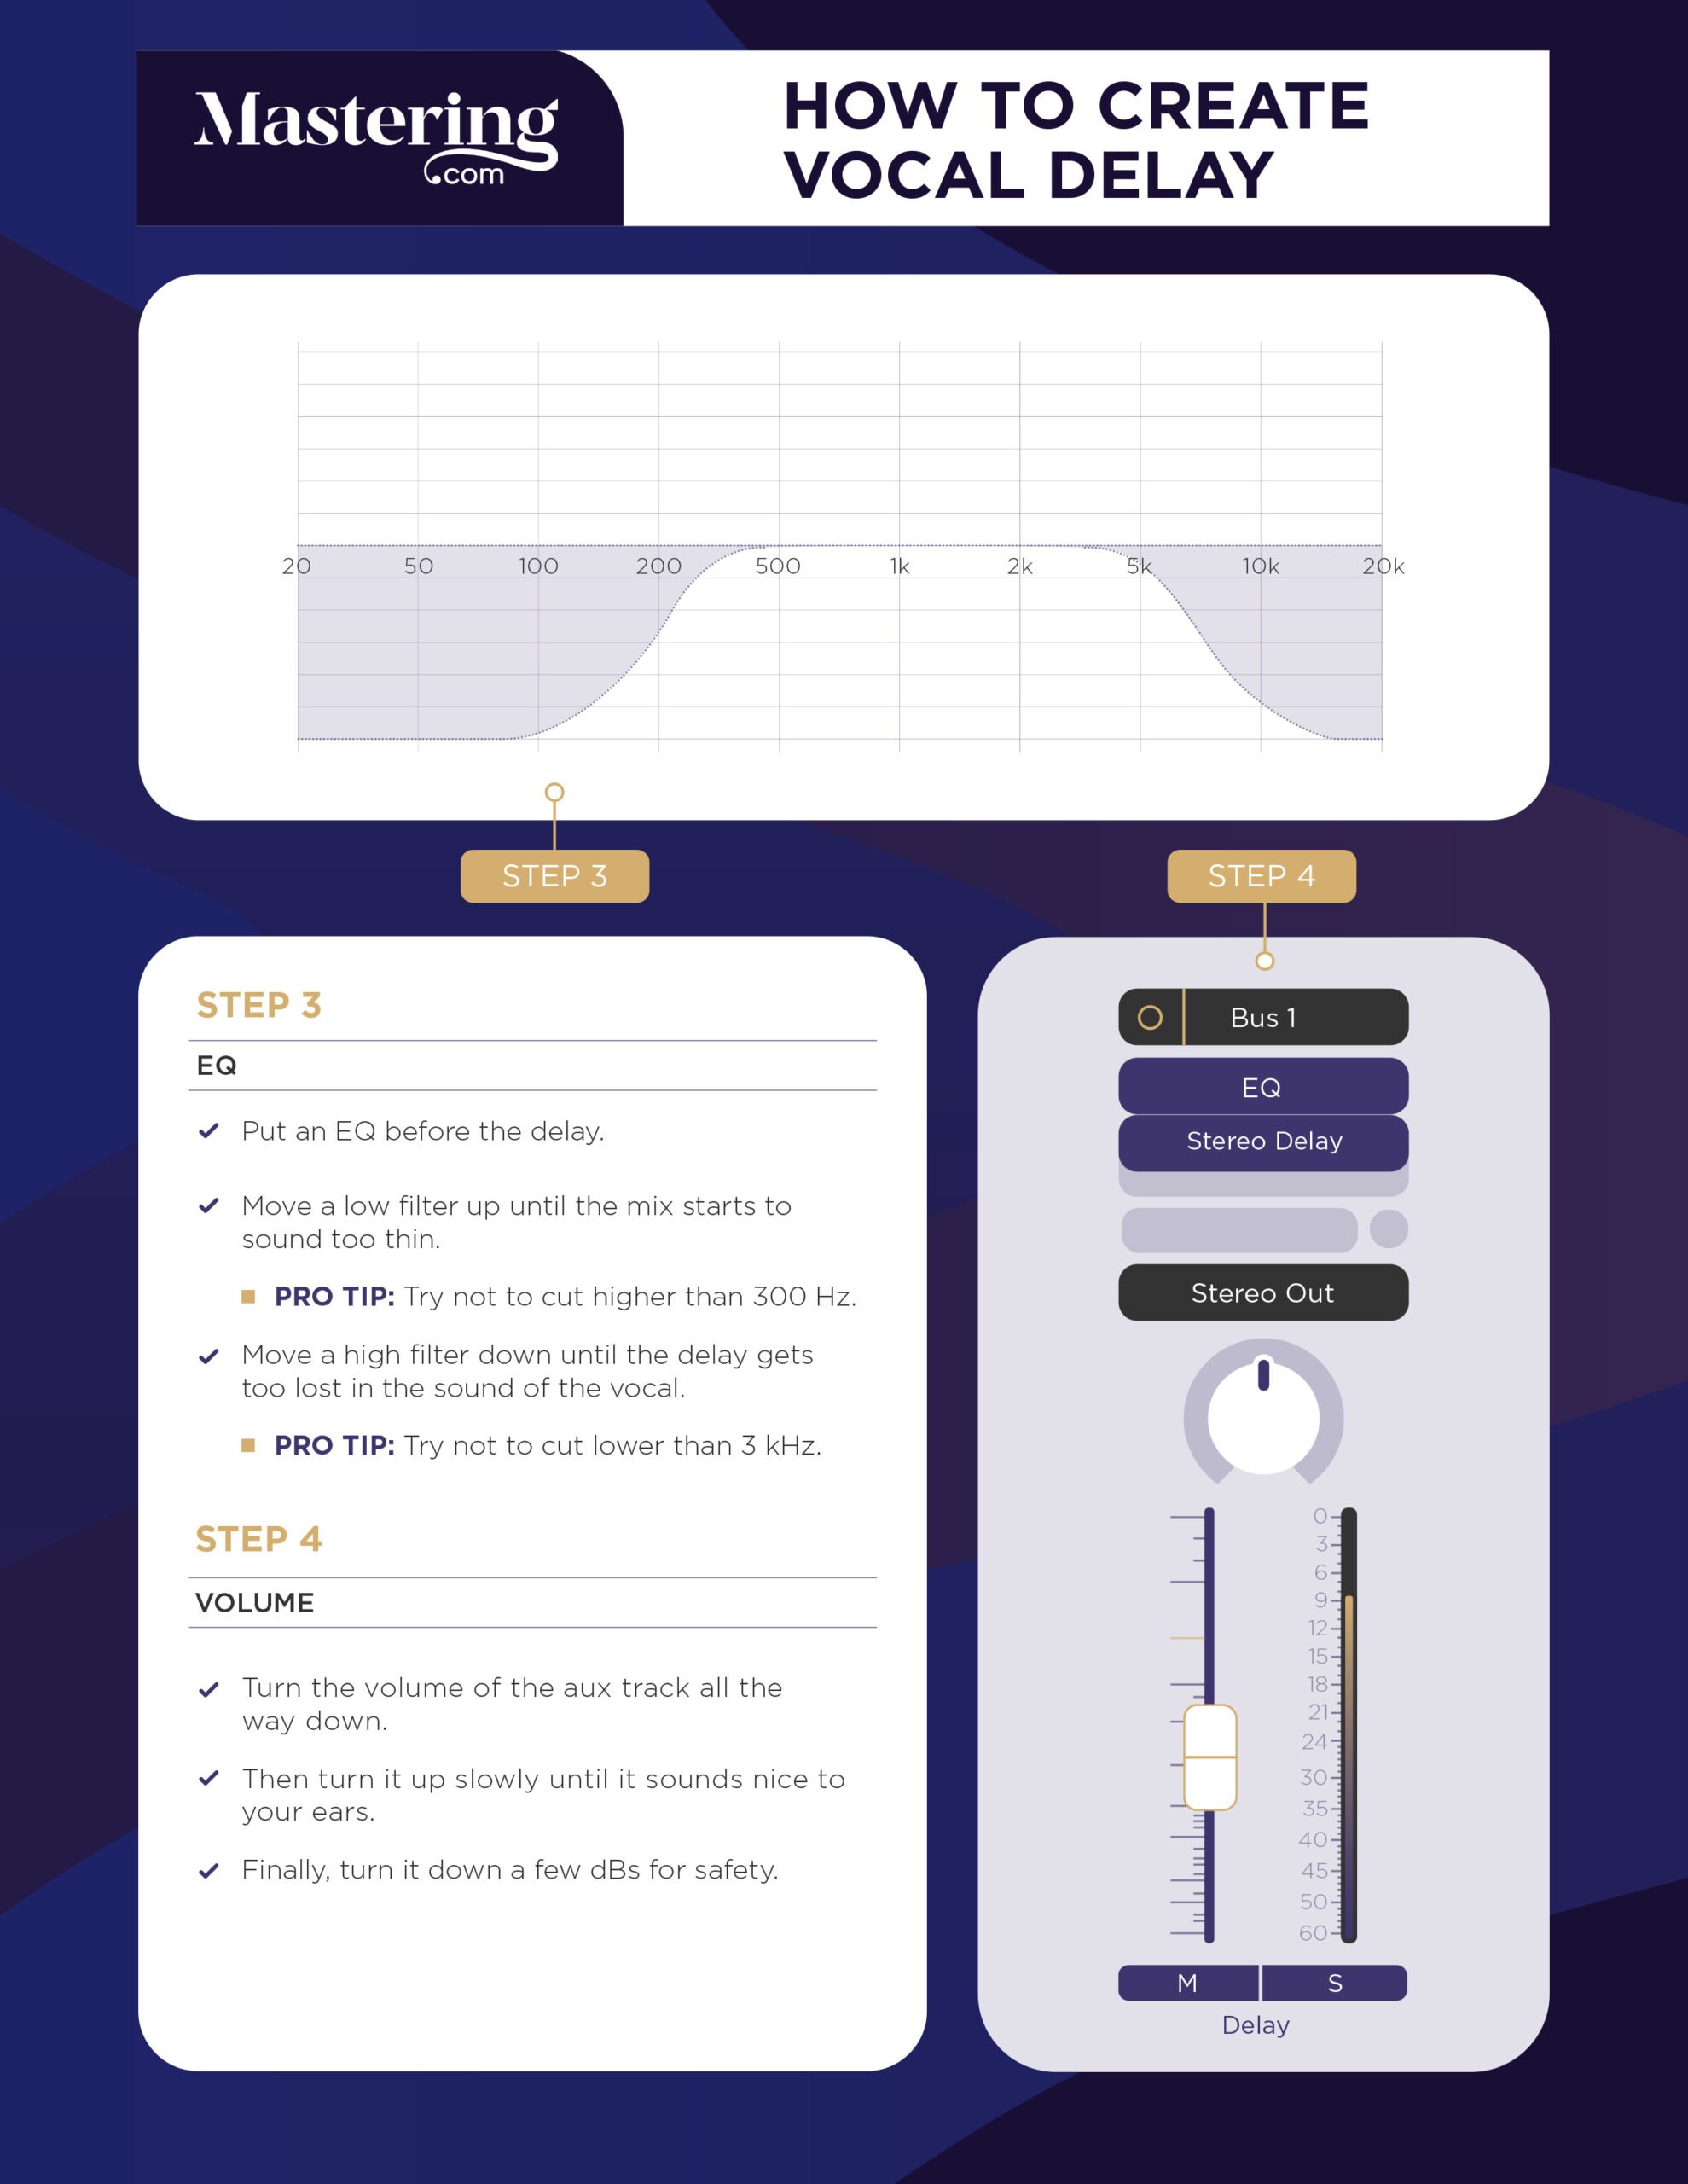
Here’s how it works:
By using different times on the left and right side you add stereo width.
When you mute the delay, you’ll notice that the vocal is dry in comparison.
If you want more depth and interest, you can use a mono delay. Try syncing it plenty of feedback to the song’s tempo. This gives the classic ‘echo’ effect that you hear on a lot of pop songs.
Experiment with whole note, half note and even quarter note delays.
If you want it to be more obvious, adjust the timing with your ear. Set the time manually rather than using the sync function.
A lot of people create ‘delay throws’ by automating the send and only adding delays on the last word of a phrase. This can add interest and fill in the gaps between phrases.
Step 13: Range Allocation
The home stretch! There are only two more things I do. The first is range allocation.
By cutting out certain frequencies in other instruments, we can make space for the vocal to sit.
If the singer is covered up by the piano, cutting some frequencies in the piano should help.
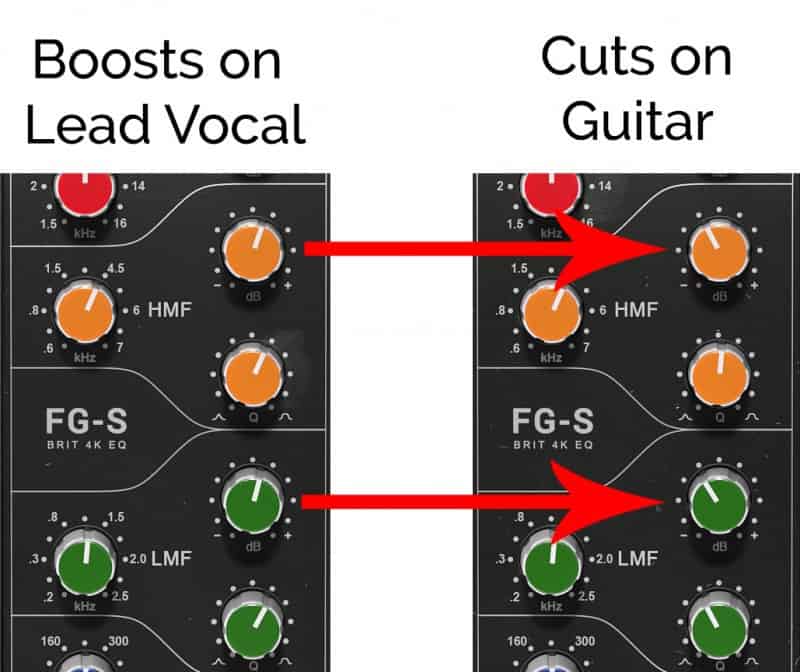
The best place to start is to cut competing frequencies on the other instrument that you boosted on the vocal.
For example, if you boosted the vocal at 130Hz, 2.3kHz, and 4kHz, but the guitar that is still competing with it, cut those frequencies in the guitar.
Find the lowest “bump” in the frequency spectrum of your vocal. That’s the fundamental. It’s often around 80-180Hz for men and 160-260Hz for women. Turn down these frequencies on any competing instruments.
Step 14: Volume Automation
Earlier you used gain automation to make the level more consistent.
Now you can use volume automation to add more interest and character. You can enhance the emotion of the performance by exaggerating certain syllables, words or phrases.
Try enhancing the very beginning and ends of words. A lot of emotion lives in the beginnings and ends of a phrase.
My favorite way to add volume automation is to shut my eyes and manually ride the fader using a midi mappable fader, like the PreSonus Faderport.
You can achieve the same thing with your mouse (but it’s never quite the same).
Step 15: Advanced Techniques (Optional)
There are a number of other tools, plugins, and techniques that can be useful.
You can use multiband compression to add more body and tame any ugly resonances that crop up here and there.
For subtle volume control, try using parallel compression.
When you have instruments competing with the vocal, sidechain compression and range allocation can help it cut through.
You can also use chorus to add depth and shimmer to the vocal
These techniques are covered in more detail in my vocal compression guide.
UPDATE: Here’s a great technique for adding some stereo width to your vocals:
Step 16: Perfecting the Background Vocals
ARVE Error: src mismatchprovider: youtube
url: https://www.youtube.com/watch?v=nuBUrPpNkl8&t=25s
src in org: https://www.youtube-nocookie.com/embed/nuBUrPpNkl8?start=25&feature=oembed
src in mod: https://www.youtube-nocookie.com/embed/nuBUrPpNkl8?start=25
src gen org: https://www.youtube-nocookie.com/embed/nuBUrPpNkl8
You want your background vocals to sit nicely underneath the lead and support it, without distracting from it.
While the lead vocal should always be panned dead center, I recommend panning background singers hard left and hard right.
Try compressing them more aggressively. A fast attack time (below 2ms) will push them behind the lead.
There’s no need to go through and manually control the levels with gain automation or volume automation. Since they’re meant to sit in the background, heavy gain reduction is fine.
CONCLUSION
So, now you know how to get a great vocal tone.
Next Steps
If you want to dig deeper into music production and learn what it actually takes to make mixes that sound pro…
And you’re an intermediate or advanced producer…
Be sure to check out the free masterclass:
Enjoy!


